Putting the 'role' back in role-playing games since 2002.
Donate to Codex
Good Old Games
  • Welcome to rpgcodex.net, a site dedicated to discussing computer based role-playing games in a free and open fashion. We're less strict than other forums, but please refer to the rules.

    "This message is awaiting moderator approval": All new users must pass through our moderation queue before they will be able to post normally. Until your account has "passed" your posts will only be visible to yourself (and moderators) until they are approved. Give us a week to get around to approving / deleting / ignoring your mundane opinion on crap before hassling us about it. Once you have passed the moderation period (think of it as a test), you will be able to post normally, just like all the other retards.

Let's Play Fall Gelb (Allied #6 - To the Dyle!)

Malakal

Arcane
Glory to Ukraine
Joined
Nov 14, 2009
Messages
10,297
Location
Poland
z o o l said:
Thanks guys. Seems that there is a severe lack of wargamers on these boards though - ah well, it's called RPG Codex after all.

Expect an update soon, with an analysis of my opponent's first turn and some explanations of game mechanics.

There was another LP here of a grand wargame in the eastern front with truly massive scale but it died. Possibly due to little interest from Codexers - only 2 or 3 people read it. Or commented, but its hard to note how many people are reading something if they stay silent.
 
Joined
Nov 1, 2008
Messages
7,953
Location
Cuntington Manor
The panzer forces being twice as fast is ridiculous. A third faster, I may give that to them, but twice as fast? And this being before air interdiction comes into play?

Well, I guess you are meant to lose, unless your defences hold. The two weaknesses I see in your plan are:

The Belgians are being given a large frontage in the north. Are you sure they are up to it?

Still no mobile reserve. Are you able to begin massing tank divisions? Perhaps park them somewhere in the rear, preferably in forested areas (if that makes any difference to air attacks) along the most likely avenue of attack?

I wouldn't feel incredibly confident without a solid, mobile...well, in this game, semi-mobile, reserve force.

Seems that there is a severe lack of wargamers on these boards though

To a degree. There are some missing from this thread though.
 

zool

Arcane
Joined
Oct 26, 2009
Messages
897
Turn 1 (Axis) - Let the Blitzkrieg begin!

May 10th, 1940. After more than eight months of phoney war during which Brits and French showed an uncanny ability for sitting on their asses doing nothing, Hitler has finally decided to attack.

hitler-1-1.jpg
: you will suffer, you will ALL suffer!
winston_churchill-1-1.jpg
: *lights a cigar*
De_Gaulle-1-1.jpg
: *starts singing La Marseillaise*
Wilhelmina_of_the_Netherlands-1-1.jpg
: *utters something incomprehensible in her barbaric language*
leopold3belgium2432-1-1.jpg
: well, good luck dealing with Eben Emael. It is impregnable!


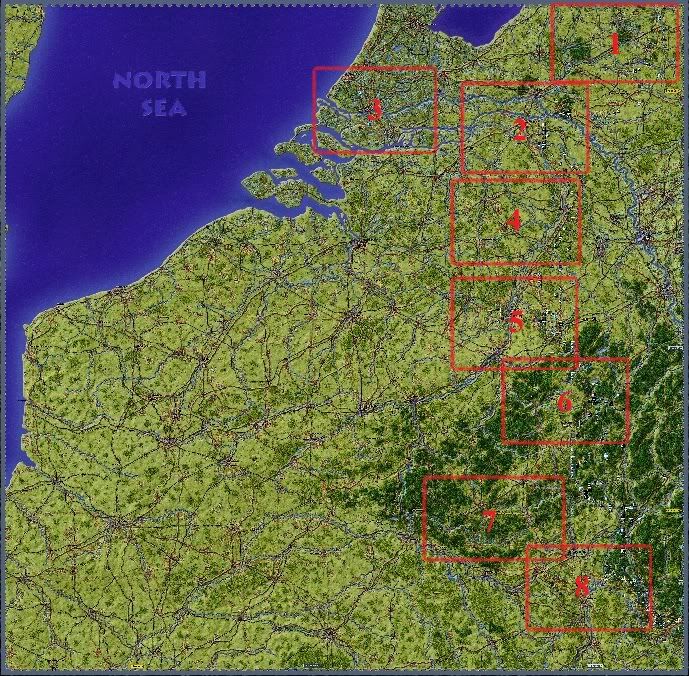
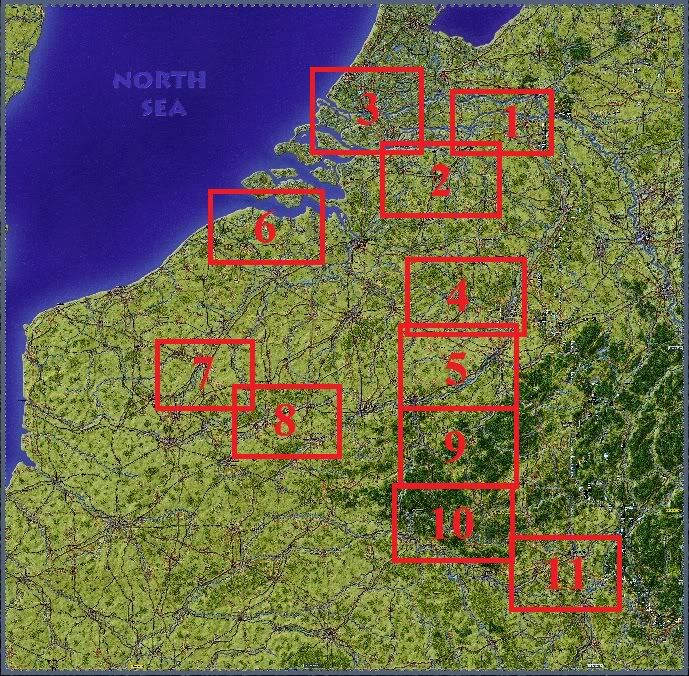
For a general overview of which screenshot was taken where:

StrategicMapTurn1.jpg


The attack on Fortress Holland

Holland will surrender if Rotterdam is taken by the Axis. The consequence is simple: all units will be ordered to rush toward the Rotterdam area in order to 1. prevent the German fallschirmjagers from taking the city and 2. prevent the Axis forces on the ground (mostly the SS Verfugungs motorized division and the 9th Pz-Div) from linking up with the paratroopers. More on that when I play my turn. For now, let's focus on my opponent's turn.

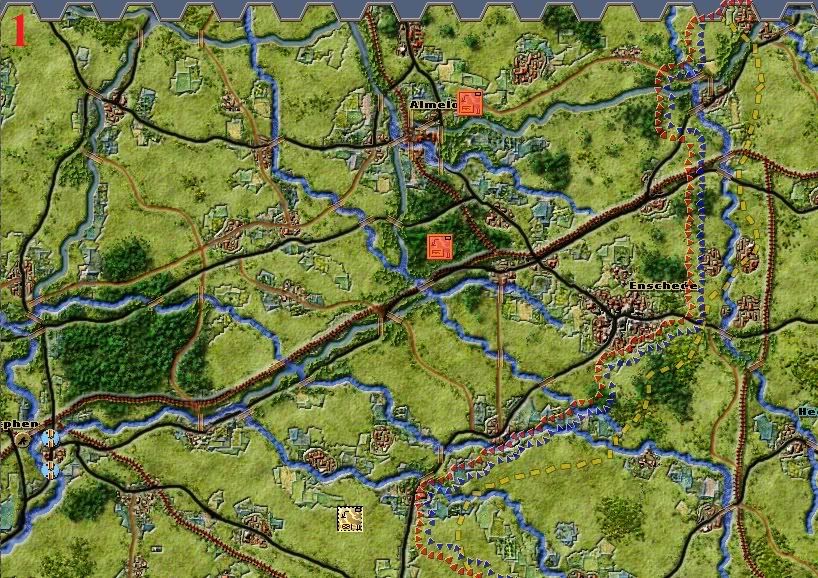
As you can see on the following screenshot, the Dutch have decided not to defend the northeastern part of their country. The only three units they've left there are extremely weak and two of them start in a "surprised" state (the reddish ones) - they can't move this turn unless an enemy unit comes close. The southermost Dutch unit is entrenched, as shown by its sunken appearance. Being entrenched doesn't necessarily mean that a unit is in bunkers or such "hard" fortified positions: it only denotes units which have had time to prepare basic entrenchement positions (trenches, foxholes, ...).
Note: the yellow dotted lines represent political borders - in this case between Germany and the Netherlands.

HollandNorth.jpg


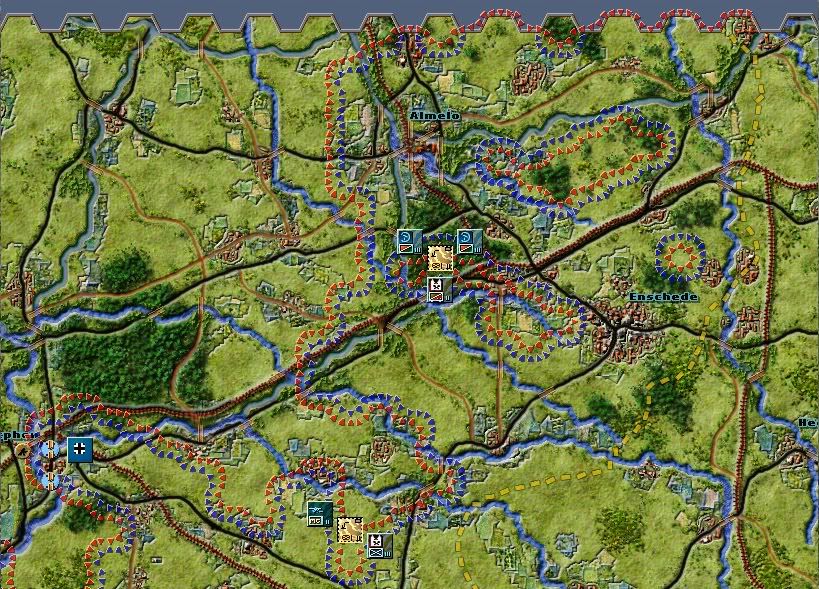
At the end of the Axis turn, the northermost unit has been eliminated while the two others haven't been attacked yet but are already surrounded. The two northernmost blue-ish German units are two regiments of the 1st Kavallerie Division, the only German cavalry division. Below is the recon unit of the 227th Infantry Division (tip: if you want to know what a unit is, have a look at the OOB screenshots I posted on the first page)

HollandNorthEnd.jpg


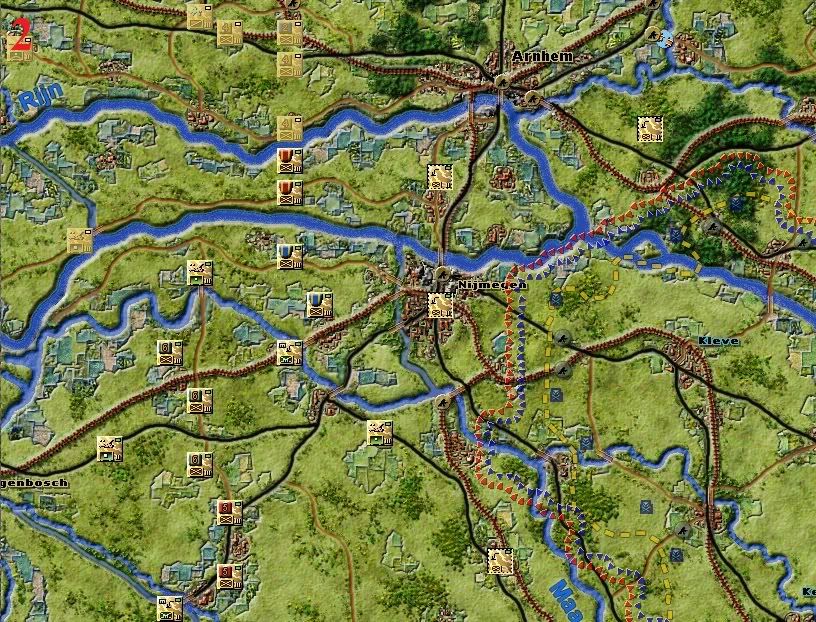
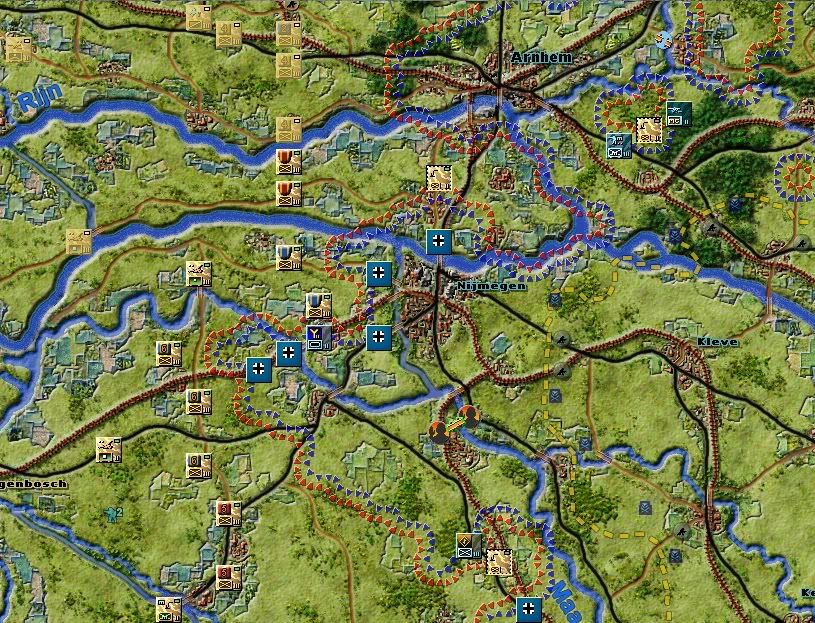
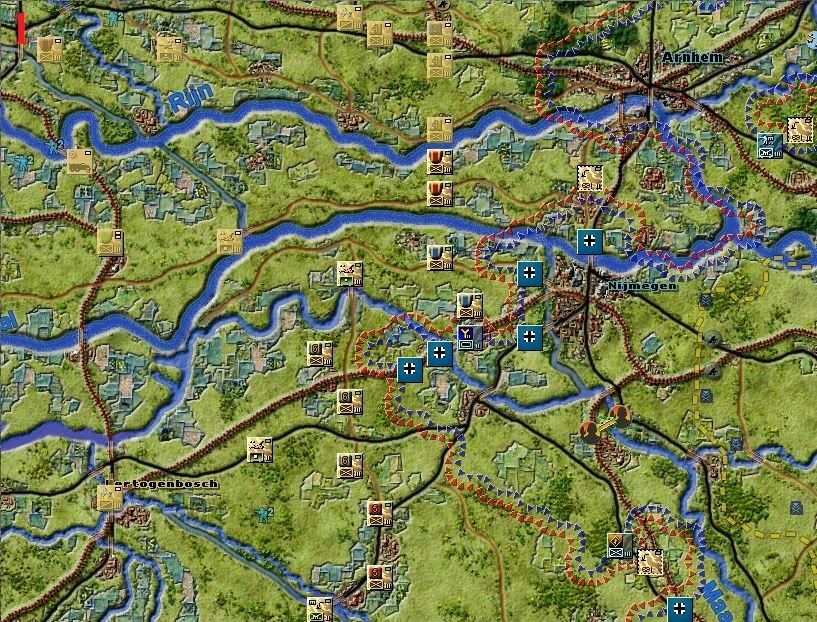
The main Axis attack comes in the area of Nijmegen, which is a little more heavily defended.

Nijmegen.jpg


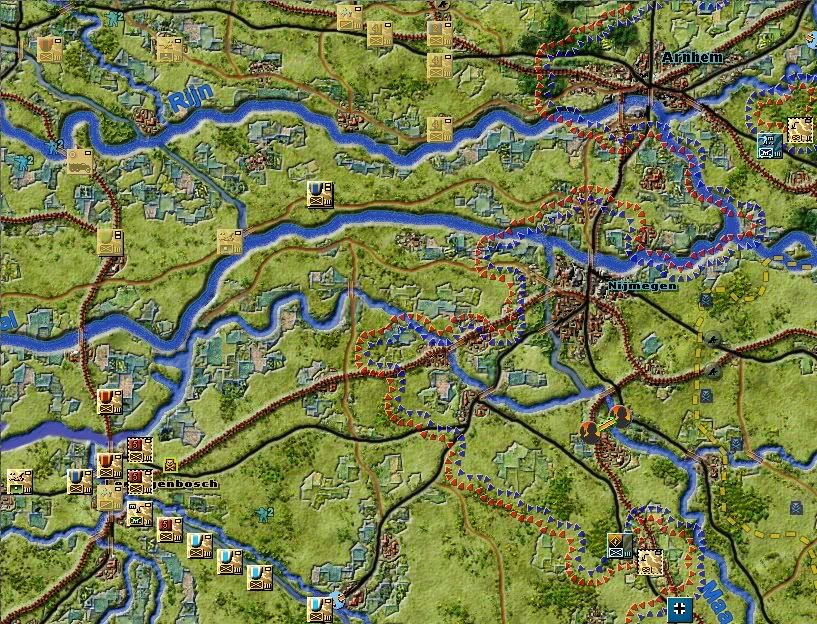
The Axis forces take control of Arnhem and Nijmegen and progress on the south bank of the Waal, destroying several of our units in the process. A regiment of the 9th Pz-Div is spotted southwest of Nijmegen. Also notice that a German pontoon unit has built a pontoon over the river south of Nijmegen: the little icons at each end of the pontoon indicate that those two hexes will suffer from a movement penalty for the upcoming turn, thereby simulating congestion (units have to queue up to go through the narrow pontoon).

NijmegenEnd.jpg


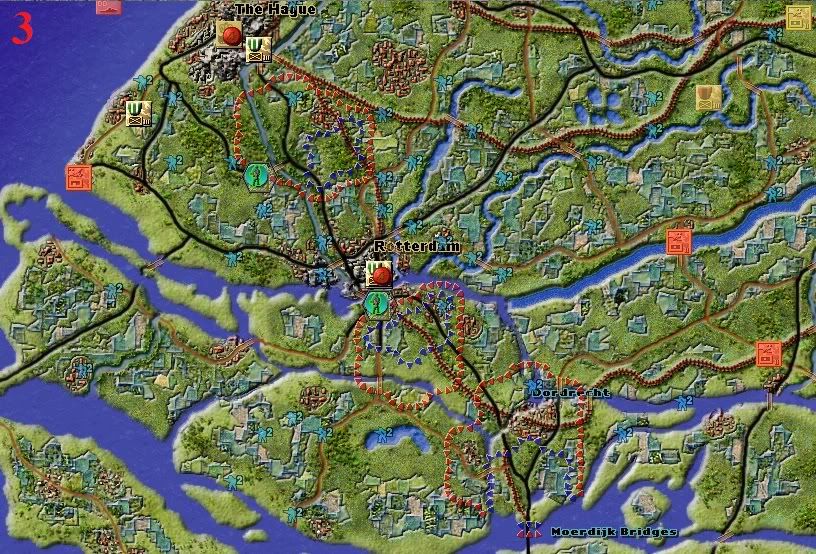
Yet-unspotted enemy paratroop units have landed northwest and south of Rotterdam, and north of the Moerdijk bridges. The light blue icons with a ² next to them you can see scattered on this screenshot are isolated paratoopers, simulating the scattering of para units after an airdrop. The only thing they do is add a movement penalty for my units on those hexes. The "²" indicate that they last for two turns.

Rotterdam.jpg


The daring German fallshchirmjagers threaten Rotterdam, which is only defended by a Dutch infantry regiment and an AA unit (hidden under the infantry regiment). However, there is also a fortress on that hex (also hidden by the infantry regiment) which means that it will be difficult for the German paras, who lack any artillery, to take the city by themselves. Moreover, they also have to defend their drop zone halfway between The Hague and Rotterdam (you can see it on the screenshot above) from which they get their supply and where reinforcements will spawn next turn. They have also taken control of the undefended strategic bridge at Moerdijk: that is where the 9th Pz-Div is headed, and we will do our best to slow it down while we try to retake the bridge.
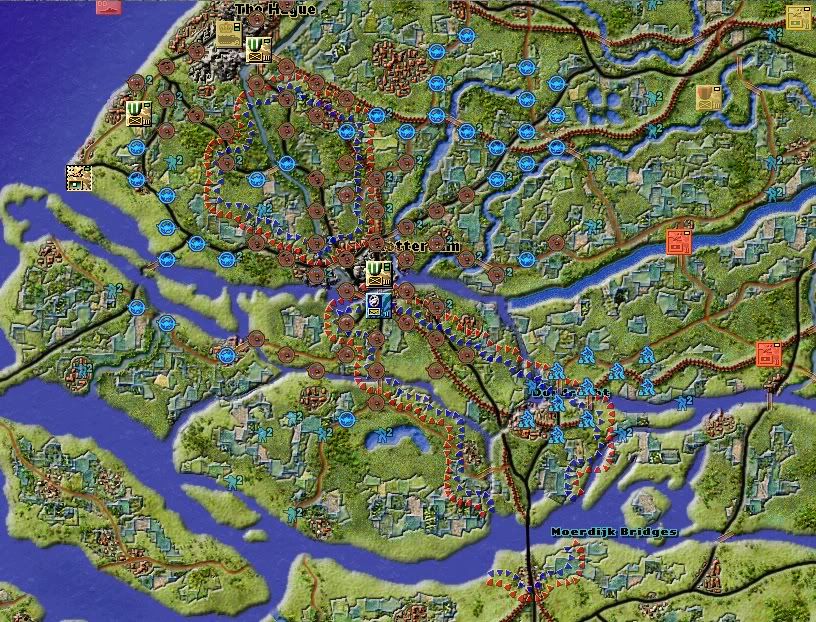
My opponent has used two interdiction assets in this area: first, an aerial interdiction around Rotterdam (the radius is quite large). There is an AA unit with a 4-hex radius in Rotterdam, and another one in The Hague, which explains why the interdiction icons are browned-out around those two cities. When it is browned-out, the movement penalty imposed by aerial interdiction is halved - the interdiction is thus "reduced" and my troops will have less difficulty moving through that area.
The second interdiction he has used is around the town of Dordrecht, north of Moerdijk: it is called "partisan" interdiction and simulates actions by groups of saboteurs/commandos. Like aerial interdictions, they impose a movement penalty for enemy units on those hexes (although the radius is smaller than for aerial interdiction).

RotterdamEnd.jpg

(The supply unit in The Hague has a crown on its counter, as it also simulates the Dutch royal family.)

Wilhelmina_of_the_Netherlands-1-1.jpg
: thank God a Royal navy ship is waiting for me offshore!


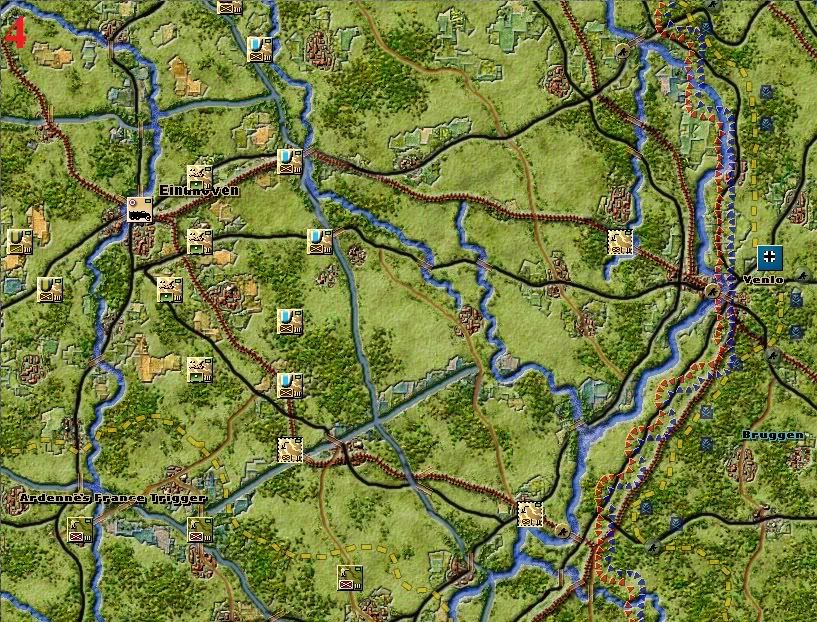
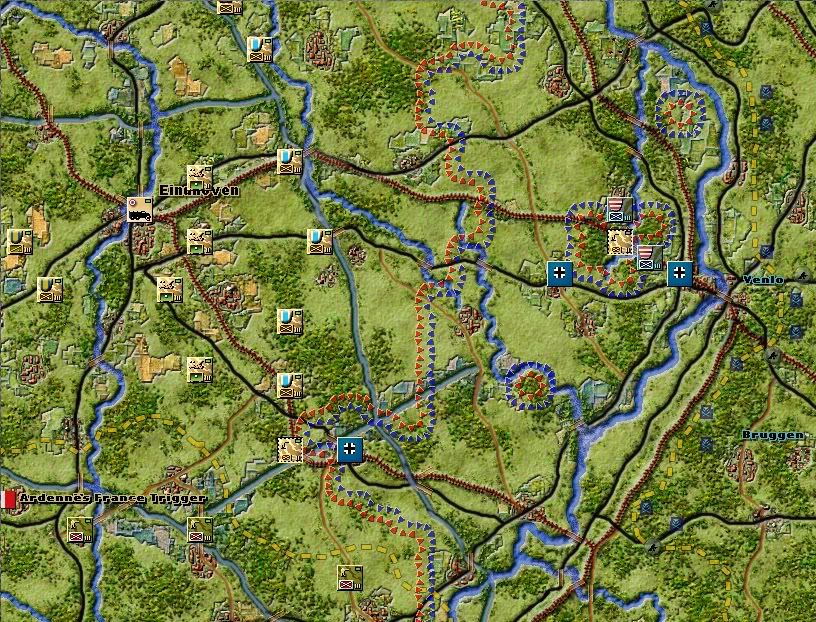
The southern part of Holland is a secondary theater of operations. The 5-regiment strong Peel Division protects the approaches to Eindhoven, while the Light Division is in reserve west of the city. You can also spot a couple of artillery units, as well as a supply unit in Eindhoven and a handful of Belgian border units in the bottom part of the picture.

Eindhoven.jpg


The German troops have easily crossed the Maas and progress toward Eindhoven, which I have no intention to defend.

EindhovenEnd.jpg


Surprise at Maastricht

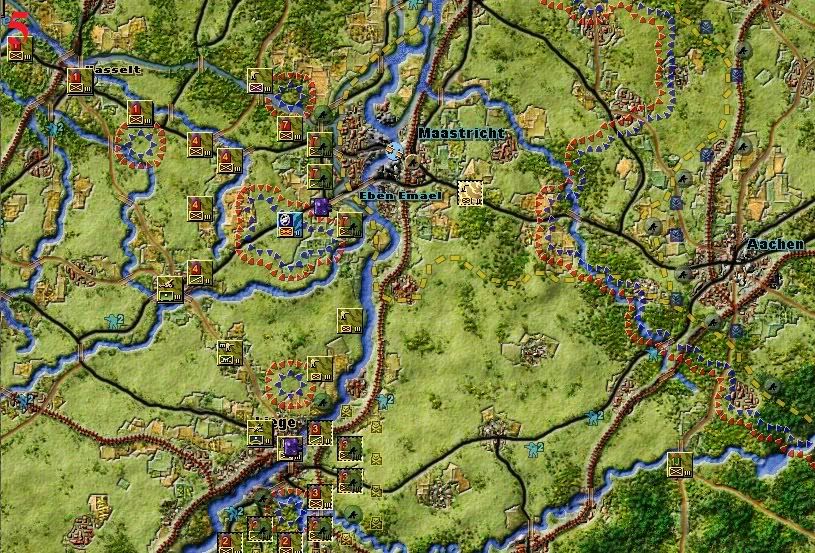
The Germans come from Aachen and first have to go through Dutch territory and Maastricht before crossing the Meuse (one bridge is already destroyed). The 7th Belgian Infantry Division protects the west bank of the river, with the added benefit of strongpoints (similar to fortresses but a little weaker). A Fallschirmjager detachement has just landed southwest of the Eben Emael fortress.
You can see at the bottom of the picture that Liege is also well-defended with minefields, strongpoints and a fortress in the city.

Maastricht.jpg


Well, Eben Emael wasn't so impregnable after all.

leopold3belgium2432-1-1.jpg
: I don't understand, my advisors assured me it was!

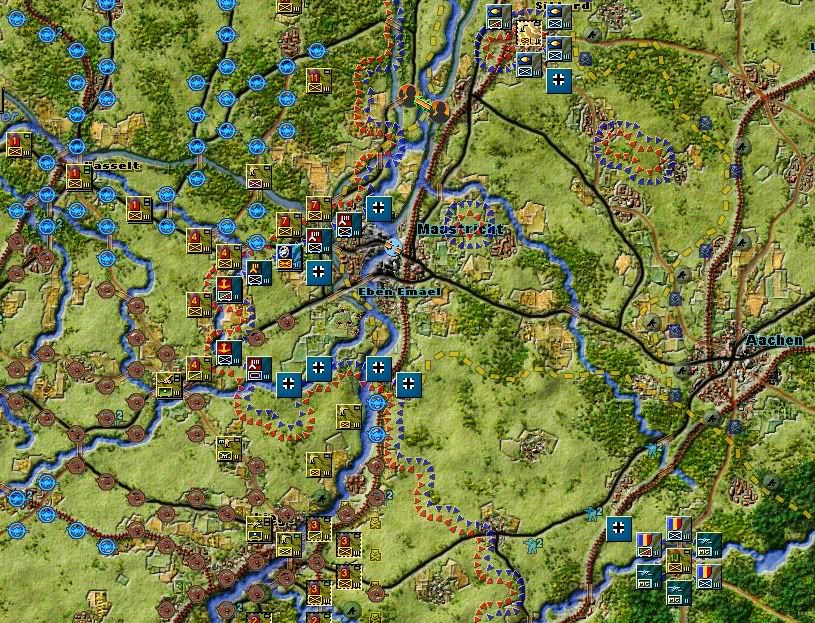
Units of the 3rd and 4th Pz-Div and of the 20th Mot. Division can bee seen operating in the area. A clean breakthough indeed, with bridges captured intact and two regiments of the 7th Division destroyed. The Pz-Div are ready to rush to the southwest and the Gembloux gap.
My opponent has also used aerial interdiction in the area, which will make the retreat of Belgian units considerably harder. However, it is also good news because he used all of his interdictions in Holland and Belgium: my French units rushing toward the Meuse will do so unhindered.
Finally, please take note of the lone surrounded Dutch unit in the upper part of the picture: I will use it in this LP's next installement as an example to explain how combat works.

MaastrichtEnd.jpg


Ardennian ghosts

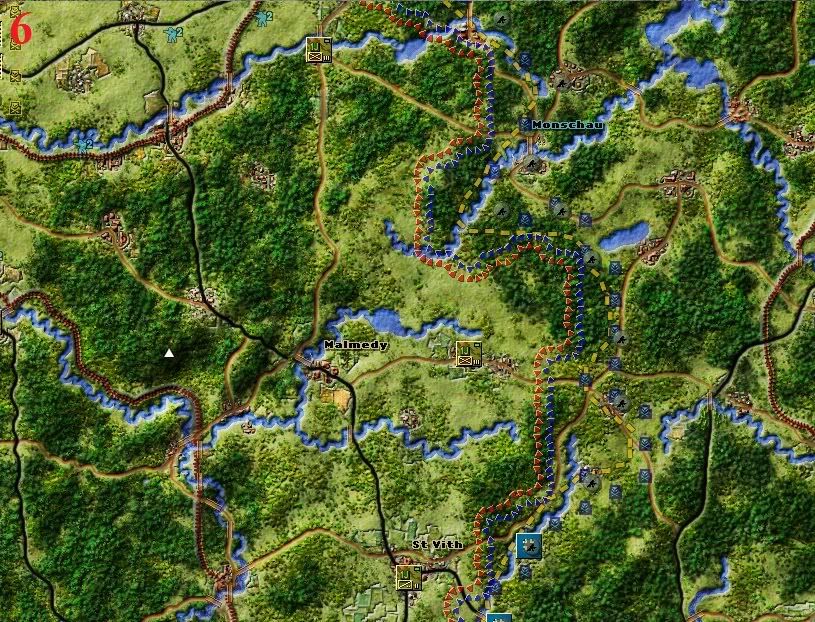
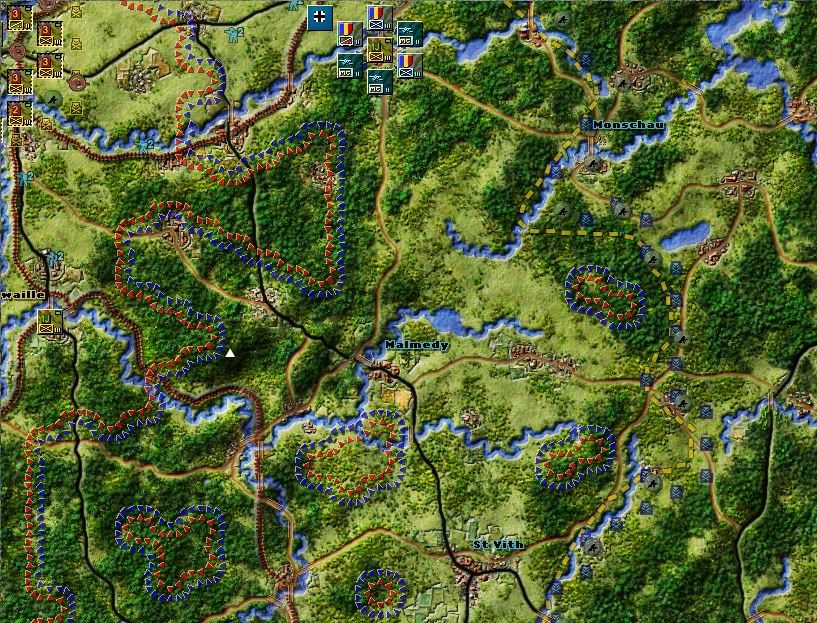
Only three Belgian regiments from the 1st Ardense Jagers Division guard the area. They're not even entrenched. :roll:

ArdennesNorth.jpg


Their sate was sealed before it even started, though the northermost one has managed to survive this turn. Because I have no units in the area, I can't see the German units driving through the Ardennes forest (though I've seen them during the turn replay when they encircled and destroyed the Belgian units - I can confirm the Pz-Div are there). Though I can't spot them, I can follow their progress by watching the frontline move (one of the few engine shortcomings). They've already driven through Malmedy and St Vith: disappointed not to have made any American prisoners there, they pressed forward west.

ArdennesNorthEnd.jpg


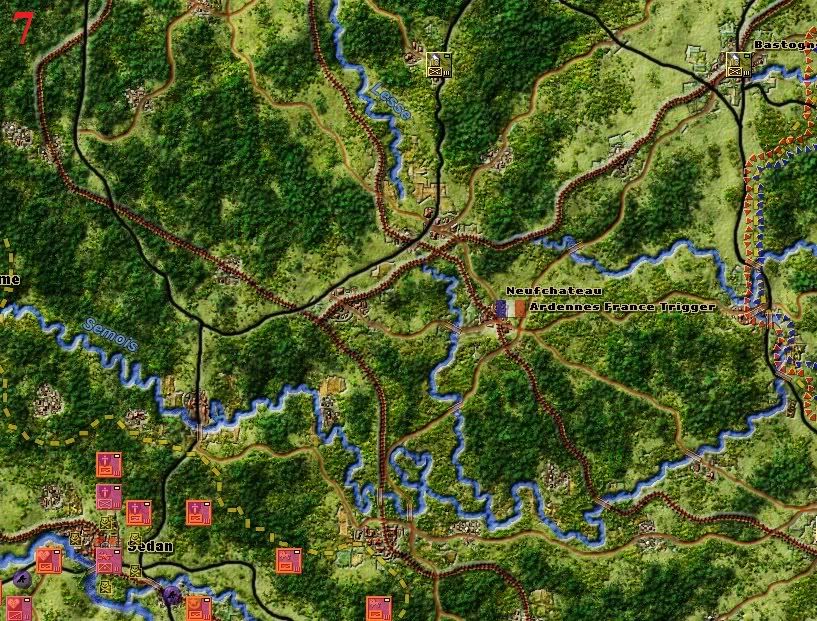
Units of the 10th Belgian cavalry Division are guarding this area in Ardennes' southern half. French units south of the border around Sedan are surprised, and I won't be able to move them this turn.

ArdennesSouth.jpg


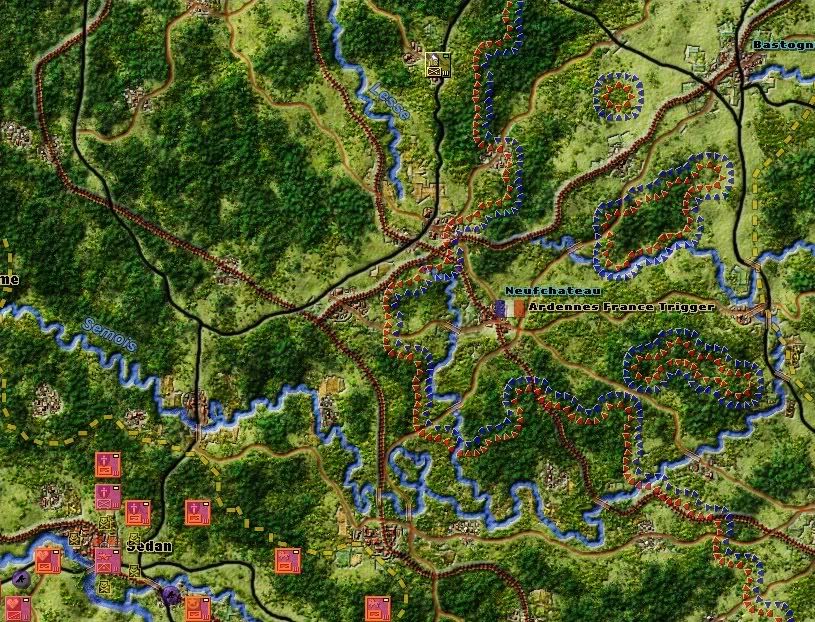
The German Pz-Div progress unopposed and unspotted. Hell is about to be unleashed about Sedan but the French troops guarding the city have no idea.

Ignore the "Ardennes France Trigger" thing, it's for when playing against the AI.

And while I'm at it, please take a minute to make a distinction between good roads (black), dust roads (light brown) and railways (dark brown). Note that as long as ground condition is set to "dry" (which it will be for most of the scenario), the cost for moving on those is the same. When it gets muddy, it's better to use good roads obviously.

ArdennesSouthEnd.jpg


Pressure on the Maginot Line

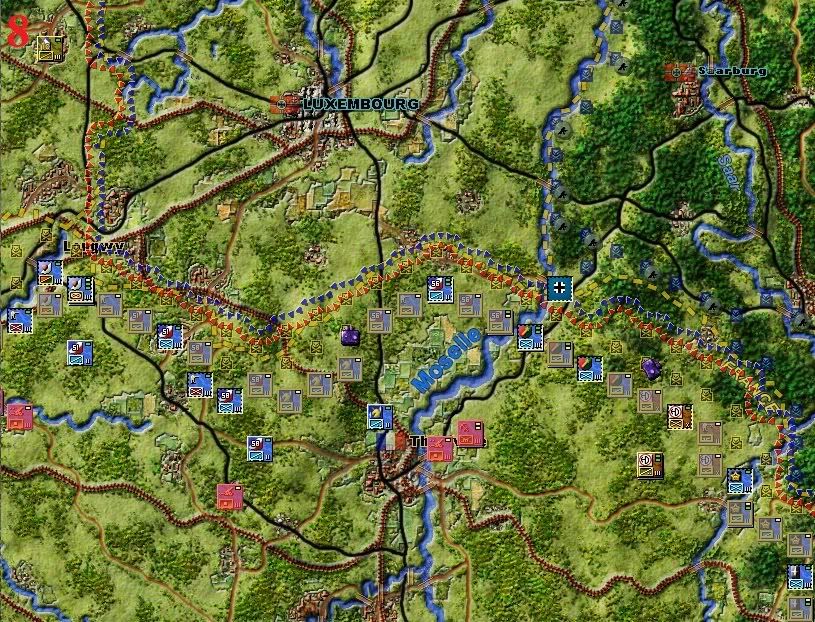
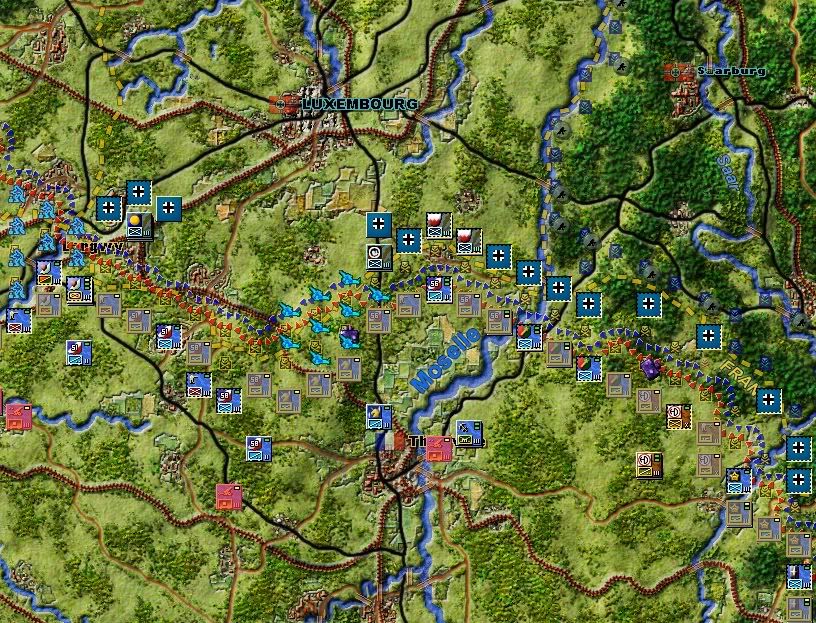
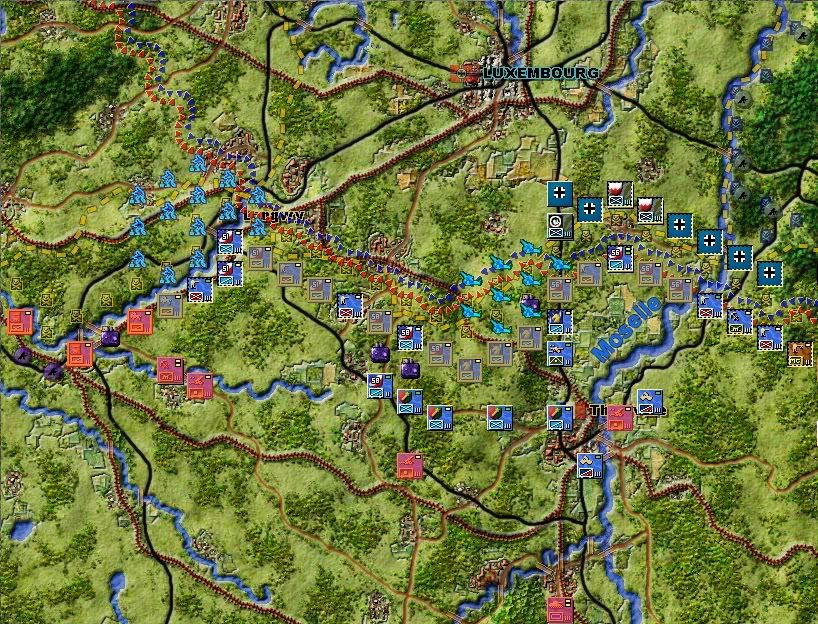
Here you can see part of the Maginot Line south of Luxembourg and Germany. It is composed of a continuous mix of fortresses and strongpoints (mostly hidden under unit counters), minefields and regular infantry units. Unless my opponent attacks in the area, I won't go into details to explain how it works because it is quite complex.

MaginotLine.jpg


My opponent has advanced his units closer to put some pressure on my line. However, as long as it is mostly infantry divisions, I should be okay. He has also used partisan interdiction near Longwy, and artillery interdiction south of Luxembourg. Indeed, instead of using an artillery unit to support your troops in battle, you can choose to use it to interdict an area, which gives your opponent's units a movement penalty on those hexes.
Finally, note the lone brown English division on the right part.

MaginotLineEnd.jpg


In the next installment tomorrow, an explanation of some game mechanics and (hopefully) my first turn.

By they way, does anyone know whether it's possible to present those before/after screens in a single screen switching to the other when you hover your mouse over it? I think it would be easier to read it that way.
 

zool

Arcane
Joined
Oct 26, 2009
Messages
897
Blackadder said:
There was another LP here of a grand wargame in the eastern front with truly massive scale but it died. Possibly due to little interest from Codexers - only 2 or 3 people read it. Or commented, but its hard to note how many people are reading something if they stay silent.

Well then, let's hope people won't stay silent. I can answer any questions about the game engine, and I'd be glad if this LP induced some people into trying this excellent wargame. A demo can be downloaded here.


Blackadder said:
The panzer forces being twice as fast is ridiculous. A third faster, I may give that to them, but twice as fast? And this being before air interdiction comes into play?

Well, I guess you are meant to lose, unless your defences hold. The two weaknesses I see in your plan are:

The Belgians are being given a large frontage in the north. Are you sure they are up to it?

Still no mobile reserve. Are you able to begin massing tank divisions? Perhaps park them somewhere in the rear, preferably in forested areas (if that makes any difference to air attacks) along the most likely avenue of attack?

I wouldn't feel incredibly confident without a solid, mobile...well, in this game, semi-mobile, reserve force.

About the "panzer forces being twice as fast is ridiculous": yes and no. Historically, German tanks were not twice as fast as French and English tanks. But this game is all about accurate simulation, and German armored units did historically maneuver much faster than their French counterparts, thanks to a superior chain of command and higher tactical flexibility. In that regard, a unit's movement capability should not be interpreted restrictively as its pure speed, but much rather as it speed coupled with its maneuverability - I'm not sure I'm making myself clear here. Anyway, in my opinion, the scenario creator did well to do so, even if he overdid it a bit. One thing that I'm not happy about though is that French DCRs, including B1-Bis regiments, are not more powerful than their German counterparts.

About my plan's two weaknesses: regarding the Belgians, I think they should be able to hold the area I assigned to them. I'm planning on pulling back all forces currently on the Albert canal as fast as possible, and I reckon that coupled with the units around Anvers and those propositioned on the Dyle river, it should be enough. If not, I'll adapt my plan accordingly.

Regarding the lack of a mobile reserve, I'm not planning on using my DCRs and DLMs on the frontline. Rather, I'll keep them at regular intervals not too far behind the frontline, ready to intervene in case of a local German breakthrough. I think I'll avoid concentrating them too much, as a well placed German aerial interdiction could then prevent my whole mobile force from moving more than a few hexes. I'd rather see them a little more scattered as long as I can be sure at least one of them will be able to intervene quickly to plug a hole, buying some time for the others to come to the rescue and/or for neighbouring infantry units to pull back without being surrounded.
 

GarfunkeL

Racism Expert
Joined
Nov 7, 2008
Messages
15,463
Location
Insert clever insult here
Ah, the classic tripwire/firebrigade-approach! Should work admirably as long as you have the mobility and punch required.

I have no idea how you would enhance the pics like that - it's not a problem for me reading them the way they are now, in any case.
 

Malakal

Arcane
Glory to Ukraine
Joined
Nov 14, 2009
Messages
10,297
Location
Poland
Soo it starts badly. Well its to be expected. But you do have some air support right? Blast Ardennes with it if possible to stop German breakthrough.
 

zool

Arcane
Joined
Oct 26, 2009
Messages
897
Yeesh said:
I'm posting to show my continued support.

But also to warn you to be en guarde...

2i0udkm.jpg

De_Gaulle-1-1.jpg
: monsieur, what is dis devilry??? Vive la France!


Malakal said:
Soo it starts badly. Well its to be expected. But you do have some air support right? Blast Ardennes with it if possible to stop German breakthrough.

The enemy has struck hard and fast - the breakthrough at Maastricht and Eben Emael is particularly impressive. But the really good news is that my opponent has used all of his interdictions in Belgium and Holland, thereby unwillingly making it easier for me to achieve my main objective: bringing as many troops as possible to the Meuse before he reaches it. If I can deny him any bridgehead over the river, his prospects of winning decrease dramatically.

I'll have at least one partisan interdiction, and maybe an aerial interdiction too, next turn and I'll make sure to use them in the Ardennes indeed.
 

Malakal

Arcane
Glory to Ukraine
Joined
Nov 14, 2009
Messages
10,297
Location
Poland
Yes, his attack is quite impressive, but its not hard against positions placed in the beginning of the scenario. I guess he retried it a few times vs AI to learn how to achieve most. Now the real thing starts.

This is also why I dislike such scenarios. I would prefer equal forces fighting it out without such factors as "surprise".
 

zool

Arcane
Joined
Oct 26, 2009
Messages
897
There is an interesting scenario for Battles in Italy - called "Churchill's Way" - which merges all three vanilla scenarios (Sicily, Salerne, Anzio) into one huge battle where the Allied commander has a wide choice of landing locations (he can even ignore Sicily completely and land directly on the Italian mainland, though it's very risky). TBut the best thing is that the defending side (Axis) actually gets to play first, meaning that he has time to move his reserves on the map - effectively making it impossible for the Allied player to know where his opponent's reserves start.
 
Joined
Nov 1, 2008
Messages
7,953
Location
Cuntington Manor
So the phony war has ended...

I look forward to seeing how things go. I agree with you about the B1's, though this is usually par for the course in wargames.
 

Erebus

Arcane
Joined
Jul 12, 2008
Messages
4,773
When does the scenario end, exactly ? And how many turns can we expect to see ?
 
Joined
Aug 21, 2010
Messages
272
:love:

I'm mostly a lurker, but I'll post to let you know that there is interest. I'm tempted to reinstall BiI just to try this scenario myself
 

zool

Arcane
Joined
Oct 26, 2009
Messages
897
Erebus said:
When does the scenario end, exactly ? And how many turns can we expect to see ?

The scenario is 24-turn long, starting on May 10th and ending on June 3rd (last day of Operation Dynamo), so only the first phase of the Battle of France is covered really. A second scenario on the subsequent battles on the Somme and the Aisne, with the opportunity to defend Paris or stage a last-stand in Brittany would be really fun, albeit nearly impossible to win for the French player.

not an artichoke said:
:love:

I'm mostly a lurker, but I'll post to let you know that there is interest. I'm tempted to reinstall BiI just to try this scenario myself

Ha! Another amateur of this fine game. We'll drink champagne in Paris once I've pushed back those Huns behind the Rhine (err I mean if I manage to keep them across the Meuse).

Thanks for the support. :love:
 

zool

Arcane
Joined
Oct 26, 2009
Messages
897
Game interface & mechanisms interlude

And now, before I (finally) get to play my turn, a little more information on the game interface & mechanics. If you wish to simply follow this AAR and don't mind missing out on how the game works, feel free to skip this installment.

Note that the game is hex-based - I've simply deactivated the hex grid to make it more pleasing to the eye.

General interface

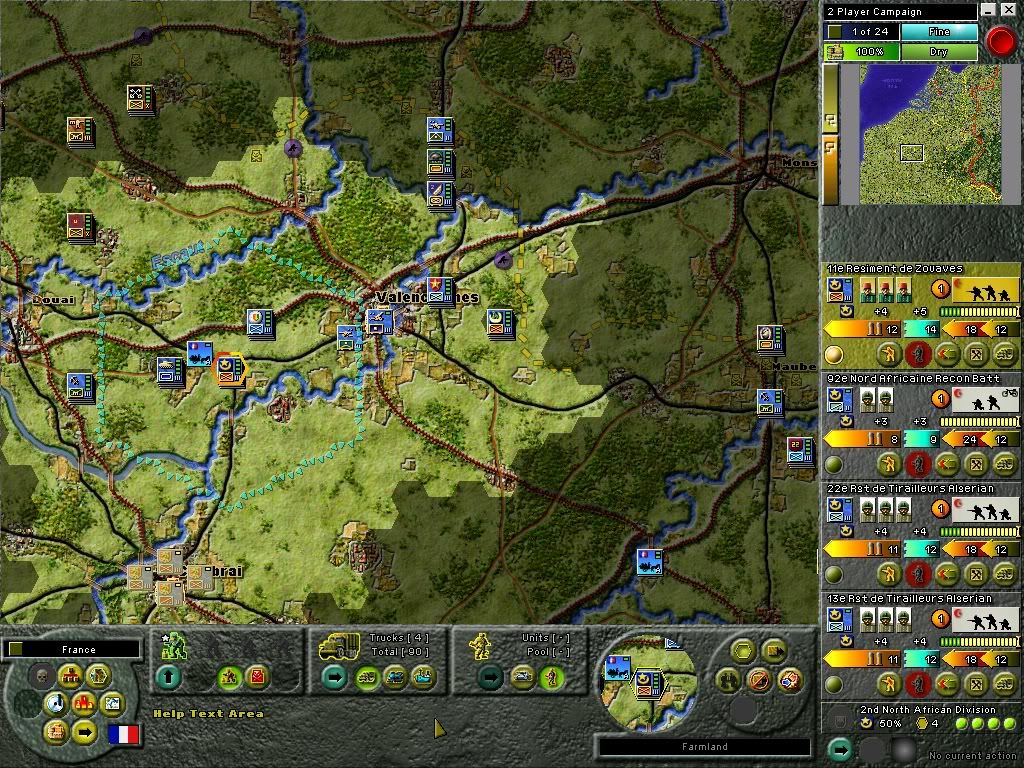
Let's start with the interface. Most of the screen is taken by what I call the tactical map or tactical view. Here, it is a shot of the 1st French Army waiting near Valenciennes, just south of the Belgian border (yellow dotted line). You can also see three divisions from the BEF, which is located northwest of the French 1st Army.
Next, the strategic map is located on the upper right of the interface. The little rectangle shows where the tactical view currently is. The red line is the current frontline and the yellow dots show where my units are. Unfortunately, this map is very small: it can be zoomed in by clicking on one of the two buttons on the left but then, the frontline and units disappear.. The frame above shows the current turn number, general supply condition (currently 100%), and air and ground condition. The big red button is the end of turn button.
Directly underneath the strategic map is the unit display. Here, I've clicked on an hex where there is a stack of four units - all of them from the French 2nd North African Division. Each regiment/unit can be selected individually of course. On the tactical screen, the radius around the selected division shows its command radius - as long as all of its regiments are within a 3-hex radius of each other, they get a bonus to their attack and defense values (see below "Unit composition and movement"). The bright hexes on the tactical map show where those regiments can move. It depends on their movement points - if I had only selected the recon battalion, more hexes would be brightened (more on that later in the "Unit composition and movement" part).
In the lower part of the interface, underneath the tactical view, are located three rectangular and two round panels, as well as a close up view of the selected unit. From left to right, the first rectangular panel is the interdiction and defense assets panel: there, I can select available interdiction (aerial, partisan) and defense (minefields, strongpoints) assets and place then on the map wherever I wish.
The middle rectangular panel is the transport panel, where I can use available transport assets (trucks, trains and boats) to quickly move my units around. You can't have more than four of each assets each turn (4 trucks, 4 trains, 4 boats) but you actually often get less. For example, I'll only start getting naval transports in the second half of the scenario when I may want to start reembarking my troops. Each transport asset carries one regiment, not one division, so they have to be used with care.
The final rectangular panel on the right is the replacement panel: there, you can assign available replacements to mauled regiments. There are two types of replacements: infantry and mechanized (the former being a little more plentiful than the latter).
The two round panels have a lot of buttons giving access to options screens and such. Let's forget about them. Only note the little French flag in the bottom left of the screen: using the arrow button on the left, I can switch to other Allied nations (UK, Netherlands, Belgium) which all have their own interdiction and defense assets, transport and replacement panels - for instance, the Belgians don't have any truck assets.

Generalinterface.jpg


Unit composition and movement

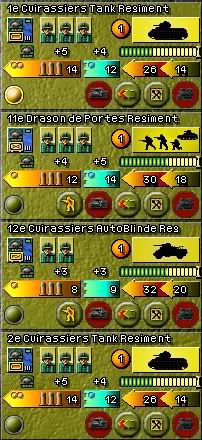
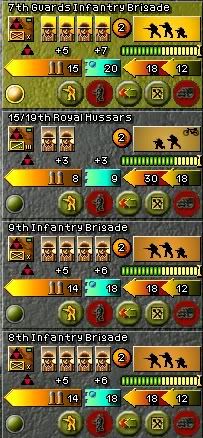
Here are so close-up shots of four different divisions, so you can fully appreciate the differences between them. From left to right: the 3rd DLM, the 22nd French Infantry Division, the 60th French Infantry Division, the 3rd British Infantry Division.

Unitandmovement.jpg
Regularunit.jpg
Substandardunit.jpg
Englishunit.jpg


Division composition: as you can see, a regular infantry division is composed of three infantry regiments and one recon battalion. Composition may vary and some divisions are only three-regiment strong but overall, most divisions have four regiments. The 3rd DLM has two Somua medium tank regiments, one mechanized infantry ("dragons portés") regiment and one recon battalion.

Background colors: Background colors differ depending on the quality of the unit. The 3rd DLM is an-all elite division: its four regiments have a golden background. Elite divisions get small bonuses in combat. The 22nd French Infantry Division is a regular combat unit, with a grey background. The 60th French Infantry Division is a substandard unit, with a light red background. This is BAD: when attacked, its regiments might surrender without even fighting. In this scenario, the chance to surrender is set to 40%. There are ways to reduce it to 20% (if a regular or elite unit is in an hex adjacent to it) but the only way to make sure they never surrender is to stack them with regular or elite units. Finally, the 3rd British Infantry Division is regular but for one elite regiment of the Guards.

So remember: elite (gold) > regular (grey) > substandard (red)

Regiment details: at the top of each regiment display area is the name of the regiment. Directly underneath it, from left to right:
1. Unit counter (as seen on the tactical map)
2. Steps: the "step", represented by a little soldier head, is roughly equivalent to a company or a battalion. The number of steps a regiment has shows its number of men (or tanks for armored units): as such, the number of steps a unit has is a way to gauge it size, not its power - though obviously, they are often related. During combat, a regiment might have casualties, resulting in the loss of one or more steps. If all steps are destroyed, the regiment is destroyed. REMEMBER THIS!
Note that infantry regiments have more steps than recon battalions - they're bigger. Also note that British infantry regiments have four steps while regular French infantry regiments have only three steps: they're actually brigades, not regiments, and thus have more men.
3. Timed replacements: the number in the little yellow circle is the number of timed replacements this regiment has. Timed replacements simulates the ability of a unit to replenish its forces on its own after some time (woundeds get out of the infirmary, damaged tanks are repaired, ...). When a unit loses a step in battle, the timed replacement is automatically used, though it take a few turns to replace the step. When possible, I will send such mauled units to the rear while they replenish their lost step(s). Also note that British brigades have more timed replacements than their French counterparts. When a unit is out of timed replacements, the player has to use regular replacements from the global pool.
4. Unit picture: allows the player to know with a quick glance the type of regiment this is (leg unit, motorized unit, tank unit, ...)

Now to the middle part:
5. Attack and defense bars: the attack (orange) and defense (turquoise) bars show each regiment's attack and defense values. The little numbers above are the divisional integrity bonuses I spoke of earlier.
The two bullets on the attack bar represent the regiment's supply: when a regiment does something (entrench, use extended movement, attakck a unit, is attacked by a unit, ..), one bullet will be consumed. Units can only do one action each turn (i.e they can't attack an enemy unit and then entrench in the same turn).These bullets are replenished at the start of each turn only if a unit is in a supplied hex. If all bullets are used, the regiment becomes "isolated", which is very bad - it's basically out of supply. Note that units from the 3rd DLM have more supply than infantry units. REMEMBER THIS!
Finally, please notice the little dots on the attack and defense bars of the 3rd DLM's regiments: these represent the shock (on the attack bar) and anti-shock (on the defense bar) capabilities of these regiments. Armored units have high shock values: when they attack infantry units with low or no anti-shock values, they'll inflict additional damage. Stacking an infantry regiment with an independent anti-tank guns battalion mitigates this effect, as those units provide some anti-shock for friendly units in the same hex. REMEMBER THIS!

6. Movement capability: each unit has different movement capabilities. The lower number shows the basic movement capability of the unit, while the higher number shows its movement capability if it uses extended movement. The bar above shows the regiment's fuel reserve (energy reserve for leg units). Green is fuel, yellow is what can be used this turn if using extended movement, and red is depleted fuel (all those units haven't moved and have full supply, so you can't see any red). A unit can potentially be rendered incapable of moving if it uses all its fuel. Units are ressupplied at the beginning of the turn as long as they're somewhere where supply can reach them. REMEMBER THIS!

And now at the bottom:

7. Bottom buttons: from left to right, they allow the regiment to leave a detachment (I'll show an example during my turn), to take a regular replacement (only available when the regiment is missing at least one step), to use extended movement, to entrench, and finally to use truck movement (this can also change to train or boat movement).


Supply

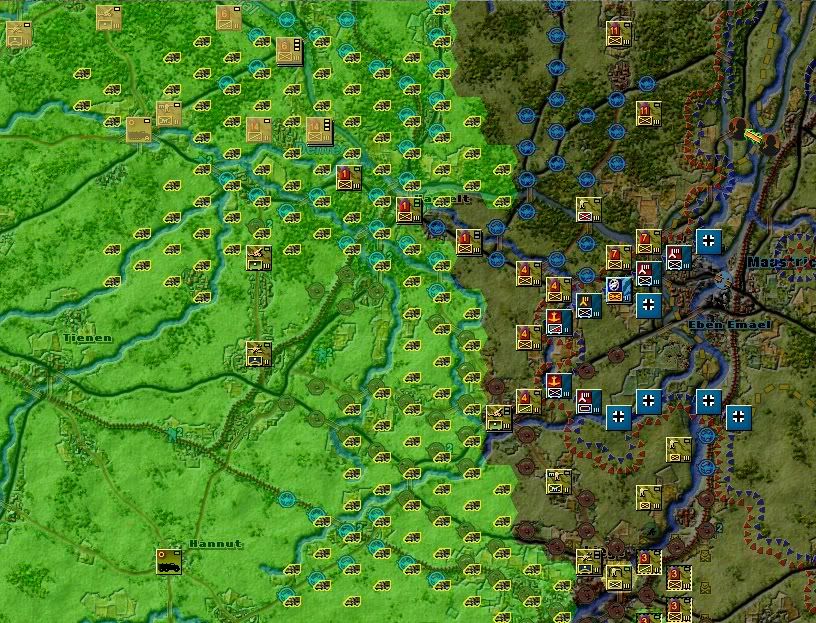
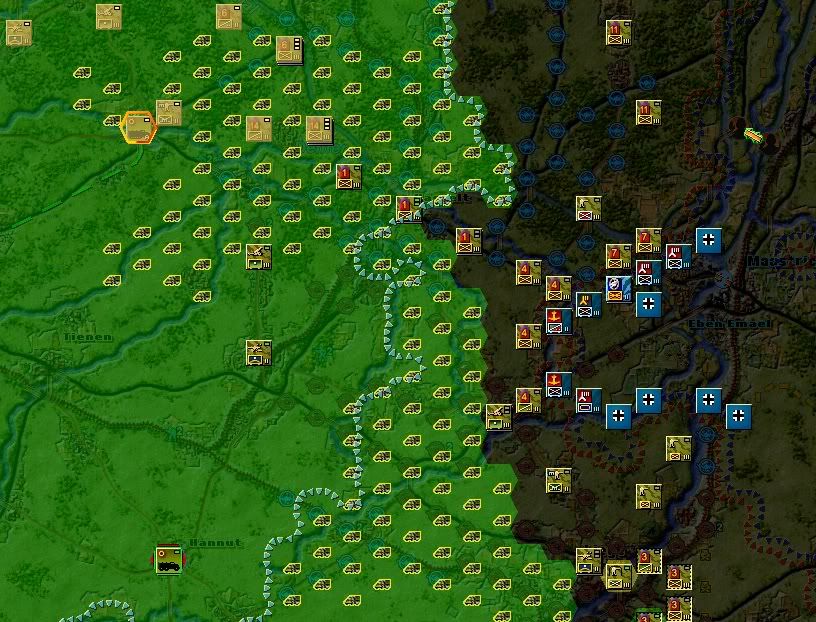
How are units supplied? There are a number of supply dumps on the map edges and in certains cities that provide supply. Supply travel freely along hexes as long as there are no movement penalties - be they imposed by enemy interdiction, enemy units, or anything that gives a movement penalty on a certain hex. That's where supply units come into play: supply units can "burst" supply over a certain number of interdicted hexes. Let's have a look at the Maastricht-Eben Emael area this turn.

Supply1.jpg


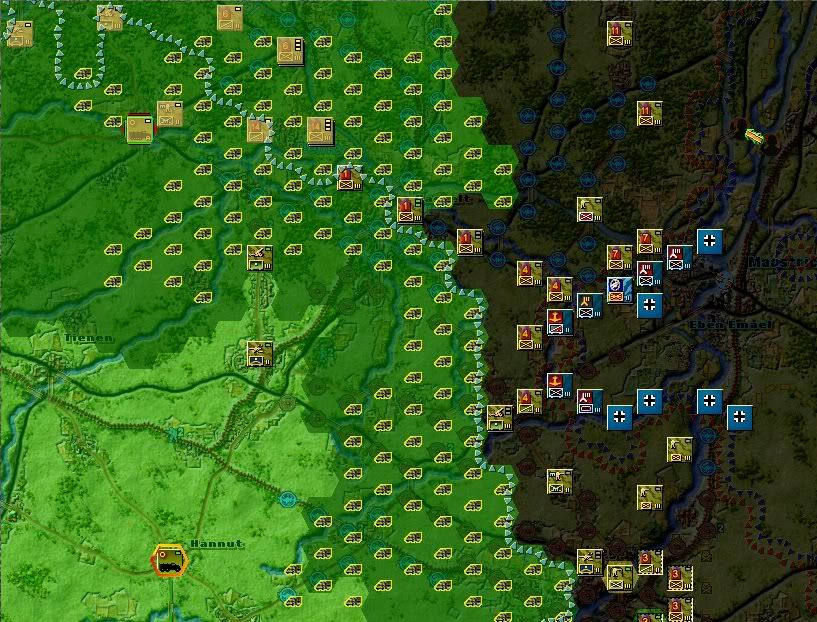
As you can see, the area is heavily interdicted. Let's turn on the supply net, which shows in green supplied hexes. Some Belgian units are already in non-supplied hexes, because enemy interdiction prevents supply from reaching them. They're not out of supply yet, because they haven't used their "bullets". But if they do so, they won't be re-supplied - and if they move, they won't get refueled.

Supply2.jpg


The green supplied hexes with yellow little trucks on it are hexes supplied not by supply dumps but by supply trucks. Each truck bursts a supply net. Let's check each of the two on-screen Belgian supply units' burst.

Supply3.jpg

and
Supply4.jpg


Here, you now have a glimpse of how supply work. Disambiguation time:

- a unit out of the green supply net is "not supplied" REMEMBER THIS!
- a unit which has used all its bullets is "out of supply". Also called "isolated" REMEMBER THIS!

Obviously, only "not supplied" units can become "out of supply/isolated" - but only when they've used all their bullets.


Combat

Wow sorry, this post is longer than I thought, sorry about that. I'll treat combat in a separate installement after I've played my turn.
 

zool

Arcane
Joined
Oct 26, 2009
Messages
897
I've started playing my turn (already moved the Dutch and Belgian armies) but in the meantime, I will try to explain how combat works in Battles in Italy (BiI).

Combat

To explain combat, I'll use three examples from my opponent's first turn. To do this, I'll be using the replay feature, which allows you to witness what your opponent has done during his turn (limited by fog of war of course).
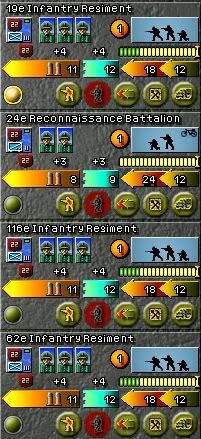
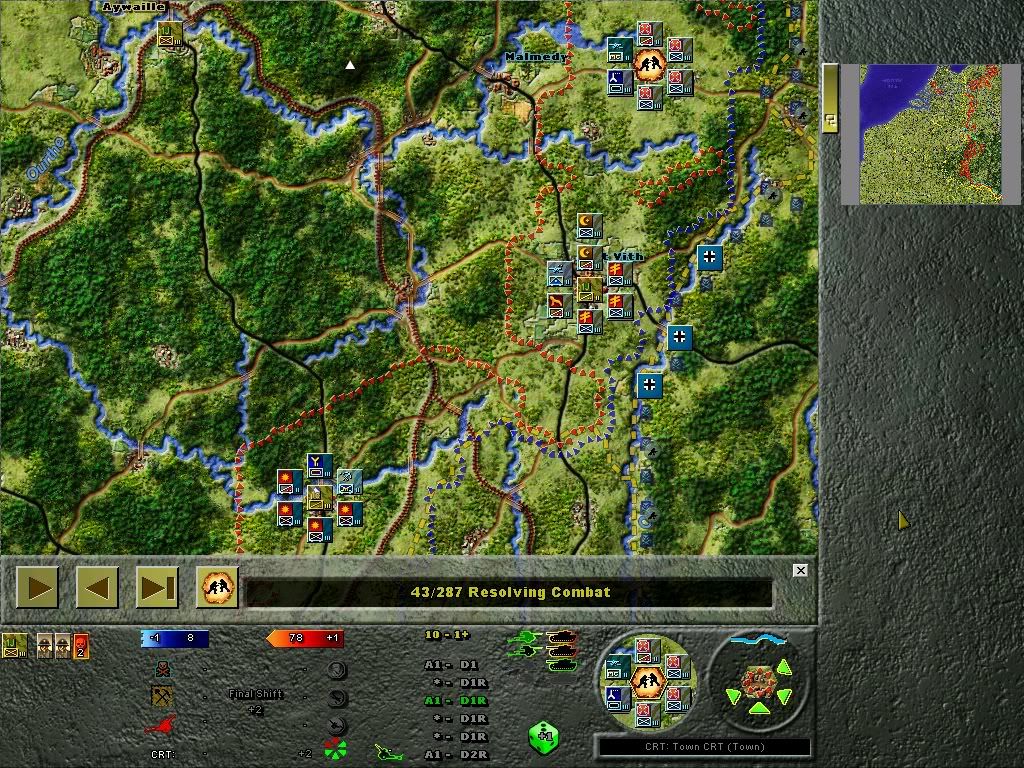
Remember those lone Belgian units from the 1st Jager Division and 10th Cavalry Division guarding the Ardennes? Here is what happened to them.

Combat1.jpg


Those units got encircled and destroyed. Now, take a closer look at the battle screen in the bottom part of the picture. I took this screenshot of the first German attack - then six or seven others followed which ended up destroying all three Belgian units.

In BiI, the goal for the attacker is to get odds as high as possible (minimum odds are 1-2, maximum are 10-1+) and then pray that he gets a good dice roll (from 1 to 6). Here is how battles odds are calculated:

1. Force comparison: basic battle odds are calculated through a comparison between the attacker raw attack value (orange bar) and the defender raw defense value (blue bar).

2. Shifts: then, a number of variable can apply: the defender tries to get as many negative shifts as possible (in order to lower the odds) while the attacker tries to get as many positive shifts as possible (to get higher odds).

Things that give negative shifts (good for the defender):
- being an elite unit (-1)
- being entrenched (-1)
- being in the radius of a friendly artillery unit (-1) - which therefore could provide support to the defender.

Things that give positive shifts (good for the attacker):
- being an elite unit (+1)
- assigning a "commander" strategic asset (+1)
- assigning an "air support" strategic asset (+1)
- assigning an "off-map artillery" strategic asset (+1)
- assigning tactical artillery units (up to four artillery units may be assigned to a single battle, with each of them giving at least a +1 shift. Some give more e.g a single nebelwerfer unit gives +3).

Moreover, the more sides the attacker attack from, the better: attacking from three sides gives a +1 shift, from four sides a +2 shift, from five sides a +3 shift and from all six sides a +4 shift. Those are called tactical shifts. However, attacking from only one hex gives a -2 tactical shift, and attacking from two hexes doesn't give any negative or positive tactical shift. REMEMBER THIS!

3. Shock modifier: above the dice is shown a comparison between the defender anti-shock value (gun icon) and the attacker shock value (tank icon). If the shock value of the attacker is superior the the anti-shock value of the defender, the attacker will inflict more damage - this is referred as the shock modifier. Therefore, it is always a good idea to attack infantry units with armored units in order to get high shock modifiers. REMEMBER THIS!


RESULT
: Once all those shifts and shock modifiershave been taken into account, the battle odds are calculated and all there is left is to roll the dice and pray for a good result. The results column show the possible result for each of the six possible rolls (from 1 to 6). The left part shows the attacker's losses in number of steps (eg A1 = attacker loses one step) and the right part shows the defender's losses in number of steps (eg D2 = defender loses two steps). If the number is followed by an "R", it also means that the unit will retreat to an adjacent hex (if not encircled). Attacking units never retreat.


Case study: in the first picture, the defending unit raw defense value was 8 (shown on the blue bar). It was also an elite unit, which gave it a -1 shift (shown on the blue bar as well). And that's it for negative shifts (the unit wasn't entrenched and wasn't in the range radius of a friendly artillery unit).
On the contrary, the attacking units got a lot of advantage: first, their combined attack value was 78 (shown on the red bar) and at least one of them was elite, which gave them a +1 shift (shown on the red bar as well). Then, they attacked from four sides, which gave them +2 tactical shifts. Finally, their shock modifier was 1 (shock value of 3 against anti-shock value of 2).

My opponent rolled a three, which resulted in a A1-D1R result (each side lost one step, my unit would have retreated if it wasn't encircled). You can see on the left that my unit did lose a step indeed. It also had a timed replacement, which automatically kicked in: it would have taken 2 turns to replenish the lost step - except that my opponent attacked again after that and destroyed the whole unit.

Special note on overruns: a little +1 is surimposed on the dice in the first picture, to remind the player that he has a +1 shock modifier. More importantly, notice that the dice has a green color. This shows that my unit was overrunned by the attacking units: the latter were much superior in strength and number and attacked from four sides, which allowed them to realize an overrun - their attack did NOT use their bullets, which means that they can attack again this turn. Using this tactic, my opponent encircled my units and then attacked as many times in a row as was necessary to destroy my units. If he had not realized an overrun, he would have had to use new units each time - because units which would have attacked once could not have attacked a second or third time. REMEMBER THIS!
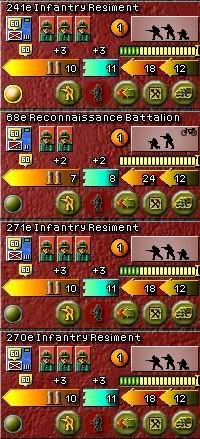


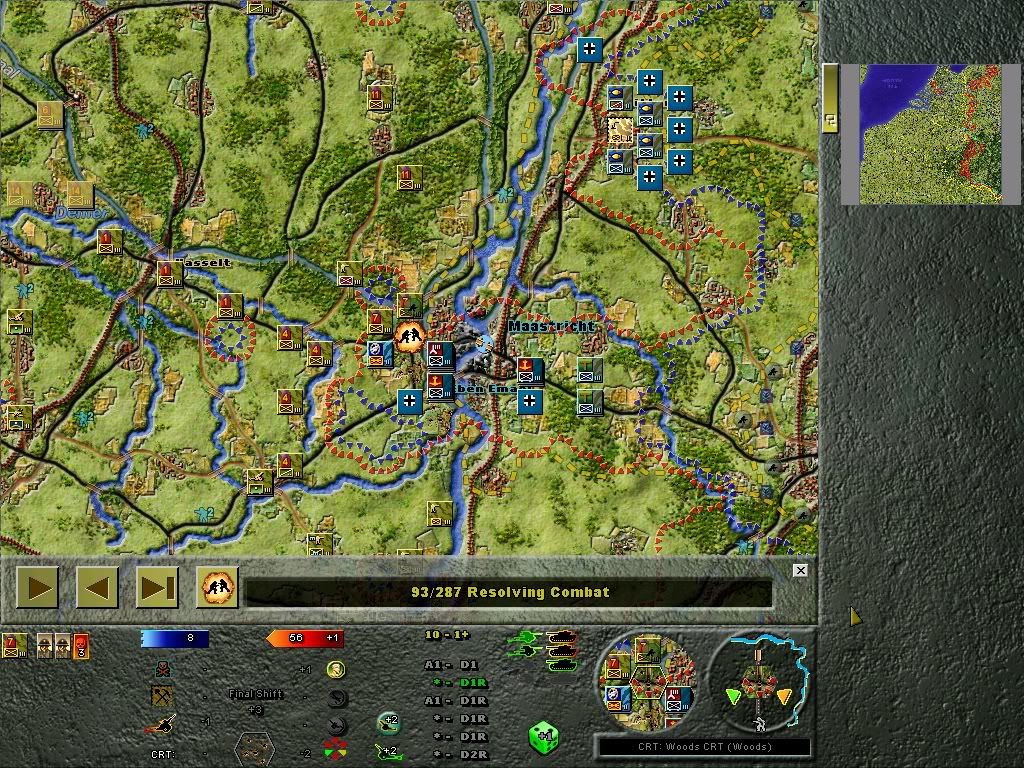
Ok, now that we all know how combat work, let's take a look at a second example to check that everything works as described.

In the picture underneath, a three-step regiment of the 7th Belgian Division is attacked near Maastricht. The defending unit raw defense value is "8". it is not an elite unit but benefits from being in the range radius of a friendly artillery unit (-1).
The attackers have at least one elite unit (+1), used a commander asset (+1), used a powerful artillery unit providing a double shift (+2). However, they're counted as having effectively attacked from only one side, as units attacking across rivers see their their attack value added to the total attack value (orange bar) but don't give any tactical shift. Thus, the consolidated tactical shift gave a -2 bonus to the defender. And here you just found out about the most important reason to defend behind rivers REMEMBER THIS!

The attacker also had a +1 shock modifier and obtained an overrun. You can see the combat result by yourself.

Combat2.jpg


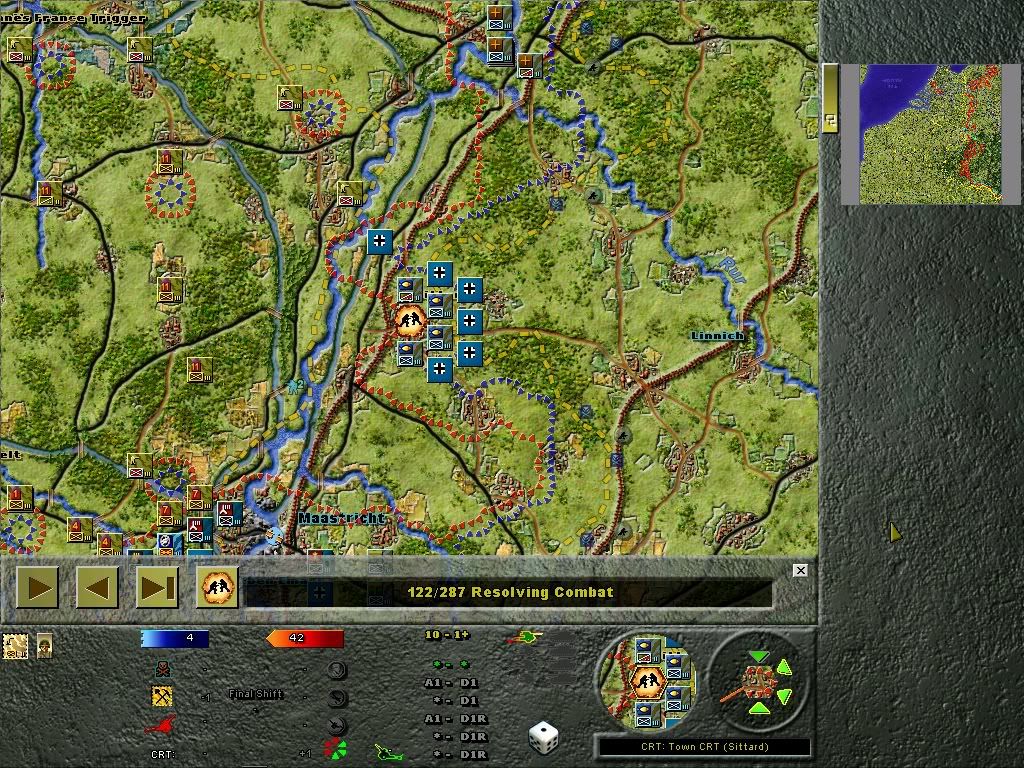
Third example: this weak one-step Dutch border battalion is entrenched in the small town of Sittard. It is attacked on four sides by a German infantry division. Look at the result column: yeah, it got VERY lucky.

Because it is entrenched, it had a -1 shift. But more importantly, entrenchement dramatically lowers the likeliness for the attacker to obtain an overrun. This is why it is very important to entrench your units as often as possible. In this case, the dice is not green: the attacker didn't get an overrun. If it had, it could have attacked again after this failed attack and would certainly have destroyed my unit with a second attack. REMEMBER THIS!

Also notice that this time, the Germans didn't benefit from any shock modifier - the attacking infantry units didn't have any shock value, and anyway, the defender benefited from defending in a town, which gives a +1 anti-shock value.

Combat3.jpg


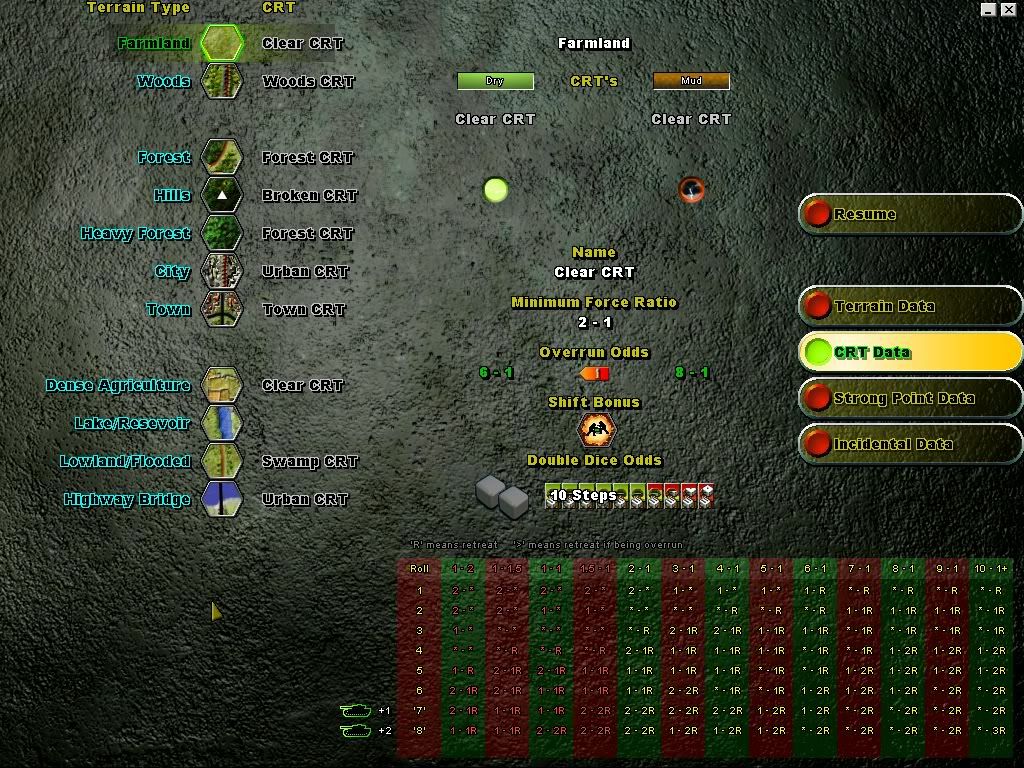
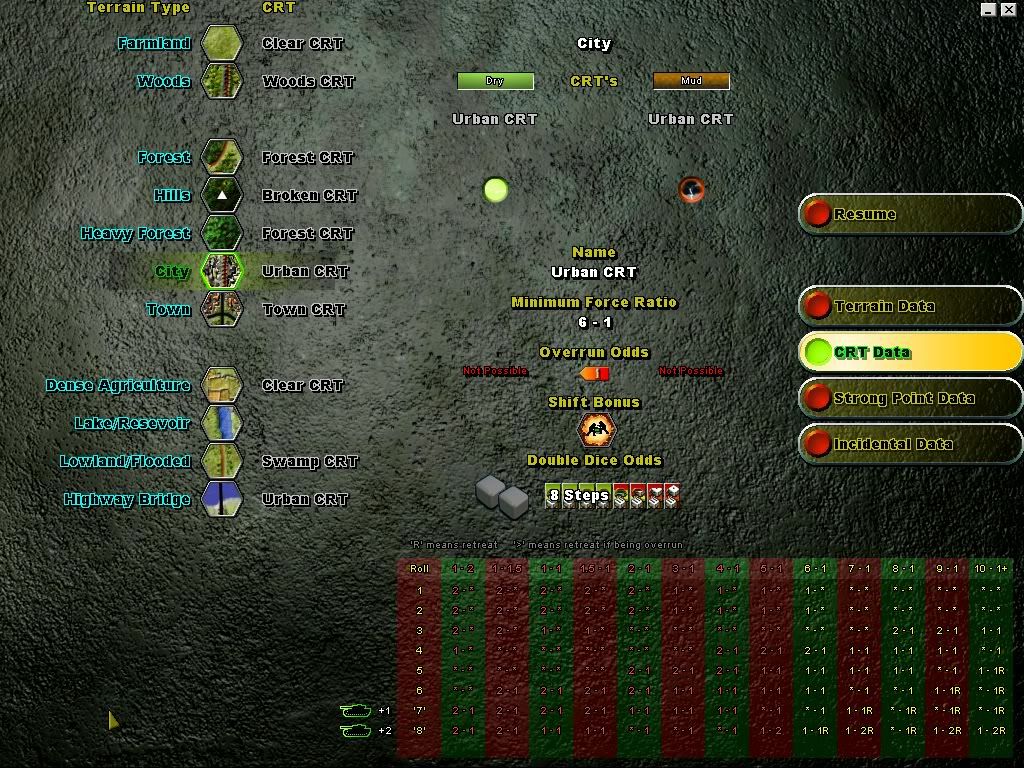
One last but important thing: there are different combat results tables (CRT) depending on the type of terrain where the combat occurs. Obviously, it's easier to defend in a forest or in a city than in clear terrain. Some terrain have higher minimal odds than other - the attacking side must meet at least those odds before a combat can occur.

As a rule of thumb, remember that in terms of ease of defense, clear < wood < town < forest < urban.

(Note how easy it is for the attacker to force the defender to retreat in clear terrain).

Have a look at the clear and city combat result tables for comparison (bottom right table). The +1 and +2 lines at the bottom shows what you can get with a +1 or +2 shock modifier. For example, if the attacker has a +2 shock modifier, rolling a 1 will get him the result he would have gotten if he had rolled a 3 without any shock modifier - in a sense, getting a +2 shock modifier is like getting a +2 bonus to your dice roll. REMEMBER THIS!

CRTFarmland.jpg


CRTCity.jpg
 

zool

Arcane
Joined
Oct 26, 2009
Messages
897
Turn 1 (Allied) - Race to the Meuse

Now that the hostilities are engaged, it is time to implement our beautifully-crafted Senne-Meuse plan.

winston_churchill-1-1.jpg
: Such a jolly good plan could only come from an exceptional mind!
De_Gaulle-1-1.jpg
: True. I am ze one who devised it.
leopold3belgium2432-1-1.jpg
: But I helped!
De_Gaulle-1-1.jpg
: No, you did not.
Wilhelmina_of_the_Netherlands-1-1.jpg
: And what about my country?
De_Gaulle-1-1.jpg
: Dear Wilhelmine, you must learn to sacrifice yourself. La grandeur de la France comes first.


I'm still limited by the fact that more than half of my units start in a "surprised" state and will be only activated next turn. But those that are already active will be ordered to move toward their planned position as fast as possible, using extended movement (equivalent to forced march/marche forcée).
Thankfully, my opponent has used all of his aerial interdictions in Holland and Belgium, which means that the 1st and 7th French Armies and the BEF can move unhindered. However, I don't doubt for a second that next turn, the area along the Meuse will be fully interdicted by the Luftwaffe. If my opponent does not do so, it might be a sign that he is not intending to cross the Meuse in force and has shifted to a Schlieffen-type plan - but I doubt he would take such a risk.

Here are the screenshots for this turn:

StrategicMapTurn1Allies.jpg


The battle for Holland

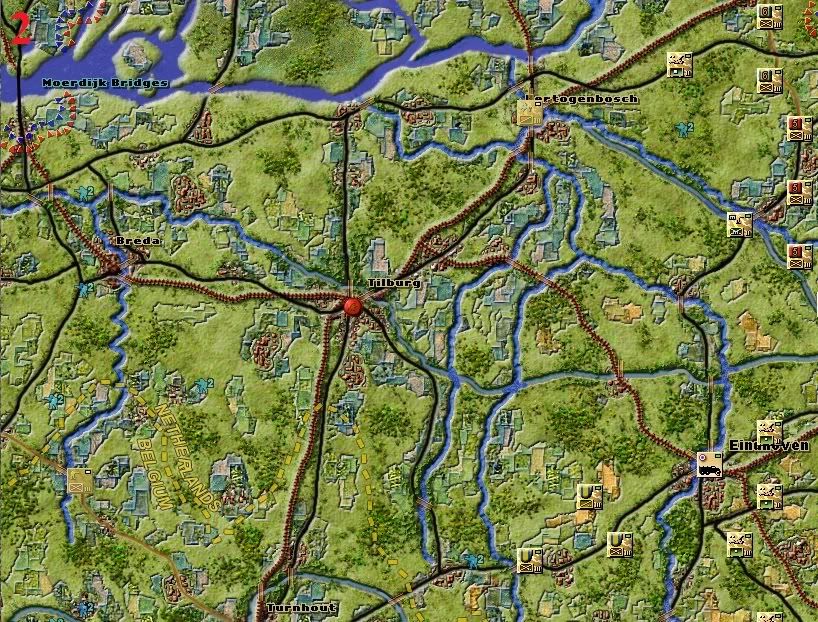
The fight for Holland impedes us to slow down the advancing German 18th Army as much as possible, while we try to destroy the paratroopers near Rotterdam. You may remember that the 9th Pz-Div advanced west of Nijmegen: the fastest way for it to reach the Moerdijk bridge and Rotterdam is the road along the south bank of the Waal, which goes through Hertogenbosch.

StHertogensboch.jpg


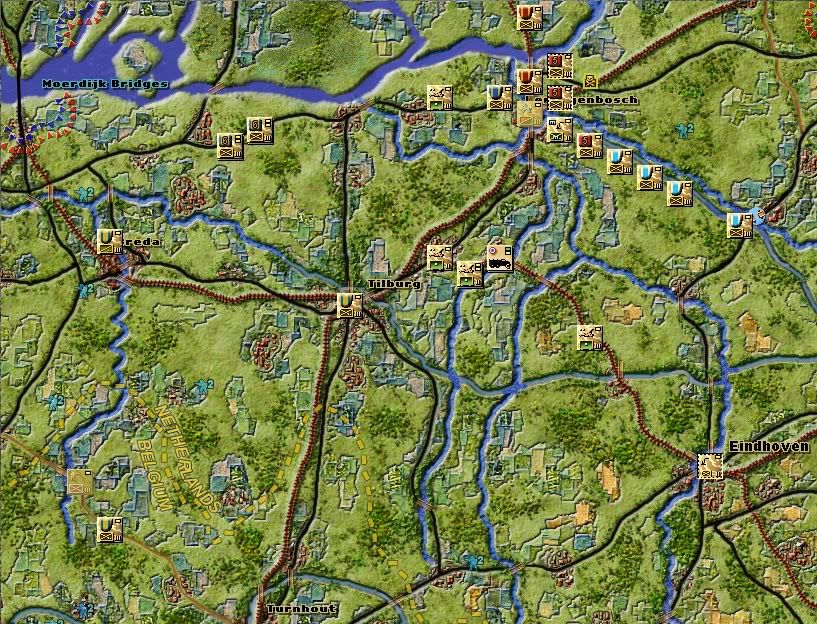
A solid defensive position is therefore established near the town, including a minefield I just laid (minefields deny tactical shifts just like rivers) and behind which two regiments of the 5th Division are entrenched. The Peel Division takes position behind a river southeast of the town, with its southernmost regiment guarding a bridge it just blew up. The 6th Division has been sent further west to try to retake the Moerdijk bridge. The weakest spot in this line of defense is the corridor behind the Rhine and the Waal, which is only defended by a lone regiment. Let's hope my opponent tries to go through Hertogenbosch.

StHertogensbochEnd.jpg


The Eindhoven area does not hold any strategic value. The city itself doesn't give any Victory Points (VPs). That red thing on Tilburg is a strongpoint - a fixed defensive position with a relatively low defense value)

Tilburg.jpg


All available forces are ordered to retreat toward the Moerdijk bridge through Tilburg and Breda. The 3-regiment strong Light Division based west of Eindhoven will assist the 6th Division is trying to retake the bridge from German paratroopers. Its reconnaissance battalion which reached Breda is one of the (only) two elite regiments of the Dutch army. You can spot the aforementioned 6th Division on the road near the Moerdijk bridge. Also note that I've left a single one-step border battalion entrenched in Eindhoven in order to delay the german forces coming from the southeast.

TilburgEnd.jpg


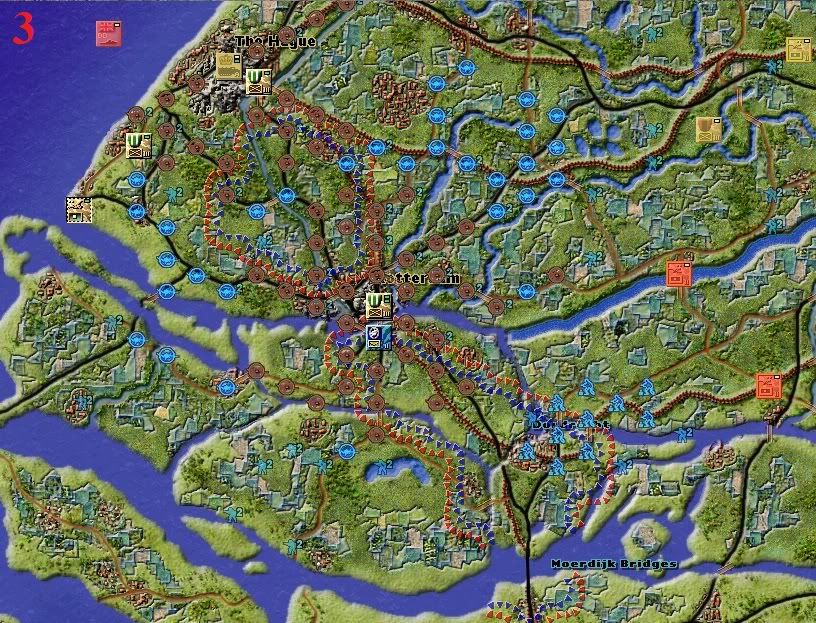
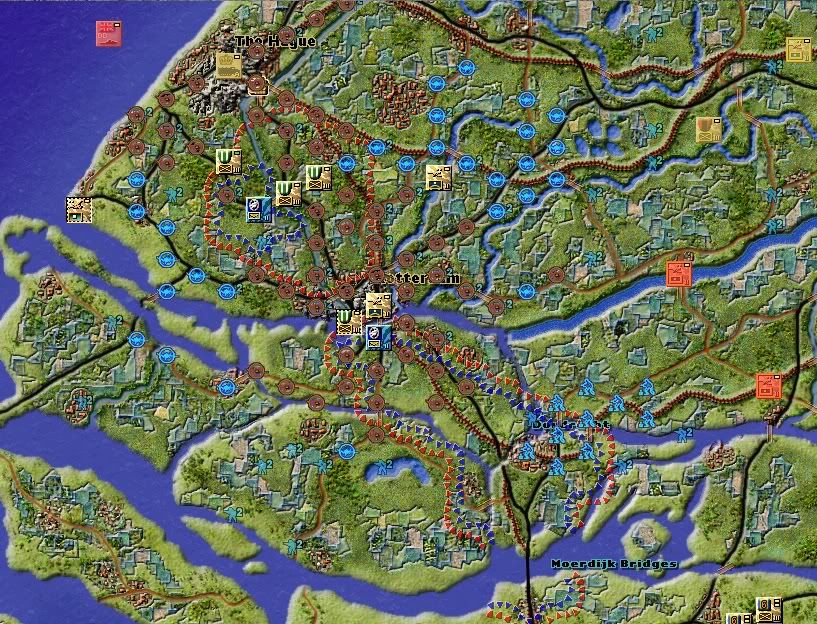
The battle for Rotterdam is going to be messy. If the Germans don't take the city quickly, expect to see a clusterfuck of units fighting around and in the city. The Rotterdam hex with a Dutch regiment on it is THE hex: if the Germans capture it, the Netherlands will surrender.

Rotterdam.jpg


Three Dutch regiments move from The Hague toward the German drop zone, which is protected by a German unit. Unfortunately, those are frail two-steps regiments. The Dutch regiment in Rotterdam moves one hex and entrenches: this way, all the bridges crossing the river are covered (there is a strongpoint hidden underneath the AA unit in the crucial hex - it should be able to withstand a German attack next turn). However, it is of utmost importance that we bring in reinforcements as quickly as possible to better defend the city.
Finally, note that I've moved an AA unit from The Hague to the northeast of Rotterdam in order to facilitate the arrival of friendly reinforcements next turn if this area is once again interdicted.

RotterdamEnd.jpg


Belgian retreat


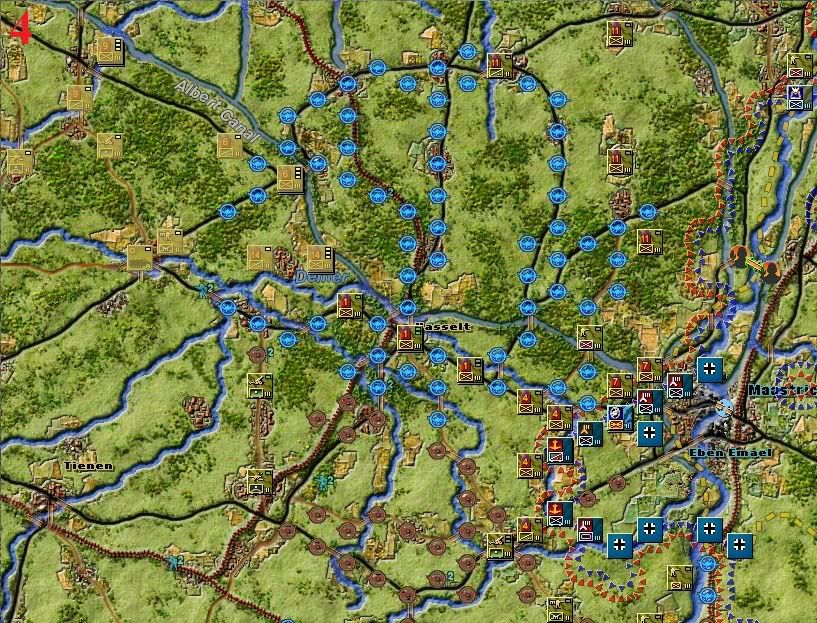
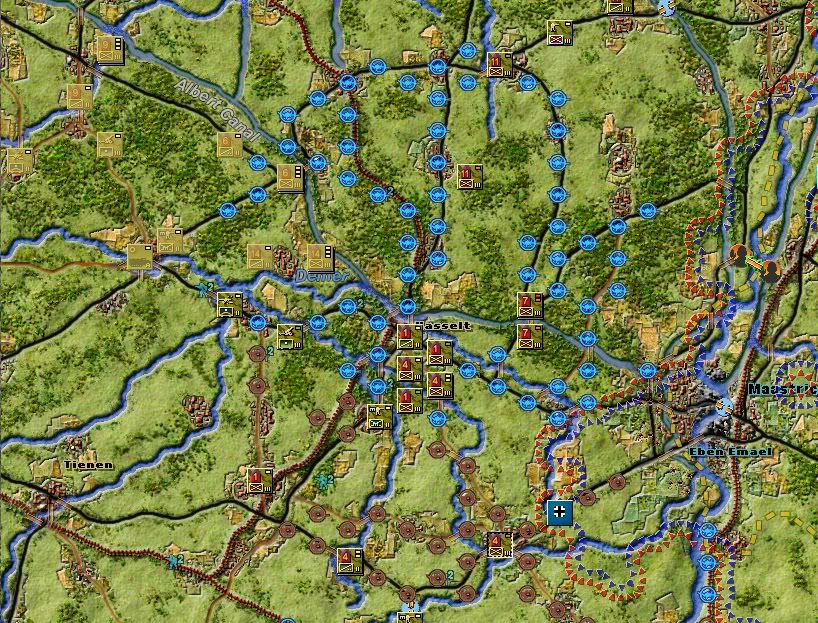
This area has been heavily interdicted, and there is little we can do to stop the German breakthrough. As you can imagine, the supply situation is dire for the divisions east of Hasselt. Notice how the tiny rectangle in the upper-right part of an unit counter changes color from green to grey depending on whether the unit is on a supplied hex or not. When a unit is out of supply, the tiny rectangle becomes red.

AlbertCanal.jpg


I expect my opponent to push hard in the plains toward Tienen, in order to encircle all my units in Hasselt and even those further west on the Albert canal. In order to delay him as much as possble, a few regiments of the 1st and 4th Divisions take position in towns or at strategic crossroads. They are going to get crushed but the enemy will waste some time doing so.

AlbertCanalEnd.jpg


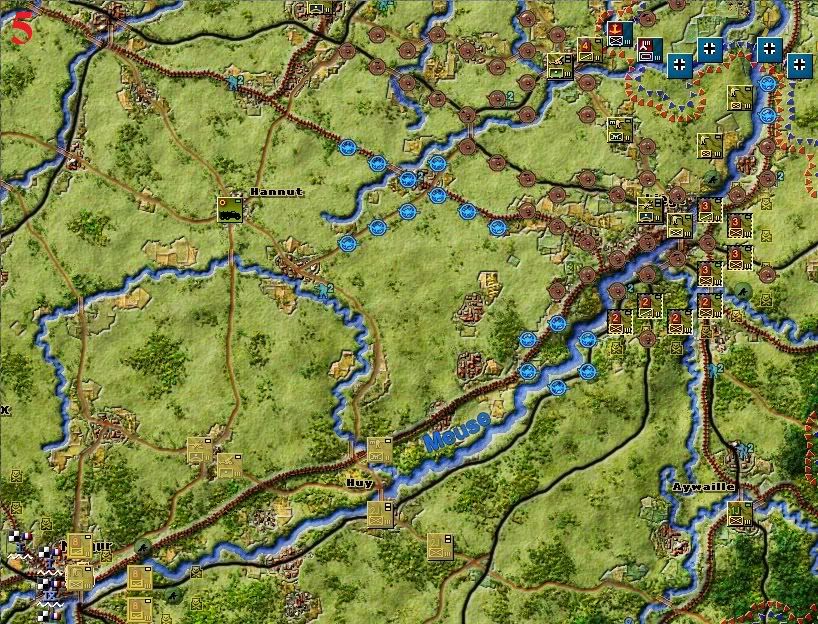
Liège is well defended with minefields and strongpoints manned by the 2nd and 3rd Divisions, but is is worth no VPs and will be surrounded in a turn or two by advancing German forces to the north and to the southeast.

Liege-Namur.jpg


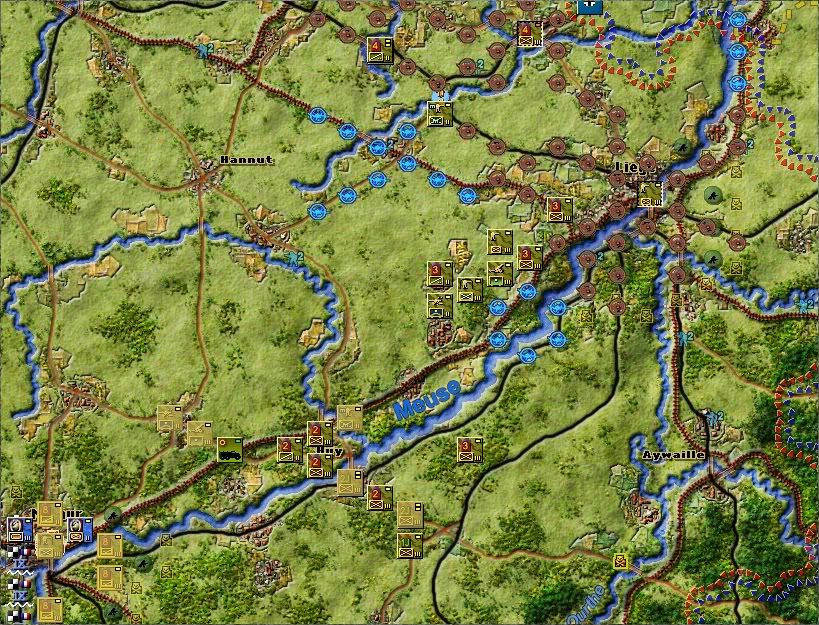
Therefore, a full retreat along the Meuse toward the southwest is ordered. Only a single independent regiment is left in the fortress to hamper mopping up operations by German forces. Aerial interdiction hinders our retreat - the 2nd Division has opted for moving through the uninterdicted south bank of the Meuse but, save for one regiment, the 3rd Division has to opt for the northern bank along with a few independent and support units.
The lone Belgian regiment in Aywaille has moved west toward Huy: on its way, it tried to blow up the bridge over the Ourthe river but failed. To make up for this failure, a minefield has been laid there, in order to slow down enemy forces progressing toward Huy (minefields add a significant movement penalty to their hex). This way, I hope to avoid a pincer movement trapping the units currently retreating from Liège.

Liege-NamurEnd.jpg


Ready to move

Let's take a look at our three main armies before they start their marche forcée toward their assigned positions.

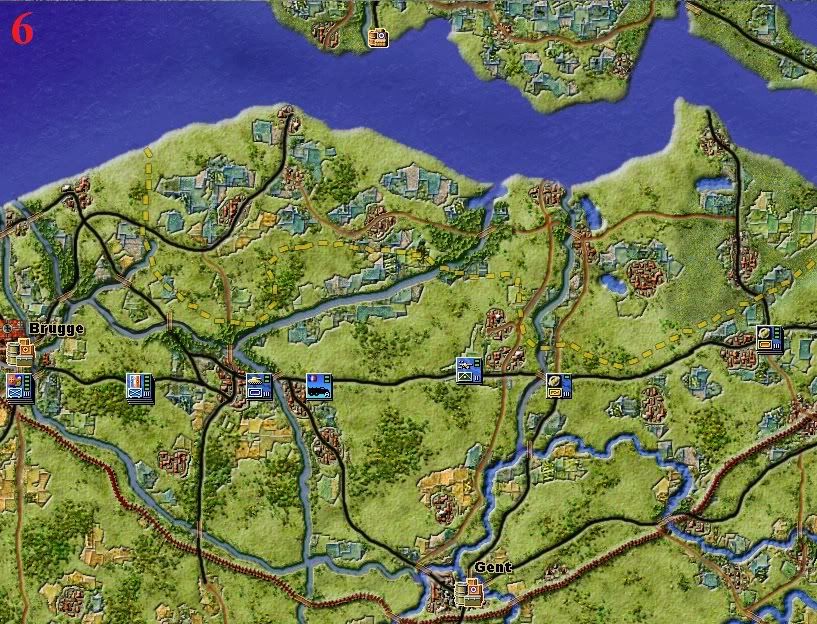
The 7th French Army is stationed west of Antwerp, and is to move south toward Bruxelles and the Senne-Meuse canal. A couple additional infantry divisions are deployed further west and are not visible on the screen. The two divisions near Brugge are motorized infantry divisions (thereafter "D.I.M" for "Division d'Infanterie Motorisée"): unlike their western counterparts, they're very mobile.

7thArmy.jpg


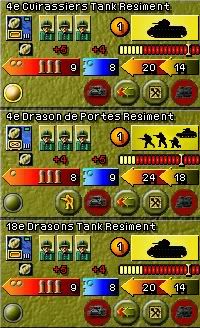
Also, note that I will not move the 1st DLM this turn, as it is in the middle of a refuelling operation. If I moved it now, it would lose the benefit of this refuelling and would be short on fuel for the subsequent turns.

1stDLM.jpg


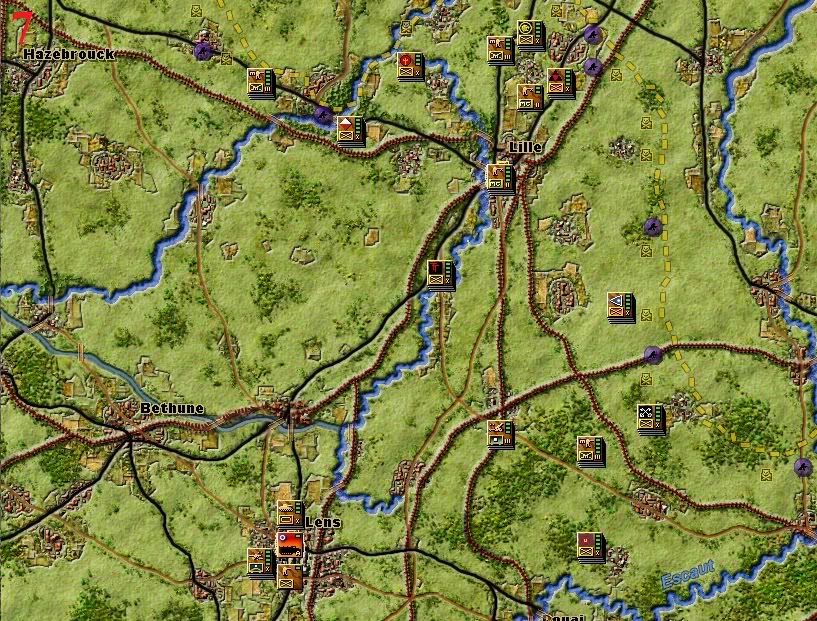
The British Expeditionary Force is stationed at the Belgian border, near Lille and Lens. It is to move east toward the Charleroi area. Unfortunately, it only has three independent armored regiments north of Lens: all the other units travel on foot and are therefore very slow.

BEF.jpg


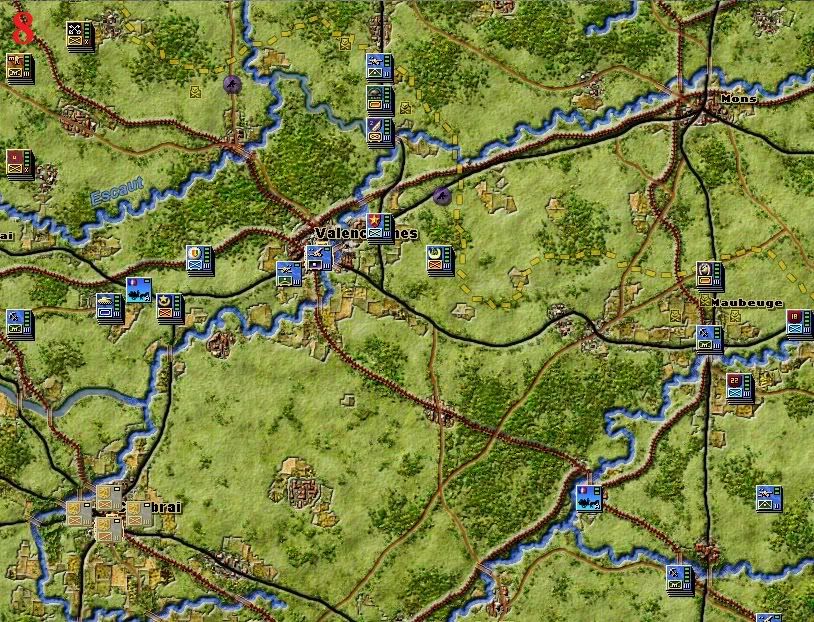
Finally, the 1st French Army is based between Cambrai, Valenciennes and Maubeuge. Try to memorize the icons of the 2nd and 3rd DLMs north of Valenciennes and of the 1st DCR north of Maubeuge (if you forget them, you can still find them on the OOB screens). All the 1st Army units units are going to move east and southeast toward the Meuse. The only exceptions are the 2nd DLM, which will be moving northeast to cover the Gembloux gap as long as the BEF has not arrived in the area, and the 1st DCR which will be sent to Namur: there, depending on the situation of the Belgian troops retreating from Liège, it will either engage enemy forces attempting to cut their retreat, or head south to help defend the area around Dinant.

1stand9thArmy.jpg


The race for the Meuse

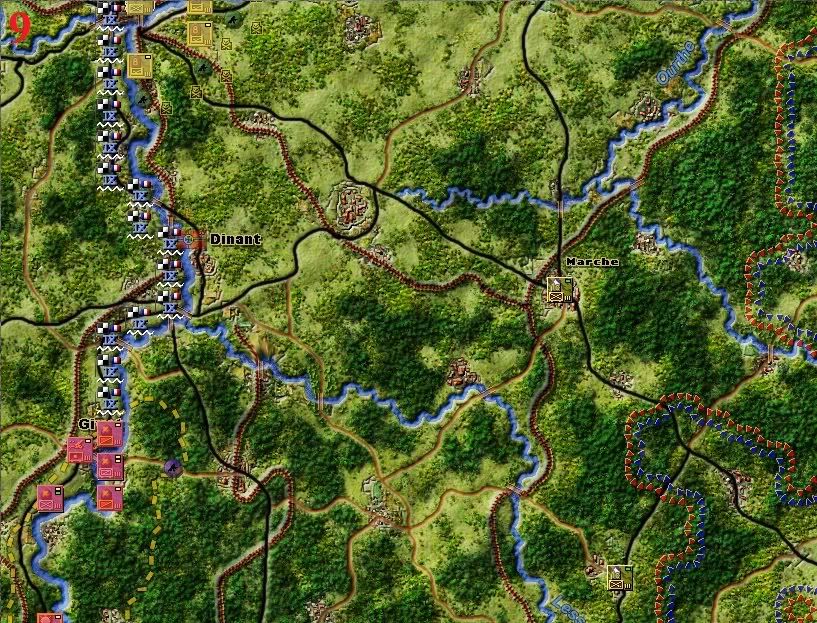
The (surprised) 1st Cavalry Division guards the bridge over the Meuse at Givet: cavalry divisions are pretty good mobile units, usually mixing recon, mechanized, motorized and horses regiments, with one or two regiments being elite (gold background). On the other hand, the bridges around Dinant are not even guarded.

Dinant.jpg


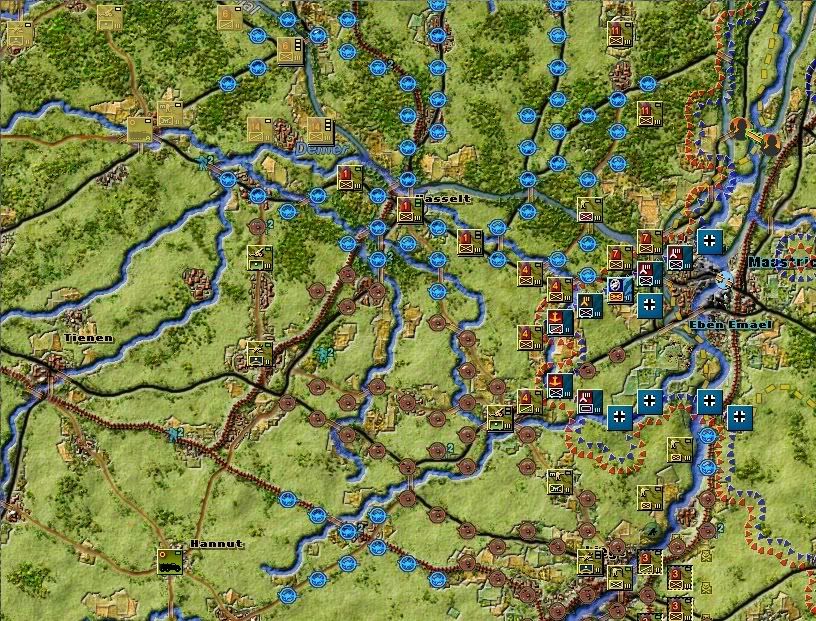
The 4th Cavalry Division has raced to Dinant and secured the bridge. Next turn, I will try to blow up as many of them as possible. (I couldn't do it this turn because the units of the 4th Cavalry used extended movement to get there, and have thus used up their action for this turn). A few other recon battalions have arrived in the area.
If you take a close look at Marche, you can spot a shallow orange icon of a soldier holding a rifle on that hex: before moving west toward Dinant, the Belgian regiment based there left a detachment. Like minefields, detachements have two uses: they deny tactical shifts from that hex (useful when defending) and they add a movement penalty to the hex (useful for slowing fown the enemy). But while it takes several turns to clear an enemy minefield, detachements only last for one turn. REMEMBER THIS!
DinantEnd.jpg


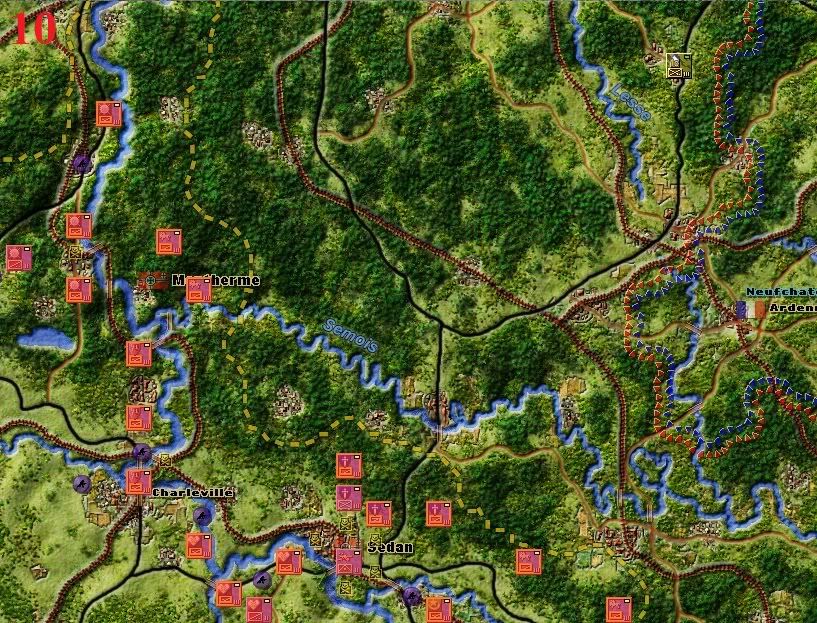
The area around Monthermé is lightly guarded by two substandard French infantry divisions. Remember that substandards divisions may surrender if attacked and are near useless if not stacked with regular or elite units! The 5th Cavalry Division protects the northern access to Sedan, but it is surprised and I have no way of moving it. A lone ATG unit is in the town itself.

Sedan.jpg


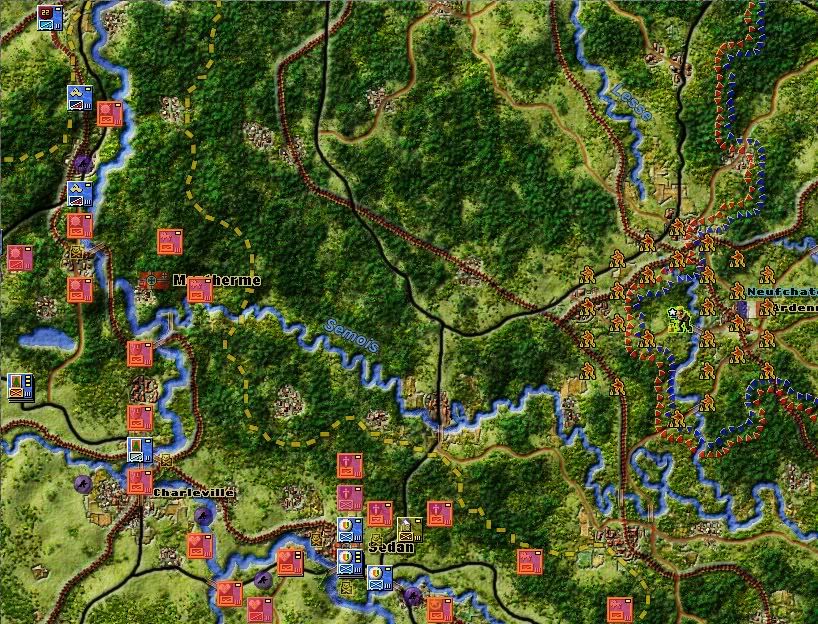
A regular infantry division, the 4th North African Division (thereafter "D.I.N.A" for "Division d'Infanterie Nord-Africaine") arrives by foot west of Monthermé, along with two independent recon units. Moreover, the 5th DIM has been brought by train from the Valenciennes area: the Germans will soon find out that Sedan is a little better defended than they thought. A Belgian regiment retreating from the north covers the road leading to the city, and our only partisan interdiction asset is used on the roads west of Neufchateau in order to slow down the enemy.

SedanEnd.jpg


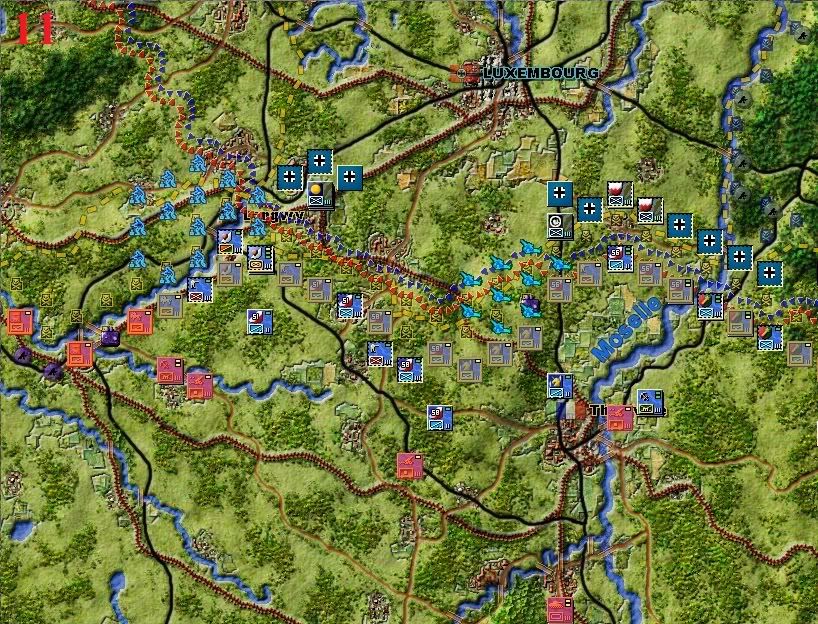
The Maginot line is well-defended: maybe I could try to free up a couple of divisions and send them west toward Sedan?

MaginotLine.jpg


The 3rd Cavalry Division, which was defending Longwy, is sent west, along with three other infantry divisions (one of them you can see on the road west of Thionville).

MaginotLineEnd.jpg


On a side note, do you guys find the pics blurry? When I'm using my computer at work, they look fine. But when I use my laptop at home, they look all blurred. Right-clicking on them and selecting "show picture" (and then zooming in) allows me to see them not blurred but it is not very practical. Any idea why this is?
 
Joined
Nov 1, 2008
Messages
7,953
Location
Cuntington Manor
The pictures are perfectly satisfactory.

Your plan so far seems good. Next turn will show which way the show is going to go.

As for the Ardenne...

v30.jpg


"I have already told you...the Ardenne is untankable!"

.
5943_Gamelin.jpg


"I agree!"

Might as well free up a division or two from the Maginot, depending on how powerful the forts are in this scenario.
 
Joined
Jun 13, 2010
Messages
1,128
Right-clicking on them and selecting "show picture" (and then zooming in) allows me to see them not blurred but it is not very practical. Any idea why this is?
LCD interpolation. Everyone with big enough screen can see them normally.
 

Malakal

Arcane
Glory to Ukraine
Joined
Nov 14, 2009
Messages
10,297
Location
Poland
Even if Maginot forts are a joke there is no real incentive to defend southern areas is there? Any major VP locations there? Unlikely. And with map limitations no real encirclement can take place from there. Move everything you can.

Your screens are fine but I have problems with following your actions. Could you use only one screen in a scene but with added arrows or something like that?
 

zool

Arcane
Joined
Oct 26, 2009
Messages
897
Thanks for the comments, everyone. :salute:

Blackadder said:
Might as well free up a division or two from the Maginot, depending on how powerful the forts are in this scenario.
That I did (see last two screenshots and accompanying text). I've already freed four divisions, and I'm thinking about two others which could be pulled out of the Maginot line without dramatically weakening it. But I first want to see what my opponent does next turn in this area: then, I should have a better idea of whether he intends to attack there or not.


Black Bart Charley said:
Right-clicking on them and selecting "show picture" (and then zooming in) allows me to see them not blurred but it is not very practical. Any idea why this is?

LCD interpolation. Everyone with big enough screen can see them normally.
Oh ok. Good to know you're all seeing the pictures fine though.


Malakal said:
Even if Maginot forts are a joke there is no real incentive to defend southern areas is there? Any major VP locations there? Unlikely. And with map limitations no real encirclement can take place from there. Move everything you can.
The cities south of the Maginot Line (Verdun, Thionville, Metz and a couple others) each give between 5 and 10 VPs per turn: it isn't a lot, considering that the average French infantry regiment is worth 30 VPs, but it's still something if multiplied by 24 turns. Anyway, half of the regiments on the Maginot line are substandard fortress infantry regiment with very low mobility, so I can't really move them elsewhere. I've already pulled out four divisions, and I could pull out two more while keeping the Maginot line intact.

Malakal said:
Your screens are fine but I have problems with following your actions. Could you use only one screen in a scene but with added arrows or something like that?
I've thought about this but the truth is that - as you might have noticed - I suck badly at editing pictures. I don't even know how to make curved arrows in Photoshop Elements :oops:. So the screens would probably end up looking terrible. Except if you have no problems with Paint-edited pics of course. I figured the start-of-turn vs end-of-turn pics + accompanying text describing what I've done would make up for the lack of arrows and such.
 

Malakal

Arcane
Glory to Ukraine
Joined
Nov 14, 2009
Messages
10,297
Location
Poland
Paint ones are fine for me, there is simply too much units with too much symbols there for me, I can't follow your brilliant tactics (hopefully brilliant).
 

GarfunkeL

Racism Expert
Joined
Nov 7, 2008
Messages
15,463
Location
Insert clever insult here
Pics look fine to me, 1440x900 here.

What you could do is just use the circle-tool in Paint to point out points of interest in the maps. The game tries to convey at lot of information through the counters, leading to cluttered-sreenshots problem Malakal talks about.
 

As an Amazon Associate, rpgcodex.net earns from qualifying purchases.
Back
Top Bottom