


-
Welcome to rpgcodex.net, a site dedicated to discussing computer based role-playing games in a free and open fashion. We're less strict than other forums, but please refer to the rules.
"This message is awaiting moderator approval": All new users must pass through our moderation queue before they will be able to post normally. Until your account has "passed" your posts will only be visible to yourself (and moderators) until they are approved. Give us a week to get around to approving / deleting / ignoring your mundane opinion on crap before hassling us about it. Once you have passed the moderation period (think of it as a test), you will be able to post normally, just like all the other retards.
You are using an out of date browser. It may not display this or other websites correctly.
You should upgrade or use an alternative browser.
You should upgrade or use an alternative browser.
Let's Play Fall Gelb (Allied #6 - To the Dyle!)
- Thread starter zool
- Start date
zool
Arcane
- Joined
- Oct 26, 2009
- Messages
- 897
Funny, because I actually decided to try this game after having seen a few screenshots: I remember thinking "Whoa, a wargame that doesn't look like shit for once. Let's try it!". I find the map and unit counters to be visually very appealing. The rest of the interface is somewhat "unique" though - not necessarily in a good or bad way.

zenbitz
Scholar
- Joined
- Feb 2, 2009
- Messages
- 295
It's clearly an upgrade from the "old days" but someone with some graphic design was badly need for this:
1) There are better ways to use hexes and not have the terrain features map exactly
2) Unit "counters" are way way way too busy. Probably some sort of semantic zooming (i.e,. less info as you zoom out)
3) map colors/textures are garish and hard to read. It's like they tried to make it look like a true color satellite map... but did a bad job.
I don't even want to think about actually using the GUI.
What about the combat is strange, specifically. What are "realistic results". My favorite table top war game series (OCS from http://www.multimanpublishing.com) has a great "surprise" feature which when coupled with fog of war (not knowing strength of forces you are attacking, except for "top" unit) means that you have to REALLY plan because things don't happen the way you expect them too (like you know, war)
not an artichoke
Cipher
- Joined
- Aug 21, 2010
- Messages
- 272
Unit counters are pretty clear, in my opinion. NATO symbol and unit size indicator in the bottom half; divisional emblem and status indicator bar on the top. It's easy to tell what's what at a glance. My only criticism is that the divisional emblems are sometimes difficult to read and keep straight, but I love the flavor of using them and not just colored borders or something.
zool
Arcane
- Joined
- Oct 26, 2009
- Messages
- 897
zenbitz said:It's clearly an upgrade from the "old days" but someone with some graphic design was badly need for this:
1) There are better ways to use hexes and not have the terrain features map exactly
2) Unit "counters" are way way way too busy. Probably some sort of semantic zooming (i.e,. less info as you zoom out)
3) map colors/textures are garish and hard to read. It's like they tried to make it look like a true color satellite map... but did a bad job.
I don't even want to think about actually using the GUI.
Ok, I must admit the graphical feel is somewhat "unique", and I understand that some may find it ugly. I loved the map and unit counters at first sight, though it took me some time to appreciate the rest of the GUI. It's not as stern as wargames usually are, and sometimes even feel a little amateurish but I just grew fond of it.
I disagree about unit counters, I find them to be very clear and informative - though by now, I've played the game for so long that I can't quite remember what my first impressions on that were.
One of the biggest complaint I have about the game though is the lack of different resolutions: you can only play in 1024x768 or 1280x1024 (not available to me due to being on a laptop).
zenbitz said:What about the combat is strange, specifically. What are "realistic results". My favorite table top war game series (OCS from http://www.multimanpublishing.com) has a great "surprise" feature which when coupled with fog of war (not knowing strength of forces you are attacking, except for "top" unit) means that you have to REALLY plan because things don't happen the way you expect them too (like you know, war)
I've described how combat work in an earlier post, and all I can say about it is that it does a correct job at simulating actual losses. The dice roll simulates the fact that "things don't happen the way you expect them to".
not an artichoke said:Unit counters are pretty clear, in my opinion. NATO symbol and unit size indicator in the bottom half; divisional emblem and status indicator bar on the top. It's easy to tell what's what at a glance. My only criticism is that the divisional emblems are sometimes difficult to read and keep straight, but I love the flavor of using them and not just colored borders or something.
Thanks for taking the time to do what I was too lazy to write (i.e an explanation of units counters).

I really appreciate the fact that game counters show divisional emblems - it adds a lot to the flavor indeed. Dutch and Belgian units are particularly easy to follow considering that their division emblem is their division number (I assume everyone has figured that out by now...), although obviously, independent battalions and a few divisions (Peel division, ...) don't have a number.
zool
Arcane
- Joined
- Oct 26, 2009
- Messages
- 897
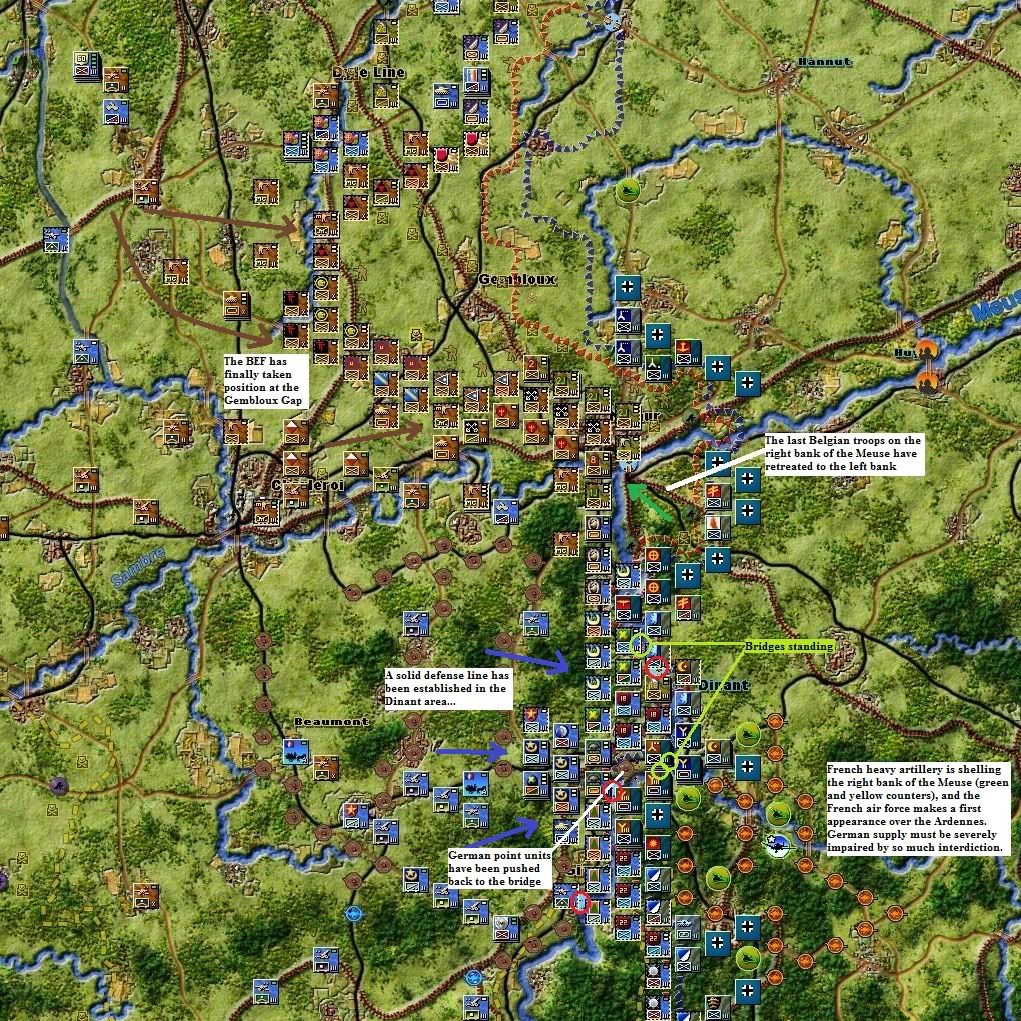
Turn 4 (Axis) - Hitler's thrust slows down
My opponent has had a moderately successful turn: he was only able to secure one very limited crossing over the Meuse at Dinant, and he didn't take advantage of my weak defense line at the Gembloux Gap. Instead, he favored attacking Namur's northern defense where he only made some very limited progress. In Belgium, he has ceased attempts to cut off the bulk of Belgian forces from their lines, and seems instead intent on storming Antwerp. That said, take my optimistic statements with a grain of salt: the Allied forces situation remains precarious, and the Axis strength remains formidable
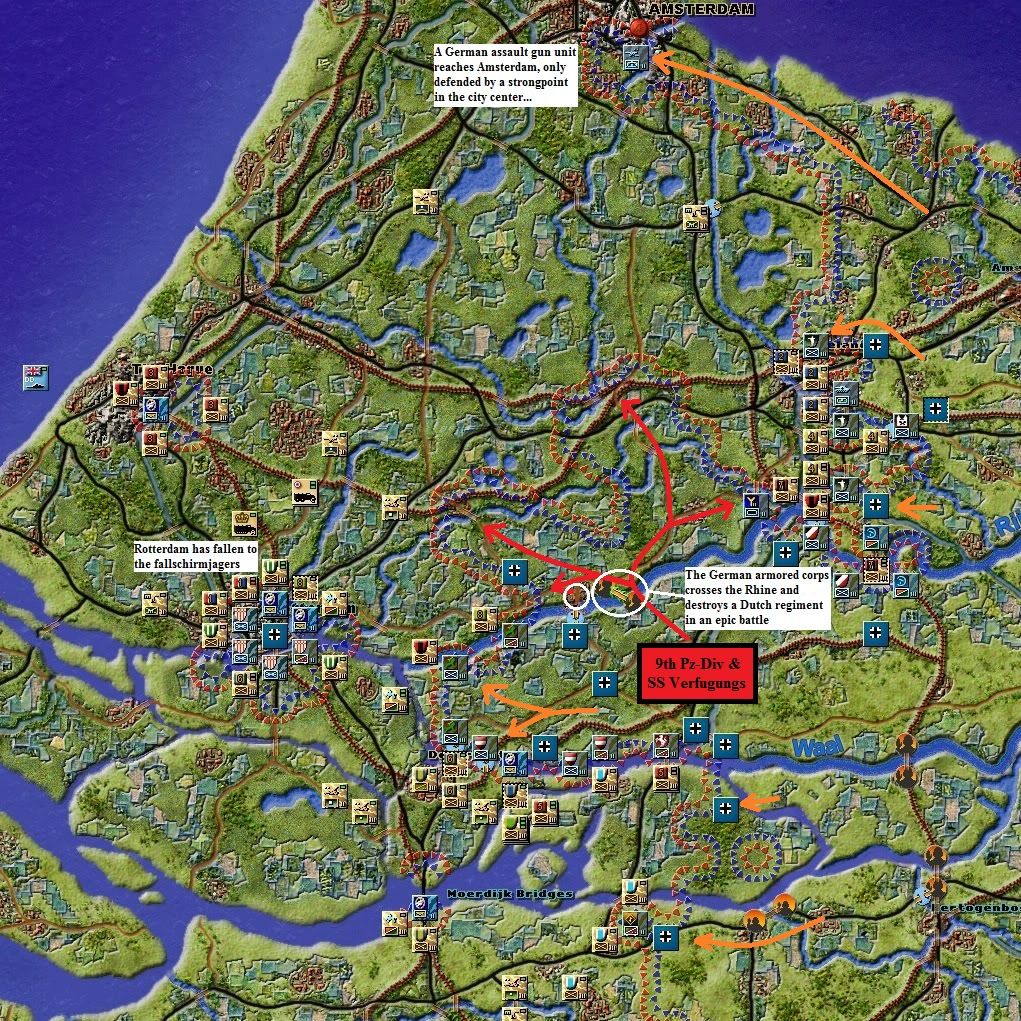
Holland: disaster averted
Action in the northern part of Holland is only secondary, though obviously, I can't hold a full line there. The road to Amsterdam is open. Visibly aware of my weakness there and trying to put as much pressure as possible, the enemy has exposed one of his recon battalions south of Zeeland (Utrecht): we'll see during my turn if we can make him pay.
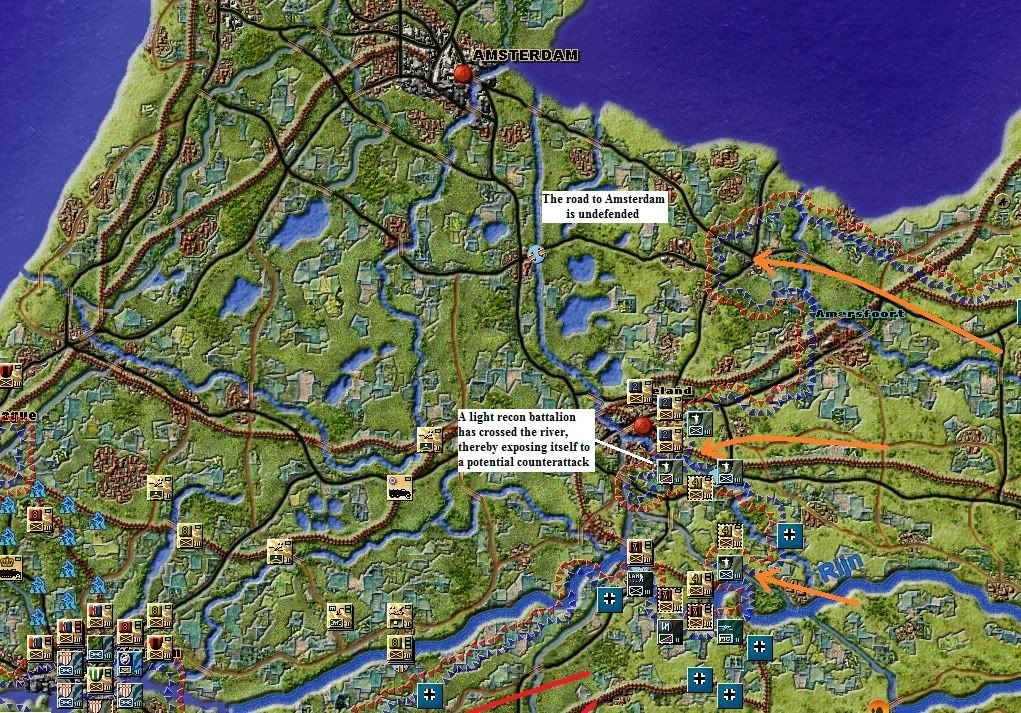
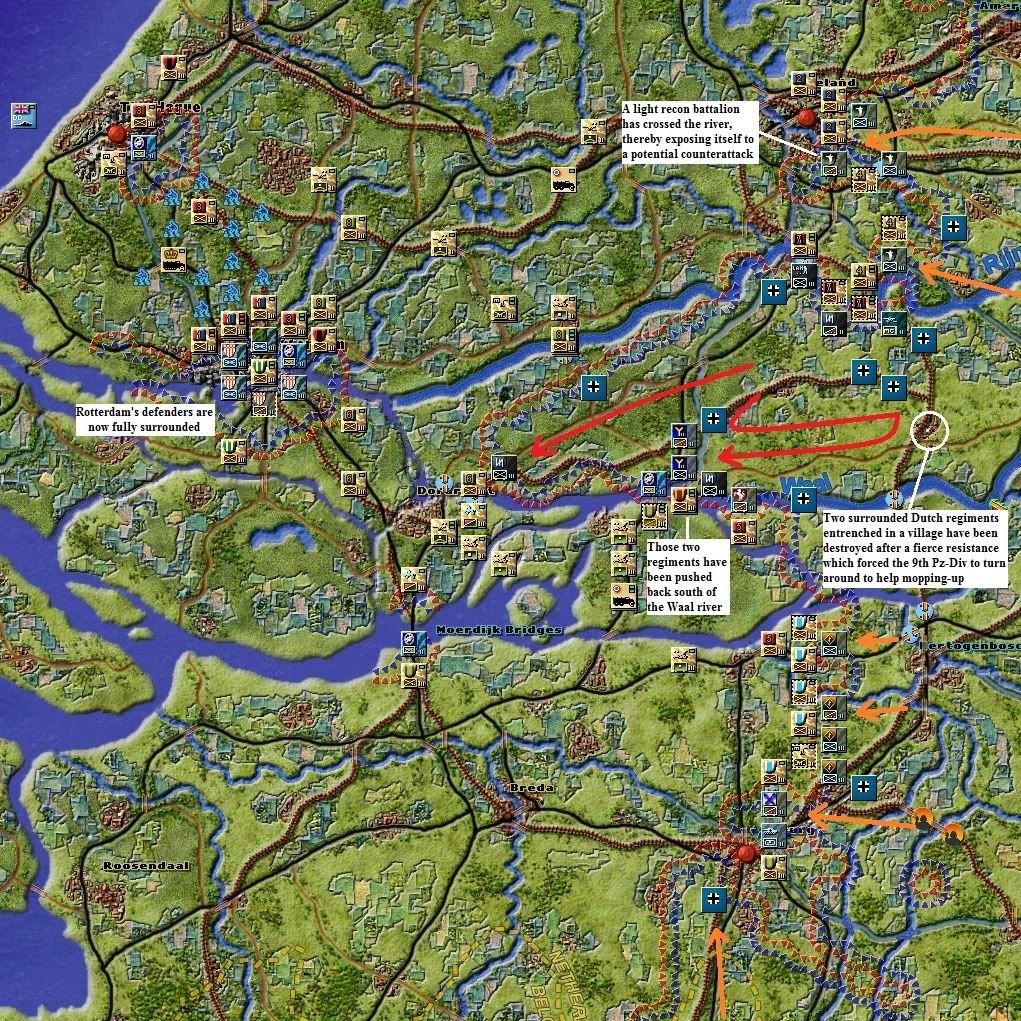
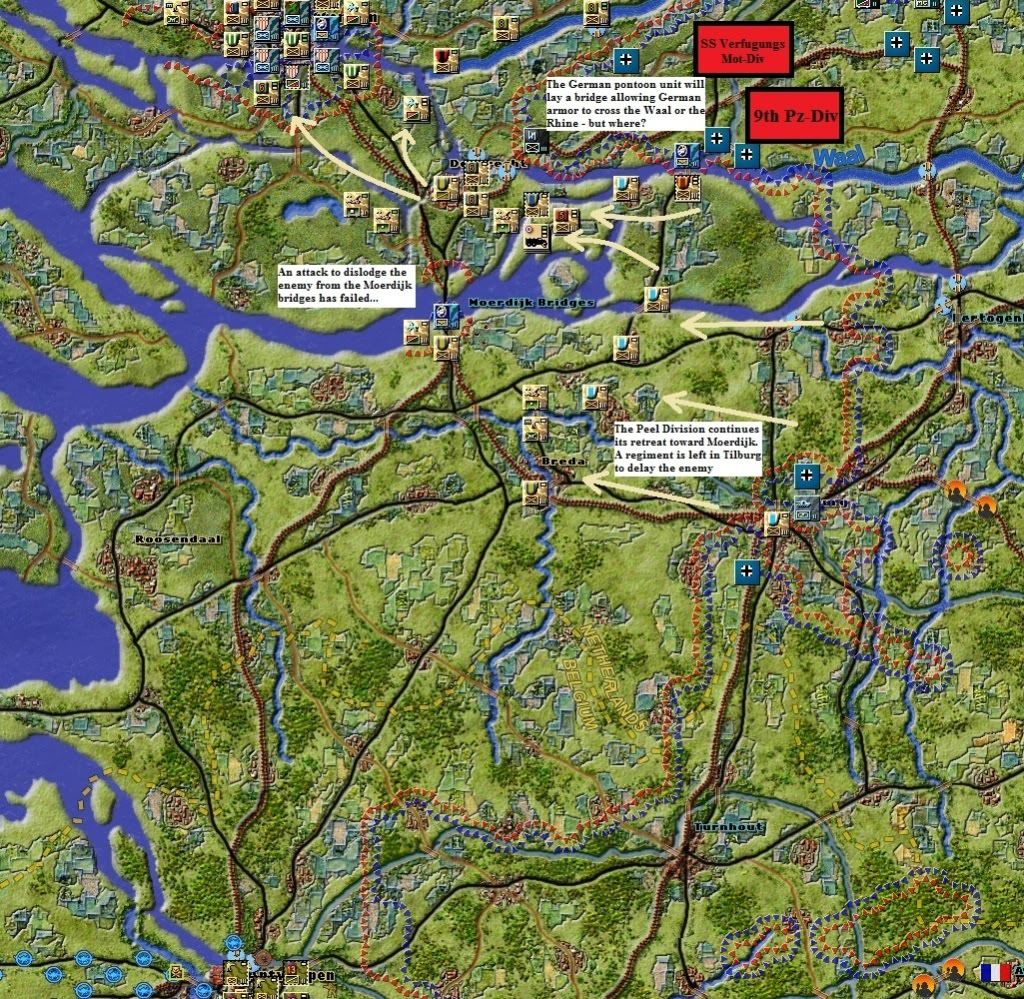
Central and southern Holland are where the action's at. The two elite German divisions (9th Pz-Div and SS Verfugungs Mot-Div) are now trapped between the Waal and the Rhine. Thankfully, my opponent has been delayed by Dutch stragglers and hasn't seized the occasion to attack and cross the only bridge still standing over the Waal. That will give us some time to reorganize, though an enemy pontoon unit has been spotted in the vicinity: there is little doubt that my opponent is planning to cross the Rhine or the Waal somewhere next turn in order to continue his progression toward Rotterdam, which is now fully surrounded. Yet, German paratroopers haven't been able to muster enough strength to attack the city.
South, a German infantry division coming from Hertogenbosch continues to put pressure on the Peel division, which is also threatened to be turned on its south flank near Tilburg.
Belgium: Hitler's thrust is slowed down
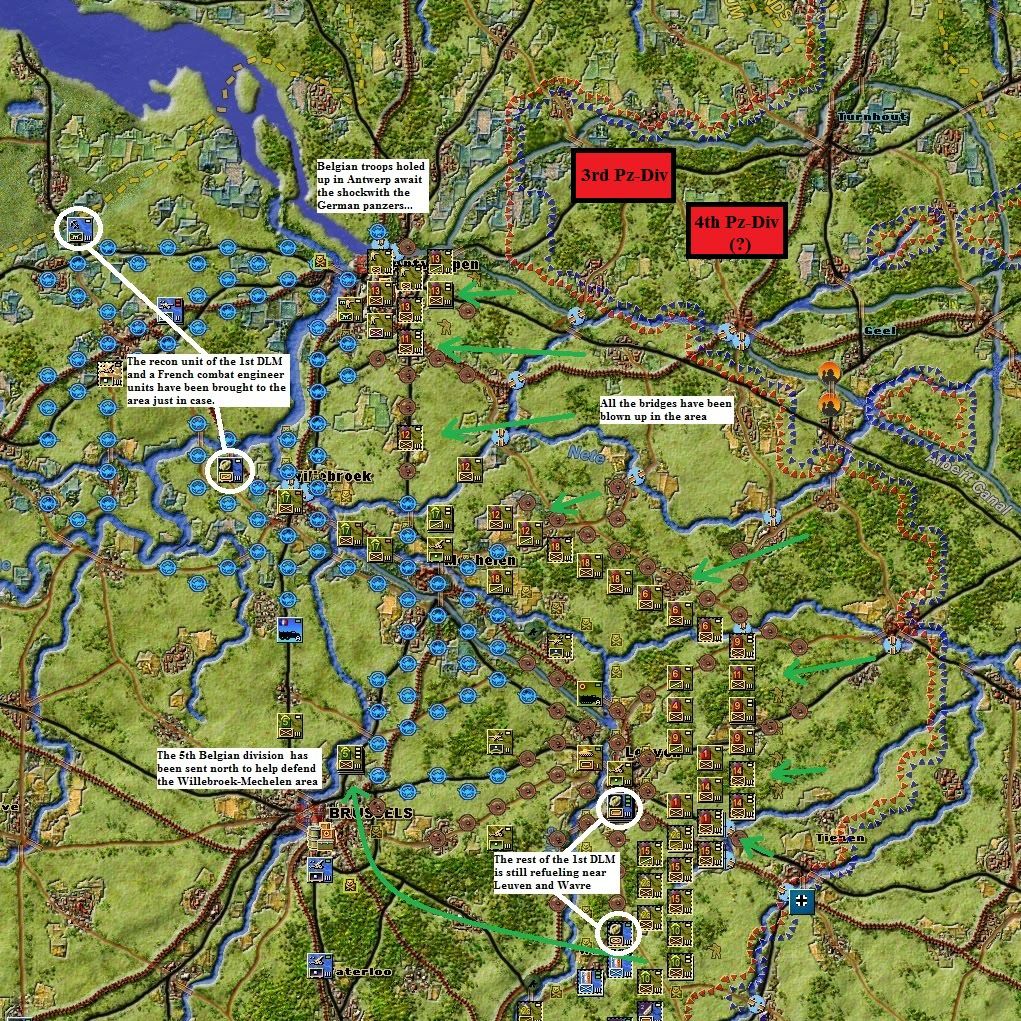
My plan to extricate the bulk of the Belgian army from the Albert Canal to the Dyle river and the Brussels area is working wonderfully. The 4th Pz-Div hasn't attempted any attack against the southern flank of the bulge - in fact, I haven't spotted it for the whole turn, which probably means that my opponent sent it south toward Gembloux.. The north flank of the bulge has been similarly left alone, with only very limited probing from German infantry units all around the bulge.
The heavy use of aerial interdiction by my opponent around Antwerp, coupled with rapid German progress form the Turnhout area toward the Belgian port, seems to indicate that he may be trying to storm Antwerp with its 3rd Pz-Div. During my turn, I'll use a recon unit to probe those two unidentified German units near Antwerp and see if I'm right.
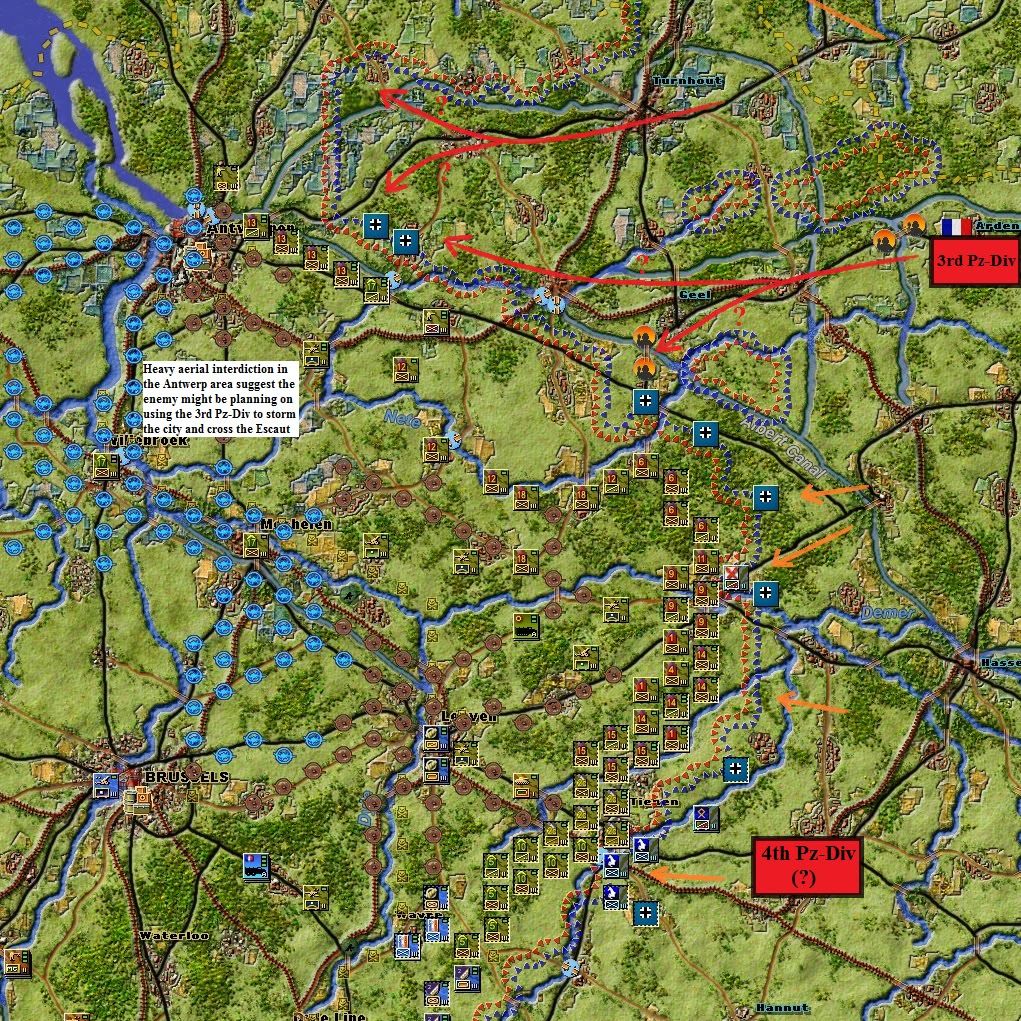
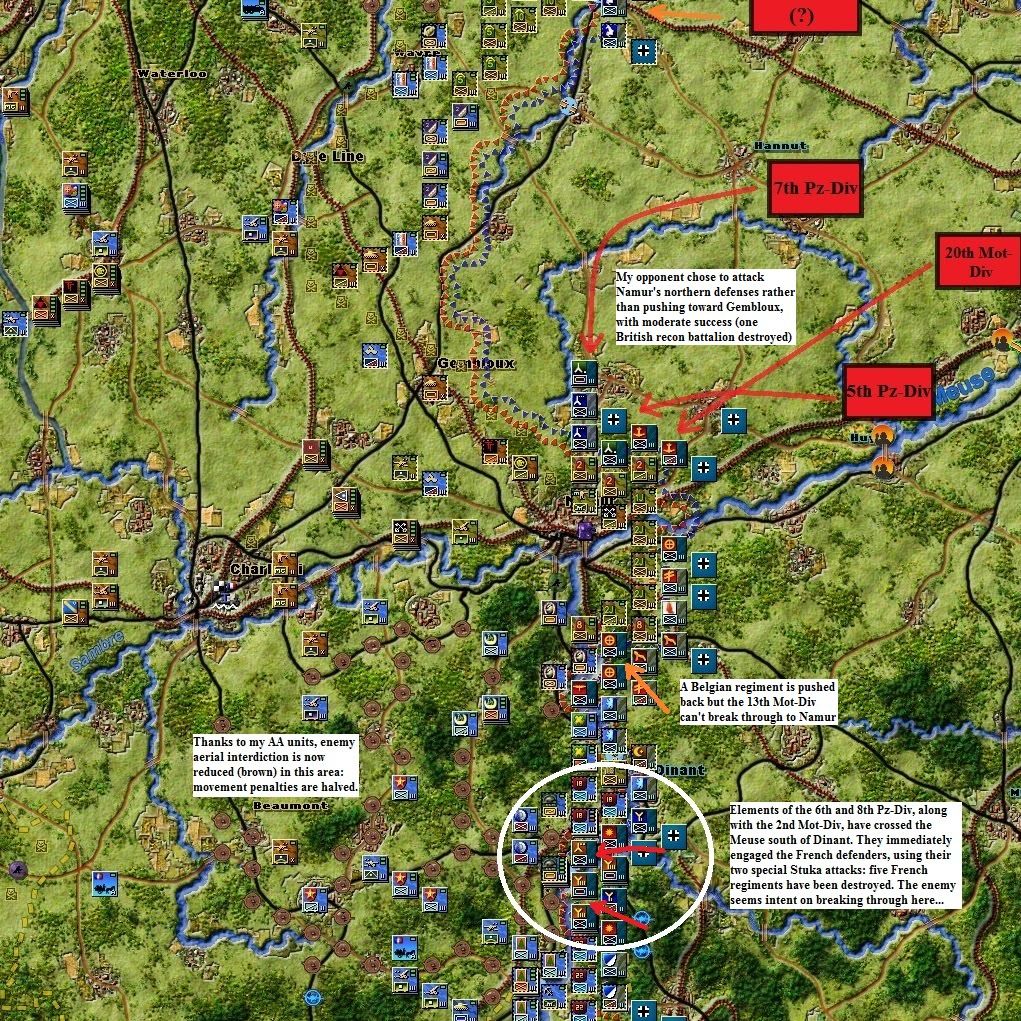
And now, the central and most important area of the whole campaign: the Gembloux Gap and the Dinant-Givet area. As you can see, my opponent missed an occasion to break through my line at Gembloux before the BEF was in position. Instead, he attacked the northern defenses of Namur, where the Anglo-Belgian forces held valiantly, even though the recon battalion of the British 1st Division was destroyed in the encounter - the first British loss. The absence of any enemy aerial interdiction around Gembloux will facilitate the BEF positioning when I play my turn.
East, Liege's defenders are still holding the city but are now out of ammo, and will certainly surrender next turn (not visible on the screenshot).
South of Namur, the Belgian 8th Division and 2nd Ardense Jagers Division are holding German efforts to progress northwest through the woods toward Namur. At Dinant, my opponent has used both of his special Stuka attacks to get some breathing air on the west bank of the Meuse. Though five French regiments have been destroyed, the enemy bridgehead is still very limited in size: the Pz-Div can't deploy and outmaneuver my units, and are thus pretty much as useful as any normal infantry division. Two additional French DINA are arriving and will serve to make up for the loss of those five regiments. If I can prevent my opponent from breaking out of his tiny bridgehead, I'll be more than satisfied.
France: pressure around Montmédy
The southern part of the Ardennes around Monthermé is eerily calm. That's a good thing, because my line there is mostly held by susbtandard units, shouldered by a couple of regular or elite independent units, except at Sedan where the solid 5th Cavalry and 5th DIM are holding the only road leading to the town.
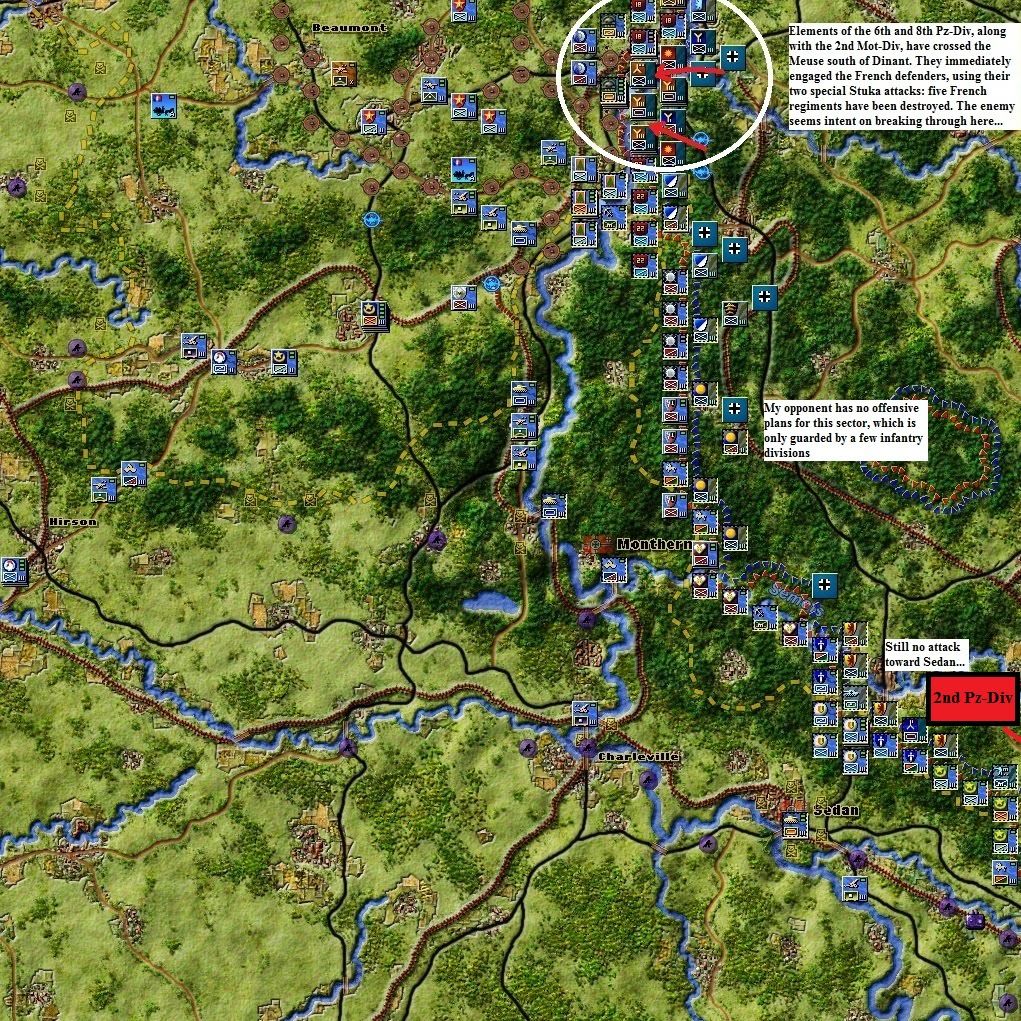
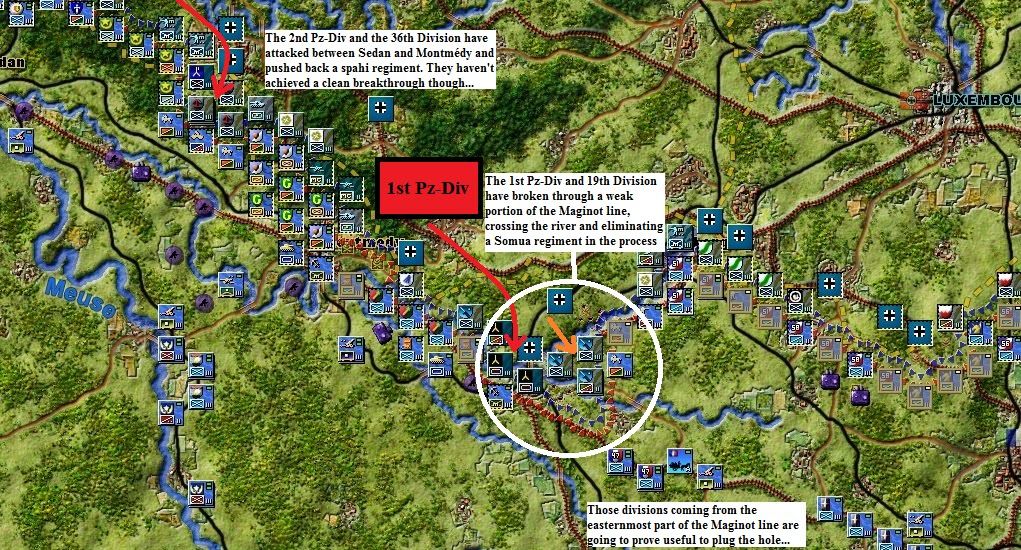
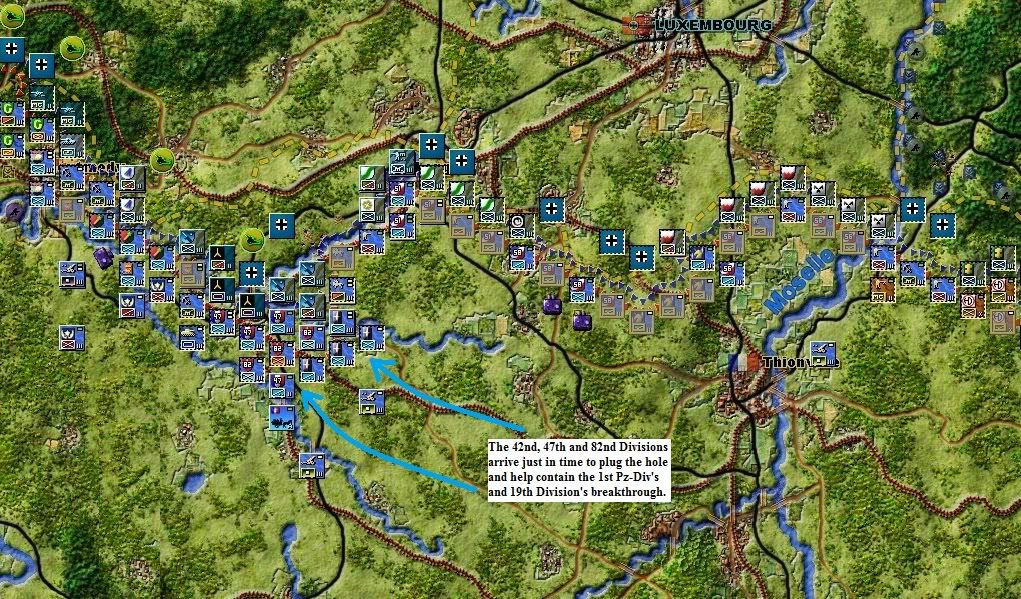
Instead, the enemy is putting a lot more pressure east of Sedan. The 2nd Pz-Div and 36th Division have tried to break through in the forest between Sedan and Montmédy, pushing back a spahi (colonial cavalry) regiment but failing to achieve a clean breakthrough. The 1st Pz-Div and 19th Division have been more successful to the southeast where they found a weak point in the Maginot line and broke through. Thankfully, that breakthrough coincides with the arrival in the sector of several infantry divisions I freed from the eastern part of the Maginot line. Consequently, I'm not too worried about it, even if I will closely monitor the situation there.
My opponent has had a moderately successful turn: he was only able to secure one very limited crossing over the Meuse at Dinant, and he didn't take advantage of my weak defense line at the Gembloux Gap. Instead, he favored attacking Namur's northern defense where he only made some very limited progress. In Belgium, he has ceased attempts to cut off the bulk of Belgian forces from their lines, and seems instead intent on storming Antwerp. That said, take my optimistic statements with a grain of salt: the Allied forces situation remains precarious, and the Axis strength remains formidable
Holland: disaster averted
Action in the northern part of Holland is only secondary, though obviously, I can't hold a full line there. The road to Amsterdam is open. Visibly aware of my weakness there and trying to put as much pressure as possible, the enemy has exposed one of his recon battalions south of Zeeland (Utrecht): we'll see during my turn if we can make him pay.
Central and southern Holland are where the action's at. The two elite German divisions (9th Pz-Div and SS Verfugungs Mot-Div) are now trapped between the Waal and the Rhine. Thankfully, my opponent has been delayed by Dutch stragglers and hasn't seized the occasion to attack and cross the only bridge still standing over the Waal. That will give us some time to reorganize, though an enemy pontoon unit has been spotted in the vicinity: there is little doubt that my opponent is planning to cross the Rhine or the Waal somewhere next turn in order to continue his progression toward Rotterdam, which is now fully surrounded. Yet, German paratroopers haven't been able to muster enough strength to attack the city.
South, a German infantry division coming from Hertogenbosch continues to put pressure on the Peel division, which is also threatened to be turned on its south flank near Tilburg.
Belgium: Hitler's thrust is slowed down
My plan to extricate the bulk of the Belgian army from the Albert Canal to the Dyle river and the Brussels area is working wonderfully. The 4th Pz-Div hasn't attempted any attack against the southern flank of the bulge - in fact, I haven't spotted it for the whole turn, which probably means that my opponent sent it south toward Gembloux.. The north flank of the bulge has been similarly left alone, with only very limited probing from German infantry units all around the bulge.
The heavy use of aerial interdiction by my opponent around Antwerp, coupled with rapid German progress form the Turnhout area toward the Belgian port, seems to indicate that he may be trying to storm Antwerp with its 3rd Pz-Div. During my turn, I'll use a recon unit to probe those two unidentified German units near Antwerp and see if I'm right.
And now, the central and most important area of the whole campaign: the Gembloux Gap and the Dinant-Givet area. As you can see, my opponent missed an occasion to break through my line at Gembloux before the BEF was in position. Instead, he attacked the northern defenses of Namur, where the Anglo-Belgian forces held valiantly, even though the recon battalion of the British 1st Division was destroyed in the encounter - the first British loss. The absence of any enemy aerial interdiction around Gembloux will facilitate the BEF positioning when I play my turn.
East, Liege's defenders are still holding the city but are now out of ammo, and will certainly surrender next turn (not visible on the screenshot).
South of Namur, the Belgian 8th Division and 2nd Ardense Jagers Division are holding German efforts to progress northwest through the woods toward Namur. At Dinant, my opponent has used both of his special Stuka attacks to get some breathing air on the west bank of the Meuse. Though five French regiments have been destroyed, the enemy bridgehead is still very limited in size: the Pz-Div can't deploy and outmaneuver my units, and are thus pretty much as useful as any normal infantry division. Two additional French DINA are arriving and will serve to make up for the loss of those five regiments. If I can prevent my opponent from breaking out of his tiny bridgehead, I'll be more than satisfied.
France: pressure around Montmédy
The southern part of the Ardennes around Monthermé is eerily calm. That's a good thing, because my line there is mostly held by susbtandard units, shouldered by a couple of regular or elite independent units, except at Sedan where the solid 5th Cavalry and 5th DIM are holding the only road leading to the town.
Instead, the enemy is putting a lot more pressure east of Sedan. The 2nd Pz-Div and 36th Division have tried to break through in the forest between Sedan and Montmédy, pushing back a spahi (colonial cavalry) regiment but failing to achieve a clean breakthrough. The 1st Pz-Div and 19th Division have been more successful to the southeast where they found a weak point in the Maginot line and broke through. Thankfully, that breakthrough coincides with the arrival in the sector of several infantry divisions I freed from the eastern part of the Maginot line. Consequently, I'm not too worried about it, even if I will closely monitor the situation there.
zenbitz
Scholar
- Joined
- Feb 2, 2009
- Messages
- 295
huh, I am starting to get used to the maps now - at least at the above zoom level.
Counters are still fugly though.
I don't know why people bother to make war games like this with hexes and "counters" for a computer however. You could just treat them as blobs and the terrain as more or less continuous (or interpolated, or whatever).
Counters are still fugly though.
I don't know why people bother to make war games like this with hexes and "counters" for a computer however. You could just treat them as blobs and the terrain as more or less continuous (or interpolated, or whatever).
Kashmir Slippers
Magister
Looking good.
What is your backup plan if your opponent's breakthroughs at the Meuse and/or the Maginot Line turn out more successful than anticipated? Do you have any considerable force stashed behind the lines, or have you put all of your luck at the defense lines?
What is your backup plan if your opponent's breakthroughs at the Meuse and/or the Maginot Line turn out more successful than anticipated? Do you have any considerable force stashed behind the lines, or have you put all of your luck at the defense lines?
zool
Arcane
- Joined
- Oct 26, 2009
- Messages
- 897
Kashmir Slippers said:Looking good.
What is your backup plan if your opponent's breakthroughs at the Meuse and/or the Maginot Line turn out more successful than anticipated? Do you have any considerable force stashed behind the lines, or have you put all of your luck at the defense lines?
Most of my reserves are concentrated at the Gembloux Gap and on the Meuse (Dinant area). That said, at some point, I'm going to have to make a choice between forming a solid frontline - which means using some of my reserve on the frontline - with the risk of the enemy still breaking through, or a weaker one but with plenty of reserves. Ideally, I would keep two DLMs and some British armor behind my line to serve as emergency reserve units.
Regarding the Maginot line, I've stripped its easternmost portion of all non-essential units: it is pretty much devoid of any reserve. However, my opponent has shown no intention of attacking there. The westermost portion of the Maginot line, where he has broken through, is being reinforced by those very units I pulled from the eastern portion of the line. Three divisions are going to plug that hole, and he only has the 1st Pz-Div there (though he could conceivably bring the 2nd Pz-Div too). Moreover, this area is quite close to the map edge, where a couple of fresh divisions are going to arrive in the next few turns.
An attack through the Maginot line! French High Command was right after all! All those billions of franks were spent well.
This is what I like, a full scale assault between two strong forces. Not very blitzkrieg like but nice to look at.
This is what I like, a full scale assault between two strong forces. Not very blitzkrieg like but nice to look at.
Orgasm
Barely Literate
- Joined
- May 4, 2010
- Messages
- 1,360
Does the game count VPs every turn? How is the score?
I never played the game but can we declare that you've won? The scenario description says that ze Germans win by destroying units, mostly thorough the massive surrenders that trigger if the capitals fall. Now its the 6th turn and he is nowhere near taking any of them. Amsterdam is surrounded, yes, but its your turn and I see lotsa units coming to relief the poor beggars in the cauldron.
Where is his unstoppable german force for the first few turns?
I never played the game but can we declare that you've won?
Where is his unstoppable german force for the first few turns?
zool
Arcane
- Joined
- Oct 26, 2009
- Messages
- 897
Malakal said:An attack through the Maginot line! French High Command was right after all! All those billions of franks were spent well.
This is what I like, a full scale assault between two strong forces. Not very blitzkrieg like but nice to look at.
Yep, it looks like we're not gonna have a blitzkrieg, though we will only know that for sure in a few more turns - my opponent still has an opportunity to break through at Gembloux.
Regarding the attack on the Maginot line, it is for now only a secondary attack. But if my opponent brings his 2nd Pz-Div in support of his 1st Pz-Div, things are going to get a little more serious.
Orgasm said:Does the game count VPs every turn? How is the score?
I never played the game but can we declare that you've won? Surprised The scenario description says that ze Germans win by destroying units, mostly thorough the massive surrenders that trigger if the capitals fall. Now its the 6th turn and he is nowhere near taking any of them. Amsterdam is surrounded, yes, but its your turn and I see lotsa units coming to relief the poor beggars in the cauldron.
Where is his unstoppable german force for the first few turns?
The games has a VP count and the Allies have a large lead. The VP screen shows me winning a major victory at the end of the scenario but of course, that is only if nothing changes until then. My opponent still has a lot of time to destroy many of my units and take strategic cities worth several VPs.
Even though I'm satisfied with how the first few turns went, I would really refrain from proclaiming my victory so soon. My opponent is handicapped because he only played this scenario once and therefore doesn't have a good knowledge of all the ins and out. But I've played other scenarios against him, and I can tell you he's got many cards up his sleeve.
Rotterdam is surrounded but because of the general lack of offensive capability of Dutch units, breaking the encirclement will be very difficult - and the 9th Pz-Div will arrive to relieve the fallschirmjagers next turn or, at best, the turn after that. More importantly, my units will face a severe lack of supply next turn, due to the fact that my opponent took control of the only supply source in northern Holland in The Hague (though I'm working on dislodging him from there). Holland will surrender soon, there is no doubt about that - the question is: how long can I delay it? And will I have opportunities to destroy some of his units before he forces my surrender?
I'd say a pretty good turn for you, no excessive losses, no clear breakthrough. Keep it like this and you'll win :D
One question though: Are there any means to replace those lost units? I don't know this game, but for example in AGEOD's games you usually have some option to bring back the divisional to&e back to nominal strength after a few turns.
And if this is not possible, how long can you sustain such losses?
zool
Arcane
- Joined
- Oct 26, 2009
- Messages
- 897
I'm not sure I understand what you're asking: are you wondering if there is a way to bring back those destroyed regiments? In this case, the answer is no, a destroyed unit is gone forever. A regiment is composed of several "steps" (roughly representing battalions) and can incur step losses. Step losses are repairable through automatic timed replacements (= a unit's in-built capacity to reorganize and compensate its losses) or regular replacements (fresh reinforcements assigned by the strategic commander to individual units). But if all of a regimen't steps are destroyed during a turn, the regiment is destroyed and gone for good - no way to bring it back.
Losses management differ from one scenrio to another. For example, in the Normandy scenario (76 turns), the Axis player must be extremely careful when it comes to minimizing losses and preserving regular replacements, lest he finds himself running out of units to hold the front during the last 20 turns of the scenario. In this Fall Gelb scenario, which is much shorter (24 turns), replacement management is less of an issue. However, the Allied player would be well advised to minimize unit losses as much as possible, even though I'm willing to sacrifice a few units in the first couple of turns in order to prevent the Pz-Div from breaking through and to keep a favorable defensive position on the Meuse.
Losses management differ from one scenrio to another. For example, in the Normandy scenario (76 turns), the Axis player must be extremely careful when it comes to minimizing losses and preserving regular replacements, lest he finds himself running out of units to hold the front during the last 20 turns of the scenario. In this Fall Gelb scenario, which is much shorter (24 turns), replacement management is less of an issue. However, the Allied player would be well advised to minimize unit losses as much as possible, even though I'm willing to sacrifice a few units in the first couple of turns in order to prevent the Pz-Div from breaking through and to keep a favorable defensive position on the Meuse.
zool
Arcane
- Joined
- Oct 26, 2009
- Messages
- 897
Turn 4 (Allied) - The Gembloux Gap is closed
Time to take advantage of my opponent's relative failure to bring about an early breakthrough in my defense line. The BEF has finally arrived in the Gembloux area and now solidly holds it. The Belgian army continues its retreat toward the Dyle, though Antwerp may be threatened by the 3rd (and maybe the 4th) Pz-Div. At Dinant, my defense line is reinforced, and heavy aerial and artillery interdiction is applied on my enemy's rear. In the southernmost sector around Montmédy, reinforcements arrived just in time to pluf the hold created by the 1st and 2nd Pz-Div.
The most important thing to keep in mind is that next turn, my opponent will have at his disposal his two last special Stuka attacks. That means he can break through pretty much anywhere if he uses both in the same area. I'm particularly worried that he will use them at Antwerp and cross the Escaut estuary, which would be a smart use of them as attacking in urbain terrain is otherwise hazardous at best. Such a breakthrough would seriously destabilize my front as I have absolutely no reserve west of Antwerp.
Holland: dutchtravaganza
I'm very satisfied with what the Dutch did this turn. First, in a daring counterattack, the Dutch 2nd and 4th Division have managed to destroy a weak German recon battalion which had crossed the river south of Utrecht (Zeeland).
Second, at The Hague, the Dutch 3rd Division managed to destroy one step of the two-step German fallschirmjager battalion holed up on the only Dutch supply source. I should be able to destroy it next turn, thereby earning VPs for it but more importantly, freeing up the supply source - the situation is becoming dire as my supply trucks are exhausting their emergency supply one after the other.
The bad news is that I've been unable to relieve Rotterdam's defenders, where the German paratroops have a strong hold on the city. I reckon the 9th Pz-Div and SS Verfugungs Mot-Div should be able to cross the Waal or the Rhine next turn with a pontoon and link up with the fallschirmjagers. Then, Rotterdam will fall very quickly and the Dutch will surrender.

In the south of Holland, the Peel division continues its retreat toward Moerdijk, where a counterattack against the German fallschirmjagers holding the bridges has failed.
Belgium: worries at Antwerp, relief at Gembloux
A quick recon shows that the 3rd Pz-Div is indeed threatening Antwerp:

The Belgian 13th Division and a few independant units fall back in the city as planned - but if my enemy uses his special Stuka attacks there, he might be able to penetrate into the city and reach the strategic bridge over the Escaut estuary. Then, it will be open terrain for the panzers as I have no reserve in the area - and intense Luftwaffe activity prevents me from bringing any reinforcements quickly. Moreover, I suspect the 4th Pz-Div, which I have last seen two turns ago near Tienen, to be in the area as well in order to support the 3rd Pz-Div. Whatever happens, I've laid a minefield on the west exit of the bridge over the Escaut estuary, hoping to slow my enemy down if he manages to clear my forces from Antwerp and cross the bridge.
Meanwhile, the main body of the Belgian army continues its retreat toward the Dyle in an orderly manner in spite of heavy aerial interdiction (thankfully reduced thanks to Belgian AA units).
The center of the front sees many Allied reinforcements coming in. The solid British units of the BEF take position just behind Namur and the Gembloux Gap, and wait for the inevitable shock with the 5th and 7th Pz-Div.
South, the French line at Dinant is reinforced with the arrival of the 2nd DINA. A counterattack even pushes back the German point units and further reduce their bridgehead on the left bank of the Meuse.
France: plugging the holes
With no action at Monthermé and Sedan, all eyes are turned on the two limited breakthroughs achieved by the 2nd and 1st Pz-Div, respectively west and east of Montmédy.
The French 3rd Cavalry takes a new position to plug the hole created by the 2nd Pz-Div's and 36th Division's advance in the forest between Sedan and Montmédy. No alarm here, as I still have the westernmost tip of the Maginot line acting as a second line behind my forces. Moreover, the 3rd DCR is on its way to the area.
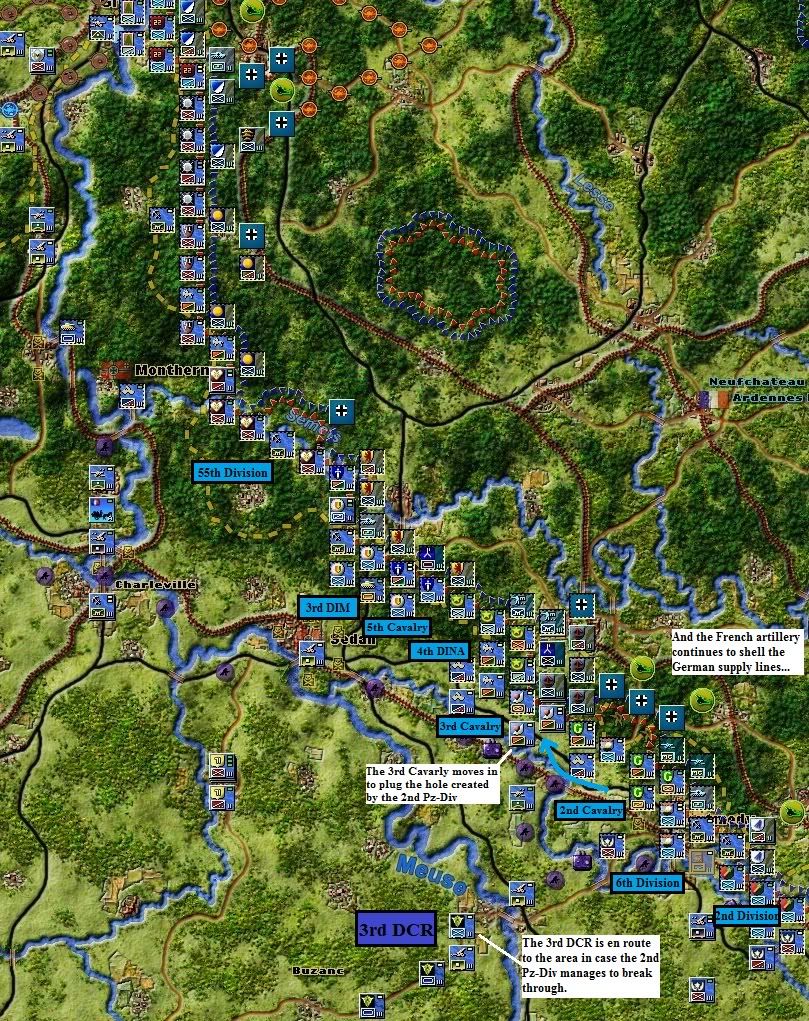
Likewise, the only break through the Maginot line is not a big cause of worries, as three French divisions arrive just in time to plug the hole. We'll see if my opponent tries to force his way through or if he prefers to pull back to try and find a weaker spot in the Maginot line.
Time to take advantage of my opponent's relative failure to bring about an early breakthrough in my defense line. The BEF has finally arrived in the Gembloux area and now solidly holds it. The Belgian army continues its retreat toward the Dyle, though Antwerp may be threatened by the 3rd (and maybe the 4th) Pz-Div. At Dinant, my defense line is reinforced, and heavy aerial and artillery interdiction is applied on my enemy's rear. In the southernmost sector around Montmédy, reinforcements arrived just in time to pluf the hold created by the 1st and 2nd Pz-Div.
The most important thing to keep in mind is that next turn, my opponent will have at his disposal his two last special Stuka attacks. That means he can break through pretty much anywhere if he uses both in the same area. I'm particularly worried that he will use them at Antwerp and cross the Escaut estuary, which would be a smart use of them as attacking in urbain terrain is otherwise hazardous at best. Such a breakthrough would seriously destabilize my front as I have absolutely no reserve west of Antwerp.
Holland: dutchtravaganza
I'm very satisfied with what the Dutch did this turn. First, in a daring counterattack, the Dutch 2nd and 4th Division have managed to destroy a weak German recon battalion which had crossed the river south of Utrecht (Zeeland).
Second, at The Hague, the Dutch 3rd Division managed to destroy one step of the two-step German fallschirmjager battalion holed up on the only Dutch supply source. I should be able to destroy it next turn, thereby earning VPs for it but more importantly, freeing up the supply source - the situation is becoming dire as my supply trucks are exhausting their emergency supply one after the other.
The bad news is that I've been unable to relieve Rotterdam's defenders, where the German paratroops have a strong hold on the city. I reckon the 9th Pz-Div and SS Verfugungs Mot-Div should be able to cross the Waal or the Rhine next turn with a pontoon and link up with the fallschirmjagers. Then, Rotterdam will fall very quickly and the Dutch will surrender.
In the south of Holland, the Peel division continues its retreat toward Moerdijk, where a counterattack against the German fallschirmjagers holding the bridges has failed.
Belgium: worries at Antwerp, relief at Gembloux
A quick recon shows that the 3rd Pz-Div is indeed threatening Antwerp:
The Belgian 13th Division and a few independant units fall back in the city as planned - but if my enemy uses his special Stuka attacks there, he might be able to penetrate into the city and reach the strategic bridge over the Escaut estuary. Then, it will be open terrain for the panzers as I have no reserve in the area - and intense Luftwaffe activity prevents me from bringing any reinforcements quickly. Moreover, I suspect the 4th Pz-Div, which I have last seen two turns ago near Tienen, to be in the area as well in order to support the 3rd Pz-Div. Whatever happens, I've laid a minefield on the west exit of the bridge over the Escaut estuary, hoping to slow my enemy down if he manages to clear my forces from Antwerp and cross the bridge.
Meanwhile, the main body of the Belgian army continues its retreat toward the Dyle in an orderly manner in spite of heavy aerial interdiction (thankfully reduced thanks to Belgian AA units).
The center of the front sees many Allied reinforcements coming in. The solid British units of the BEF take position just behind Namur and the Gembloux Gap, and wait for the inevitable shock with the 5th and 7th Pz-Div.
South, the French line at Dinant is reinforced with the arrival of the 2nd DINA. A counterattack even pushes back the German point units and further reduce their bridgehead on the left bank of the Meuse.
France: plugging the holes
With no action at Monthermé and Sedan, all eyes are turned on the two limited breakthroughs achieved by the 2nd and 1st Pz-Div, respectively west and east of Montmédy.
The French 3rd Cavalry takes a new position to plug the hole created by the 2nd Pz-Div's and 36th Division's advance in the forest between Sedan and Montmédy. No alarm here, as I still have the westernmost tip of the Maginot line acting as a second line behind my forces. Moreover, the 3rd DCR is on its way to the area.
Likewise, the only break through the Maginot line is not a big cause of worries, as three French divisions arrive just in time to plug the hole. We'll see if my opponent tries to force his way through or if he prefers to pull back to try and find a weaker spot in the Maginot line.
I must say that Dinant area looks perfect for massed aerial strikes. If Stukas are as deadly as you claim many units could be destroyed there thus forcing a breakthrough.
Still, I call bullshit on this scenario. Allied troops should be better if slower, able to stand against Germans on equal grounds.
Still, I call bullshit on this scenario. Allied troops should be better if slower, able to stand against Germans on equal grounds.
zool
Arcane
- Joined
- Oct 26, 2009
- Messages
- 897
I had a glimpse at my opponent's next turn but I can already tell you he didn't use his two last Stuka special attacks in the Dinant area. Looks like we're in for some heavy fighting there, with the Pz-Divs trying to expand their bridgehead. The terrain is mostly woods and forest, which is a good thing for the defender.
Regarding Allied units, it's true that their power has probably been a little underestimated by the scenario creator. But he also took into account how this units performed historically, and not only their theoretical strength. Regarding the allied mechanized and armored units in particular, them being nearly half as mobile as German Pz-Divs can seem ridiculous, but it's actually a pretty good simulation of the poor logistics on the French side, which severely impaired those units' mobility.
Regarding Allied units, it's true that their power has probably been a little underestimated by the scenario creator. But he also took into account how this units performed historically, and not only their theoretical strength. Regarding the allied mechanized and armored units in particular, them being nearly half as mobile as German Pz-Divs can seem ridiculous, but it's actually a pretty good simulation of the poor logistics on the French side, which severely impaired those units' mobility.
I am fine with slower units (logistics and French high command represented this way, also doctrines) but they should have equally high stats compared to their German counterparts. Considering that certain units are already locked, badly placed etc this should be enough of an advantage for the German player.
Actually I suppose I am pissed annoyed only because this game propagates the very prevalent myth of German superiority and superior number of planes/tanks. This is irritating for a history buff like me.
Actually I suppose I am pissed annoyed only because this game propagates the very prevalent myth of German superiority and superior number of planes/tanks. This is irritating for a history buff like me.
zool
Arcane
- Joined
- Oct 26, 2009
- Messages
- 897
Earlier in the thread, I did a quick recount of armored forces on both sides, showing that the Allied have:
- 4 Armored Divisions (DCR) - all of them French, and half of them have only three regiments (no recon unit)
- 3 Mechanized Divisions (DLM) - all of them French too
- 16 independent armored battalions/regiments - French, English and one Belgian tank battalion
The Germans have:
- 10 Armored Divisions (Pz-Div)
- 7 independent armored battalions - mostly Stugs
The grand total shows that each side has pretty much the same number of tanks. However, IIRC, a Pz-Div in 1940 was more powerful than its French equivalent (DCR or DLM) in terms of total number of men and tanks. In the game, Pz-Div are a little more powerful than DCRs and DLMs, which seem correct to me. But their main asset is their very high mobility which makes them deadly when it comes to exploiting a breakthrough - and which is why I'm happy to contain those three Pz-Div at Dinant and to force them to fight in an enclosed space, where they can't use their best asset.
Total number of planes aside, the Luftwaffe clearly did a much better job at interdicting enemy movement than the Royal Air Force and French Armée de l'Air. Hence, the Germans get much more aerial interdiction counters than the Allies.
A few things that suck in the unit deisgn:
- regular French infantry regiments have only 3 steps (compared to 4 for regular German infantry regiments) and no anti-shock value (compared to one point for the German ones). I'm not sure that historically, a French infantry division had fewer man than a German infantry division.
- French B1bis tank regiments are not powerful enough (shock value at 2, while Mark IV regiments have 3).
- Allied mobility, while understandably low compared to German mobility, is maybe a bit too low
- the surrender rule for the Dutch (Rotterdam falls and it's all over) is a little bit too simple and can lead to gamey behavior
zool
Arcane
- Joined
- Oct 26, 2009
- Messages
- 897
Turn 5 (Axis) - The fall of Rotterdam
This turn is dominated by the events in the Netherlands, at Antwerp and, further down south, on the Maginot line.
In the Netherlands, the 7th Flieger Division and the 22nd Luftlande Division have finally taken Rotterdam: eager to finish the Dutch campaign, my opponent has used one of his special stuka/carpet bombing attacks to subdue the city's defenders. This means that Holland is going to surrender at the end of the turn.
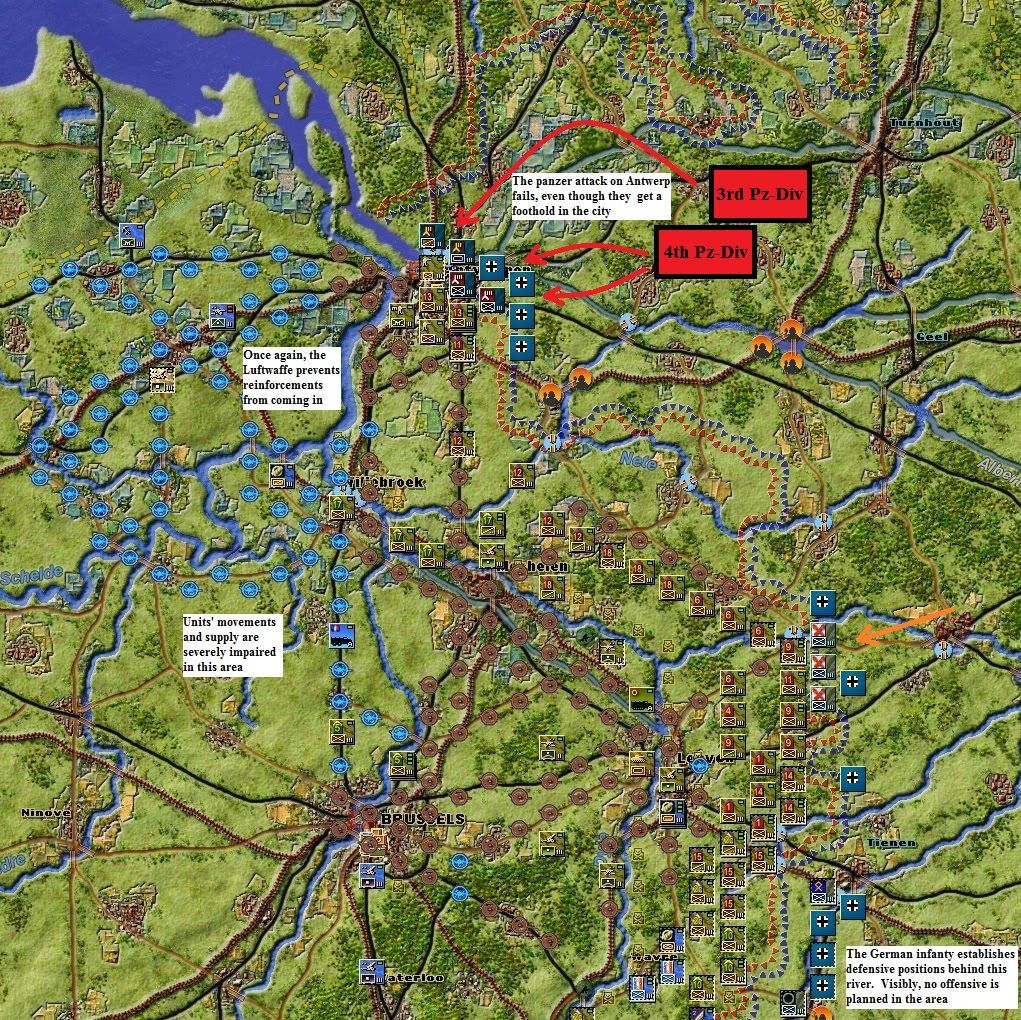
Second, my worries about Antwerp were correct: the 3rd and 4th Pz-Divs have attacked the city in force, even using the second and last special stuka attack to get a foothold in the city. Thankfully, they haven't reached the bridge over the Escaut estuary, and I should be able to prevent the German panzers from crossing it.
Finally, the Germans have made a second break through the Maginot line just east of Longwy, and combined with heavy aerial interdiction, the situation is starting to get serious there.
It's funny because GarfunkeL's hopes for a coast pincer movement and for a stripped-out Maginot line providing opportunities for the Axis player to break through it both seem to come true - though the cost pincer movement will likely stumble on Antwerp and the Escaut estuary now that my opponent's first attack on the city has partially failed.
Now for the good news (in addition to the failed attack on Antwerp):
- the Gembloux Gap area is completely calm, with the 5th and 7th Pz-Div going on the defensive before Namur.
- at Dinant, the enemy slowlys expand his bridgehead on the left bank of the Meuse but is far from being able to break out
- finally, now that my opponent has used his last two special stuka attacks, we're fighting on equal terms: I won't have to fear a potential "black swan" occuring anywhere on my front from Antwerp to the Maginot Line anymore.
Holland: this is the end...
Rotterdam has fallen. As I had predicted, it was highly unlikely that the Dutch would hold for more than 4 or 5 turns. Still, I achieved a semi-success there because I forced my opponent to use one of his precious stuka attacks to take the city - an attack which could have been used elsewhere with much graver consequences. Moreover, I've already managed to destroy an enemy unit, and I'm planning on using my last turn to destroy at least one other (in The Hague) and to look for targets of opportunity. This is the best course of action for my last turn as I have no chance to retake Rotterdam and all my units are going to surrender at the end of the turn.
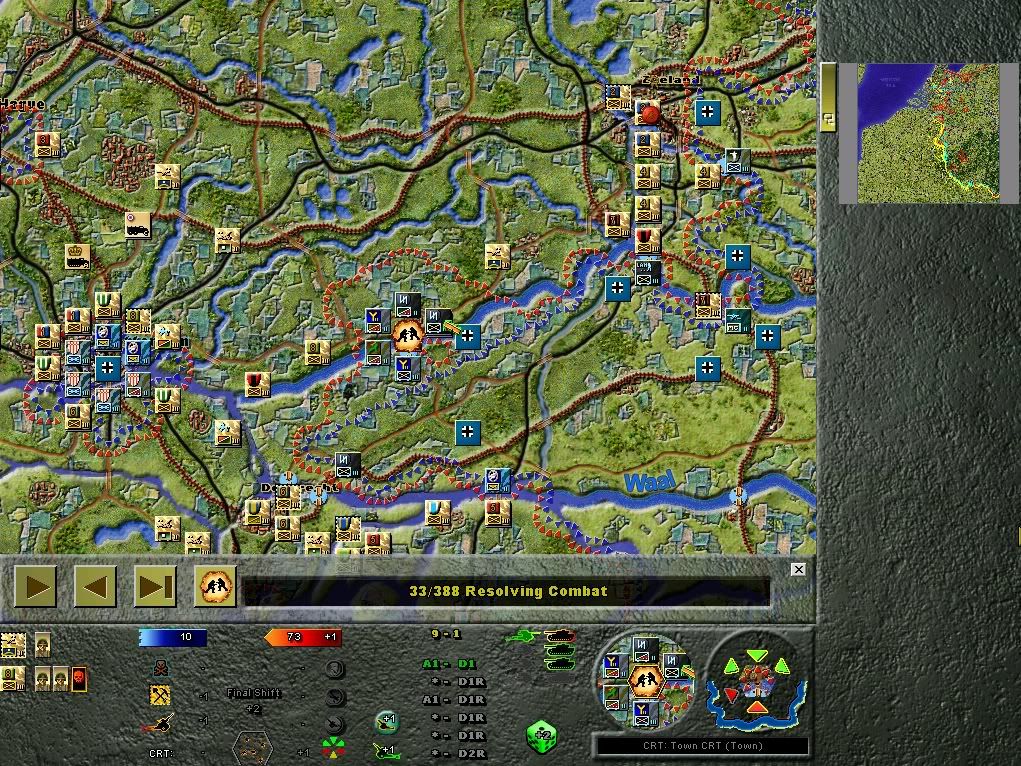
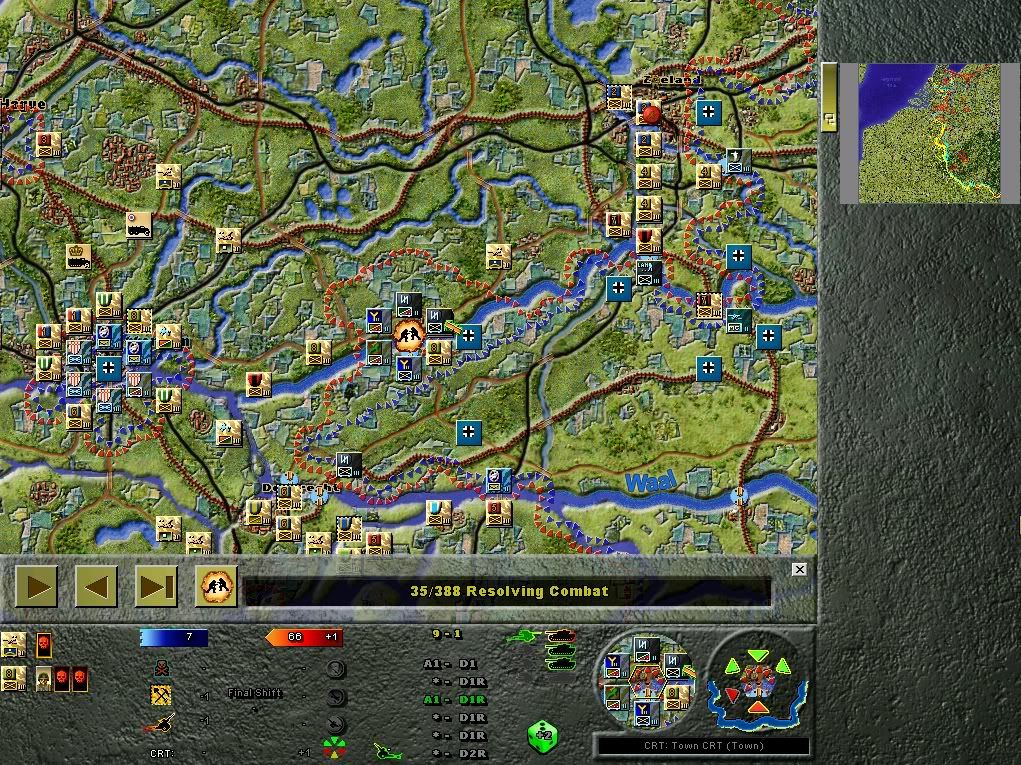
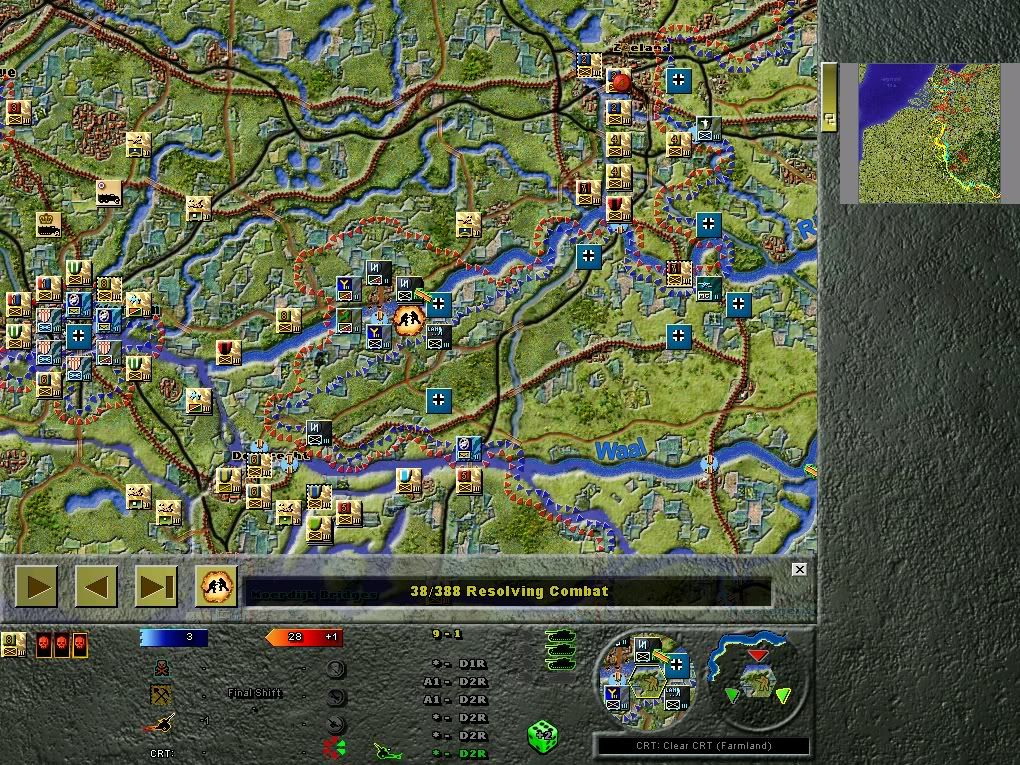
During his turn, after having taken Rotterdam with his paras, my opponent used a pontoon to make the 9th Pz-Div and SS Verfungungs Mot-Div cross the Rhine just east of that destroyed bridge, whose north exit was guarded by an AA unit and a Dutch regiment of the 8th Division entrenched in a small village. It offered a magnificent resistance to a much superior force, and it took a total of four attacks to destroy it: in memory of the tenacious resistance offered by the Dutch forces in Holland, here are the four combat shots (for more explanation on combat indications, please refer to my earlier post explaining how combat works):
My opponent rolls a 1 and doesn't manage to force my unit to retreat from the village. Each side loses one step.
Again, my opponent rolls a 1 and doesn't manage to dislodge my unit from the village. Eache side loses one step.

Finally, my opponent manages to force my unit out of the town and destroys the accompanying one-step Dutch AA unit. Each side loses one step.
My battered regiment, down to 1 step and pusehd back in clear terrain, is finally destroyed. This time, the Germans don't suffer any losses.
Belgium: Antwerp resists
I was right to worry about Antwerp: the 3rd and 4th Pz-Divs have attacked the city in force, using the second and last special stuka attack to get a foothold in the city and destroying two Belgian units in the process. Thankfully, they haven't reached the bridge over the Escaut estuary, and I should be able to prevent the German panzers from crossing it. I'm going to blow that damn bridge and lock myself up in the city (where a Belgian source of supply is located). That should be enough to discourage my opponent from trying to continue his coast pincer movement.
In the central area of the front, Gembloux has been eerily calm. The 5th and 7th Pz-Divs have gone on the defensive before Namur, and the Germans only pushed a timid reconnaissance toward Gembloux, which they subsequently evacuated.
At Dinant, heavy fighting sees the German Pz-Divs expanding their bridgehead west of the Meuse, but they're still pretty well contained. My opponent doesn't seem intent on abandoning his attempt to break through at the only bridgehead over the Meuse he has: expect to see some very bitter fighting in the area in the coming turns.
Finally, the Liège defenders, who've held the city for three days, have surrendered, out of ammo and supply.
France: trouble down under
The Monthermé-Sedan area is once again very calm, with only limited skirmishes and an attempt to inflict some losses to one of my spahi (elite colonial cavalry) regiment. The 2nd Pz-Div has left the area between Sedan and Montmédy where it had attempted to break through. My guess is that it went further east to assist the 1st Pz-Div, which has done a mighty good job/
It seems I was wrong to play down the situation here. The 1st Pz-Div has abandoned its original area of operation and found a weaker point in the Maginot line east of Longwy (the 1st Pz-Div units are hidden under infantry regiments standing on the same hex). A clean breakthrough has been achieved, and enemy aerial interdiction means that supply isn't reaching the area and that it's going to be difficult to bring in reinforcements. Still, let's remember that apart from the VPs I earn from the cities in the area (Thionville, Verdun, etc...), this area has little strategic value - and you can see there's plenty of wooded (light green) and forested (dark green) terrain where I can establish solid defense lines.
This turn is dominated by the events in the Netherlands, at Antwerp and, further down south, on the Maginot line.
In the Netherlands, the 7th Flieger Division and the 22nd Luftlande Division have finally taken Rotterdam: eager to finish the Dutch campaign, my opponent has used one of his special stuka/carpet bombing attacks to subdue the city's defenders. This means that Holland is going to surrender at the end of the turn.
Second, my worries about Antwerp were correct: the 3rd and 4th Pz-Divs have attacked the city in force, even using the second and last special stuka attack to get a foothold in the city. Thankfully, they haven't reached the bridge over the Escaut estuary, and I should be able to prevent the German panzers from crossing it.
Finally, the Germans have made a second break through the Maginot line just east of Longwy, and combined with heavy aerial interdiction, the situation is starting to get serious there.
It's funny because GarfunkeL's hopes for a coast pincer movement and for a stripped-out Maginot line providing opportunities for the Axis player to break through it both seem to come true - though the cost pincer movement will likely stumble on Antwerp and the Escaut estuary now that my opponent's first attack on the city has partially failed.
Now for the good news (in addition to the failed attack on Antwerp):
- the Gembloux Gap area is completely calm, with the 5th and 7th Pz-Div going on the defensive before Namur.
- at Dinant, the enemy slowlys expand his bridgehead on the left bank of the Meuse but is far from being able to break out
- finally, now that my opponent has used his last two special stuka attacks, we're fighting on equal terms: I won't have to fear a potential "black swan" occuring anywhere on my front from Antwerp to the Maginot Line anymore.
Holland: this is the end...
Rotterdam has fallen. As I had predicted, it was highly unlikely that the Dutch would hold for more than 4 or 5 turns. Still, I achieved a semi-success there because I forced my opponent to use one of his precious stuka attacks to take the city - an attack which could have been used elsewhere with much graver consequences. Moreover, I've already managed to destroy an enemy unit, and I'm planning on using my last turn to destroy at least one other (in The Hague) and to look for targets of opportunity. This is the best course of action for my last turn as I have no chance to retake Rotterdam and all my units are going to surrender at the end of the turn.
During his turn, after having taken Rotterdam with his paras, my opponent used a pontoon to make the 9th Pz-Div and SS Verfungungs Mot-Div cross the Rhine just east of that destroyed bridge, whose north exit was guarded by an AA unit and a Dutch regiment of the 8th Division entrenched in a small village. It offered a magnificent resistance to a much superior force, and it took a total of four attacks to destroy it: in memory of the tenacious resistance offered by the Dutch forces in Holland, here are the four combat shots (for more explanation on combat indications, please refer to my earlier post explaining how combat works):
My opponent rolls a 1 and doesn't manage to force my unit to retreat from the village. Each side loses one step.
Again, my opponent rolls a 1 and doesn't manage to dislodge my unit from the village. Eache side loses one step.
Finally, my opponent manages to force my unit out of the town and destroys the accompanying one-step Dutch AA unit. Each side loses one step.
My battered regiment, down to 1 step and pusehd back in clear terrain, is finally destroyed. This time, the Germans don't suffer any losses.
Belgium: Antwerp resists
I was right to worry about Antwerp: the 3rd and 4th Pz-Divs have attacked the city in force, using the second and last special stuka attack to get a foothold in the city and destroying two Belgian units in the process. Thankfully, they haven't reached the bridge over the Escaut estuary, and I should be able to prevent the German panzers from crossing it. I'm going to blow that damn bridge and lock myself up in the city (where a Belgian source of supply is located). That should be enough to discourage my opponent from trying to continue his coast pincer movement.
In the central area of the front, Gembloux has been eerily calm. The 5th and 7th Pz-Divs have gone on the defensive before Namur, and the Germans only pushed a timid reconnaissance toward Gembloux, which they subsequently evacuated.
At Dinant, heavy fighting sees the German Pz-Divs expanding their bridgehead west of the Meuse, but they're still pretty well contained. My opponent doesn't seem intent on abandoning his attempt to break through at the only bridgehead over the Meuse he has: expect to see some very bitter fighting in the area in the coming turns.
Finally, the Liège defenders, who've held the city for three days, have surrendered, out of ammo and supply.
France: trouble down under
The Monthermé-Sedan area is once again very calm, with only limited skirmishes and an attempt to inflict some losses to one of my spahi (elite colonial cavalry) regiment. The 2nd Pz-Div has left the area between Sedan and Montmédy where it had attempted to break through. My guess is that it went further east to assist the 1st Pz-Div, which has done a mighty good job/
It seems I was wrong to play down the situation here. The 1st Pz-Div has abandoned its original area of operation and found a weaker point in the Maginot line east of Longwy (the 1st Pz-Div units are hidden under infantry regiments standing on the same hex). A clean breakthrough has been achieved, and enemy aerial interdiction means that supply isn't reaching the area and that it's going to be difficult to bring in reinforcements. Still, let's remember that apart from the VPs I earn from the cities in the area (Thionville, Verdun, etc...), this area has little strategic value - and you can see there's plenty of wooded (light green) and forested (dark green) terrain where I can establish solid defense lines.
All is going well, not like the southern areas are very important anyway. Still its a shame to see how weak the Maginot line really is, you easily get pushed back with small assaults, ridiculous...
Your opponent wasted his stuka attacks, Holland one was especially a weak choice. Like he needed that surrender two turns earlier.
How about launching an offensive at Dinant - Gembloux? Seems like you have a mighty advantage in forces there.
Your opponent wasted his stuka attacks, Holland one was especially a weak choice. Like he needed that surrender two turns earlier.
How about launching an offensive at Dinant - Gembloux? Seems like you have a mighty advantage in forces there.
Kashmir Slippers
Magister
Sounds like you had a tough go around there, but that is war, isn't it? How does your plan hold up with the recent turnabouts? Do you think that Antwerp will hold for a few more turns? What about the breach in the Maginot Line? You say that there is little to be won on that corner of the map, but how optimistic is that really? Can you hold them off there, and if not, what is your backup plan?
Just wondering, but how many of your opponent's main forces are accounted for? You and your opponent seem to have drawn the main battle lines for the conflict, but because of your wide-spread defensive line, your opponent has the advantage of pinpoint attacks. Is there any way that you could shuffle some of your troops from the unused stretches of defense and move them toward the most heavily hit areas, or do you think your opponent is holding some of his troops off for just that occasion?
Shouldn't some more of your reinforcements be arriving some time soon anyway? Will they be of any use for the main fighting, or will they serve as more of a last-ditch defense if the German's beak through?
Anyway, I wish you the best of luck for the upcoming turns. (At least one sentence in this whole post isn't a question. Ha!)
zool
Arcane
- Joined
- Oct 26, 2009
- Messages
- 897
Malakal said:All is going well, not like the southern areas are very important anyway. Still its a shame to see how weak the Maginot line really is, you easily get pushed back with small assaults, ridiculous...
Your opponent wasted his stuka attacks, Holland one was especially a weak choice. Like he needed that surrender two turns earlier.
How about launching an offensive at Dinant - Gembloux? Seems like you have a mighty advantage in forces there.
Yeah, the Maginot line is pretty weak in this area, through remember that historically, the strongest portions of the Maginot line where those facing the German border. The extension of the Maginot line facing the Luxembourgian border was weaker.
I agree with you on the use of a stuka attack on Rotterdam: it is a tempting option for the Axis player, as it allows you to avoid wasting one or two additional turns to take Rotterdam. Still, I know I refrained from doing that when I played my first game as the Axis player, because you do need all those special attacks to achieve a breakthough on the Meuse.
Tempting as it may be, I'll refrain from sending the 1st and 2nd DLMs - the only offensive forces I have in the Gembloux area - in clear terrain toward Hannut. My opponent still has three very mobile divisions near Namur (5th and 7th Pz-Div and 20th Mot-Div) and I'm pretty sure my DLMs woudl be cut to pieces the second they advance in clear terrain. I also don't have much artillery in the area to support an assault.
At Dinant, I doubt I can reduce the German bridgehead but I'm going to do all I can to contain it as much as possible, and continue to disrupt German supply with my artillery and occasional aerial interdiction. Things are turning into an ugly slugging match in wooded terrain there, and that's exactly what I need.
Kashmir Slippers said:Sounds like you had a tough go around there, but that is war, isn't it? How does your plan hold up with the recent turnabouts?
So far, I'm rather satisfied with the turn of events. My most important objective - preventing a massive crossing of the Meuse - is essentially achieved, which will make it much more difficult for the Axis player to win a total victory. Secondary actions are also satisfactory: the Dutch have put up a good resistance, the Belgian army has managed to avoid being pocketed by the 4th Pz-Div, and the Gembloux Gap is closed with no major incident. The recent turnabouts are negligible in my opinion: if the Germans had managed to cross the Escaut estuary at Antwerp, it would have been a disaster - but as far as I'm concerned, such a disaster has been avoided.
Kashmir Slippers said:Do you think that Antwerp will hold for a few more turns?
I don't know how long Antwerp will hold now that the Germans have entered the city and are threatening the supply source right in the middle of it - which is the only source of supply for the city's defenders as Luftwaffe interdiction prevents supply from arriving from the West.. However, I'm going to blow that bridge over the Escaut estuary and lock myself up in the city, dashing his hopes for a quick crossing. It might be enough to discourage my opponent from insisting on taking Antwerp. In case it's not, I'm planning on bringing the 1st French DLM, which just finished refueling near Leuven, to the area.
Kashmir Slippers said:What about the breach in the Maginot Line? You say that there is little to be won on that corner of the map, but how optimistic is that really? Can you hold them off there, and if not, what is your backup plan?
The breach in the Maginot line is getting more serious, especially because of the heavy aerial interdiction in the area and the complete absence of friendly AA units there, which is going to considerably hamper my efforts to plug the hole. If, as I reckon, my opponent is bringing in the 2nd Pz-Div to that area too, it's going to be hard to stop him, though he still has to widen the breach. French AA units are on their way to the area, so the Luftwaffe interdiction's impact should be somewhat lessened in a turn or two. The most likely scenario is that I'm going to have to fall back in the woods south of Longwy, and try to lead a fighting withdrawal while I bring in reinforcements to the area.
But if you look at the big picture, what happens there is at worst irrelevant to the larger battle, and it may even be even a victory for me. Any Pz-Div used in this area is a waste, as the prospects for a strategic breakthrough there are extremely thin. So I'm actually happy that my opponent is keeping two Pz-Div to attack the Maginot line, because I think I have enough forces to contain them, and because obvously, he can't use them elsewhere on the battefield.
In case things turn even worse, my back-up plan is to let my opponent break south until he reaches the edge of the map, and mount a defense line in the woods east of Verdun, and another one to protect my troops east behind the Orne river. This way, he'll have a long corridor to defend, an uneasy position with easily interdictable supply lines. But I dont think the situation is going to get that bad.
Kashmir Slippers said:Just wondering, but how many of your opponent's main forces are accounted for? You and your opponent seem to have drawn the main battle lines for the conflict, but because of your wide-spread defensive line, your opponent has the advantage of pinpoint attacks. Is there any way that you could shuffle some of your troops from the unused stretches of defense and move them toward the most heavily hit areas, or do you think your opponent is holding some of his troops off for just that occasion?
I'm mostly keeping track of my opponent's most dangerous units (Pz-Divs and Mot-Divs). Now that the 4th Pz-Div has revealed its position at Antwerp, the only one unaccounted for is the 2nd Pz-Div - though as I said, I expect to see it join the attack on the Maginot line. I must admit I'm usually gettings shivers when I realize that more than one of those units are unaccounted for.
I'm already sending troops in priority to the hardest-hit areas but the Axis forces are very mobile and weakening too much a so-far calm area of the front can be a fatal mistake if the German player notices it. Because the Namur and Gembloux area is so calm, I'm actually thinking about moving the three or so Belgian divisions defending it to the north, so they can join with the main body of the Belgian army - which will make it easier to manage supply. But I'm still weighing on whether it's worth the risk, because it would inevitably weaken the defense around Namur, and there is a risk the 5th and 7th Pz-Div will take advantage of it.
Kashmir Slippers said:Shouldn't some more of your reinforcements be arriving some time soon anyway? Will they be of any use for the main fighting, or will they serve as more of a last-ditch defense if the German's beak through?
Off-map French reinforcements are arriving on a pretty regular basis since last turn: on average, for the next 10 turns, I'll get one division per turn + a number of independent units (AA units, artillery, combat engineers, recon battalion, ...). I'll use trucks to carry them as fast as possible toward the aread most in need. I've still got a couple of divisions who started on the map far from the front and are slowly making their way to join the 7th and 1st Armies.
Kashmir Slippers said:Anyway, I wish you the best of luck for the upcoming turns. (At least one sentence in this whole post isn't a question. Ha!)
Man, you sure love asking questions, but thanks for the interest!
You should keep Belgian forces at the Gembloux gap rather than joining the rest of the army. Keeping that line is very important, north not so much.
How much is the dug in bonus? Your forces gain any advantages by staying in place? I dont remember if you covered this.
How much is the dug in bonus? Your forces gain any advantages by staying in place? I dont remember if you covered this.


As an Amazon Associate, rpgcodex.net earns from qualifying purchases.